How to Connect Google Tag Manager and Google Analytics: GA4 guide

Using Google Tag Manager (GTM) alongside Google Analytics is essential to use Google Analytics properly. So today, we’ll cover what GTM is, why it’s useful, and how to connect it to Google Analytics 4.
What is Google Tag Manager (GTM)?
Google Tag Manager is a tag management system that allows quick and easy updates of measurement codes and related code fragments. Together, these are known as tags on your website or mobile app. Tags help you measure certain user interactions on your website or app through event tracking.
Google Tag Manager removes the need to manually add code to your site in order to perform more advanced tracking. It’s one of the best web analytics tools that centralises all of your tracking codes in one place, making your tracking implementation much more efficient and easier to manage.
How to install Google Tag Manager on your website
Scroll down or use the table of contents to the right if you’ve already installed GTM on your website. You can skip to ‘Linking Google Analytics with Google Tag Manager’.
There are two parts to using GA & GTM together. First is installing Google Analytics & Google Tag Manager onto your website. Second is linking Google Analytics and Google Tag Manager together.
To install Google Tag Manager on your website, follow these steps.
1. Setting up a GTM account and container configuration
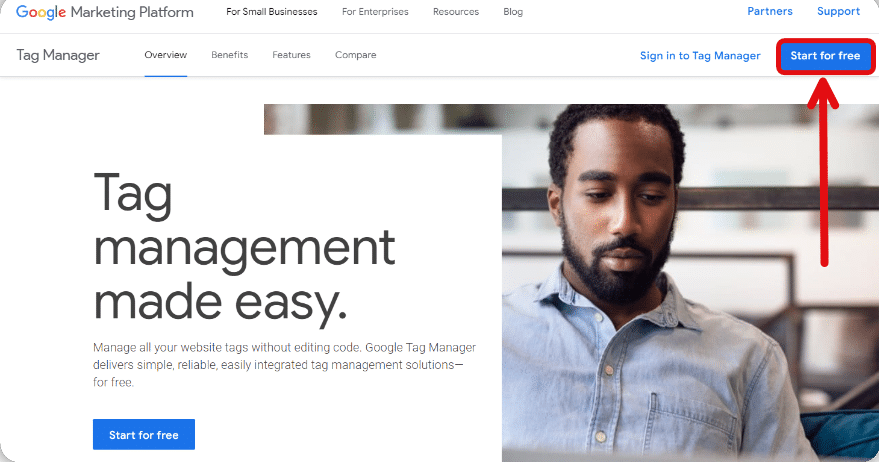
To install Google Tag Manager on your website, visit the Tag Manager homepage and choose between two primary options:
- Sign in to Tag Manager: If you already have a GTM account associated with your Gmail address or any other Google account, click this button.
- Start for free: If you don’t have a GTM account yet, click this button to create one from scratch.
Let’s assume you don’t have a GTM account yet, so click “Start for free” to begin.
After clicking “Start for free,” you must set up your new GTM account. Follow these steps:
- Account Name: Choose a name for your account, preferably your company name, for easy identification.
- Country: Select your country from the dropdown menu.
- Data Sharing(optional): You can check the box next to “Share data anonymously with Google and others” if you wish to share your data with Google.

After setting up your account, you need to configure the container. Think of a container in GTM as the equivalent of a property in Google Analytics. It stores all the tags, triggers, and variables for your entire site. You can have multiple containers in one GTM account, such as for a website, mobile app, AMP pages, etc.
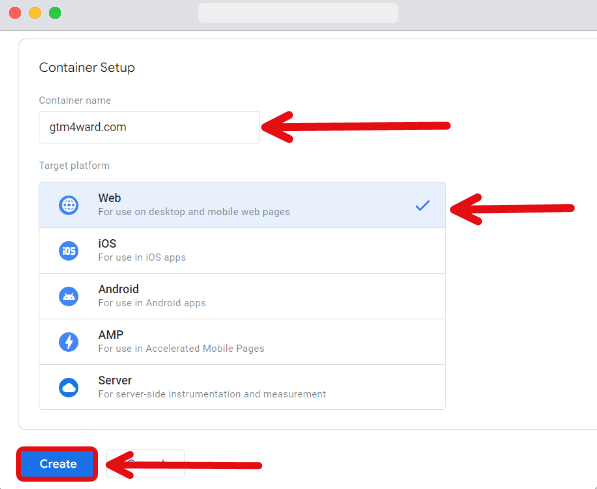
How to configure a GTM container
Name the Container: Enter a name that clearly identifies the resource, like your website’s URL.
Target Platform: Select where the container will be used. Options include:
- Web: For use on desktop and mobile web pages.
- iOS: For use in iOS apps.
- Android: For use in Android apps.
- AMP: For use in Accelerated Mobile Pages.
- Server: For server-side instrumentation and measurement.
Create the Container: After naming the container and selecting the appropriate platform (in this example, Web), click “Create.”
After configuring your container, you’ll need to review and accept the terms of service for using Google Tag Manager. Read through the rules and conditions carefully. On the same page, you’ll see a checkbox next to the text “I also accept the Data Processing Terms as required by GDPR.” Check this box to confirm your consent, then click “Yes” to proceed.

Once you’ve accepted the terms, a new window will appear with your unique GTM code snippet. This code needs to be installed on your website to enable Google Tag Manager. The code snippet consists of two parts: one that goes in thesection and another that goes immediately after the openingtag of your site’s HTML.

How can you find the GTM code snippet?
You can immediately copy the GTM code snippet and install it on all pages of your site that you want to monitor. You can click “OK” and install the code later when you add the first tags to the container.
To find the GTM code snippet later, you have two options:
1. Container ID: Click the container ID located next to the “Publish” and “Preview” buttons on the GTM dashboard.
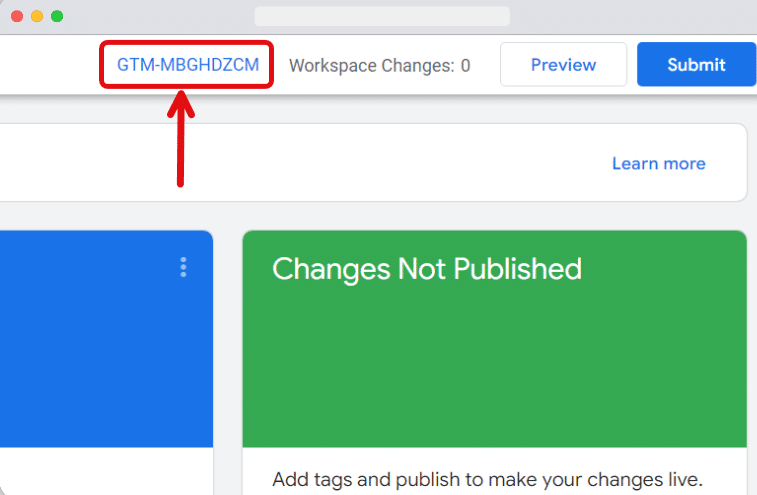
2. Admin Section: Go to Admin > Container > Install Google Tag Manager.
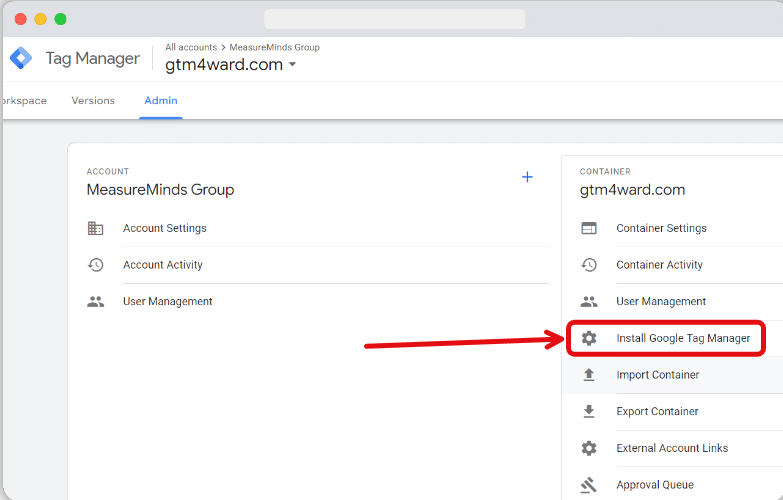
Both options will open detailed instructions on how to install the GTM on your website, including the code snippets that need to be added to your site’s HTML.
2. Install the GTM Code Snippet on Your Site
If you know website development and have admin access to the website, adding the Google Tag Manager code is straightforward. Here’s how to do it:
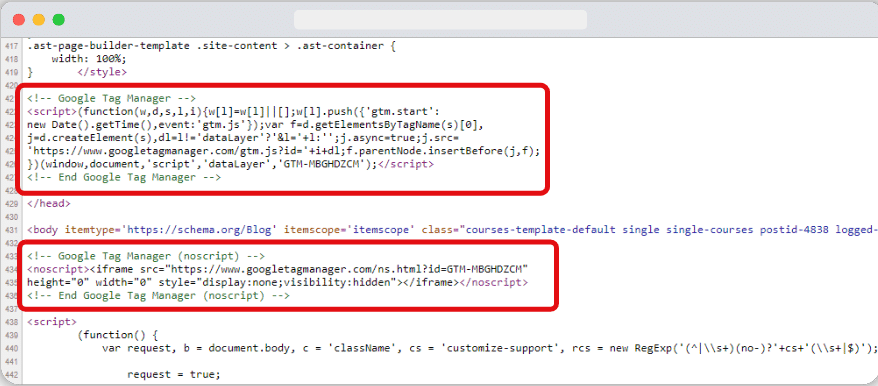
Paste the <script> part of the GTM code
Place the first code snippet, surrounded by <script> tags, as high in your website’s <head> tag as possible. This code ensures that your GTM container loads asynchronously, meaning the rest of your page will continue loading while GTM does its work.
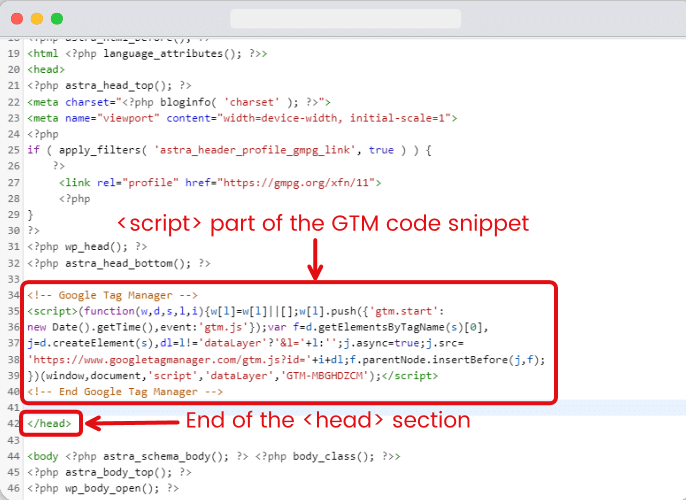
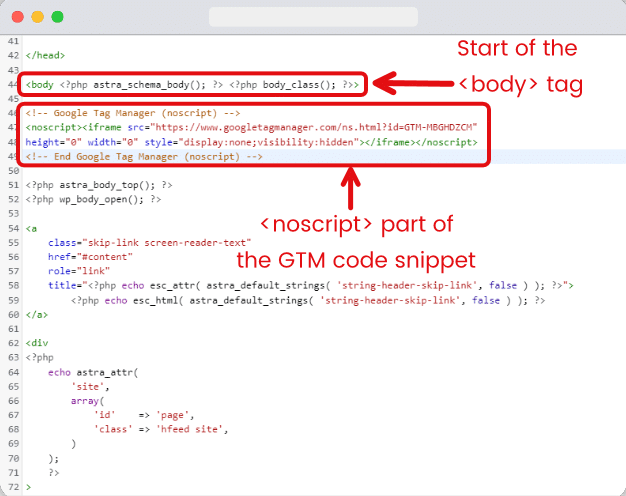
<noscript> part of the GTM code snippet
Place the second code snippet, wrapped in <noscript> tags, immediately after the opening <body> tag. This code is a fallback, enabling user tracking even if JavaScript is disabled. The <noscript> tag instructs the browser to render an iframe version of the GTM container if JavaScript isn’t enabled by users.
Important considerations
You can place both codes in the <body> section if you want, but you must never add both to the <head> section. The <noscript> tag cannot be in the <head> section as it renders an iframe, which would make your HTML invalid. Here are two suggested ways for code placement:
- Place the <script> code in the <head> and the <noscript> code in the <body> section. (Recommended)
- Place both the <script> and <noscript> codes right after opening the <body> tag.
Is <noscript> part of the GTM code necessary?
The <noscript> part is optional. It’s useful for tracking visitors who have JavaScript disabled (a very small fraction of web traffic) or for verifying ownership of other Google products, like Search Console.
Note: If you’re uncomfortable with web development, ask a developer for help. Incorrectly adding the GTM code can cause issues with your site and potentially even break it. Professional assistance ensures everything is done correctly and safely.
Check plugins for installing GTM
For those using a well-known Content Management System (CMS), a plugin that simplifies the installation of Google Tag Manager may already exist. These plugins allow you to add your GTM container ID without manually inserting the code.
Here are some examples:
- WordPress: GTM4WP is a good option for its ease of use and reliability.
- Magento: Multiple Google Tag Manager plugins are available.
- Shopify: Several effective shopify apps are available; try doing a bit of research to select the one that suits your needs.
- WIX: Wix offers built-in GTM integration for ease of use.
Using these plugins can save significant time. However, if you prefer to install it manually, follow the previously mentioned steps.
3. Publish the Container
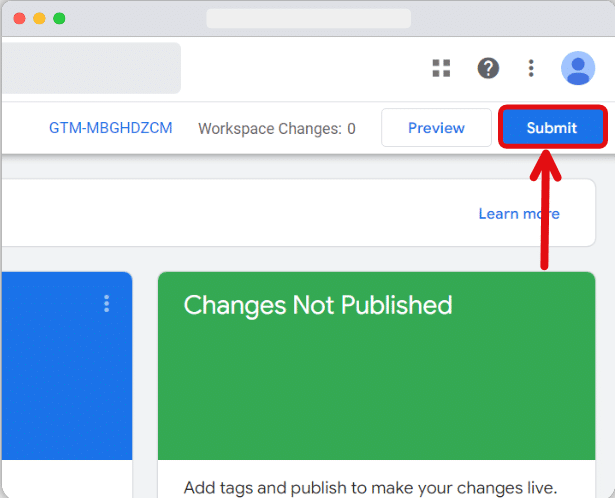
It’s a good practice to publish your container immediately after installing the GTM code on your site, even if no tags have been added yet. This helps avoid 404 errors, which can clutter your error-tracking reports if you’re using services like TrackJS. It’s better to publish an empty container to prevent unnecessary issues for developers.
To publish your container, navigate to the Workspace section in Google Tag Manager and click the Submit button in the top right corner.
Select “Publish and Create Version” from the next window. As this is your initial container setup, you can leave the Version Description field blank. Click “Publish” to finish the process.
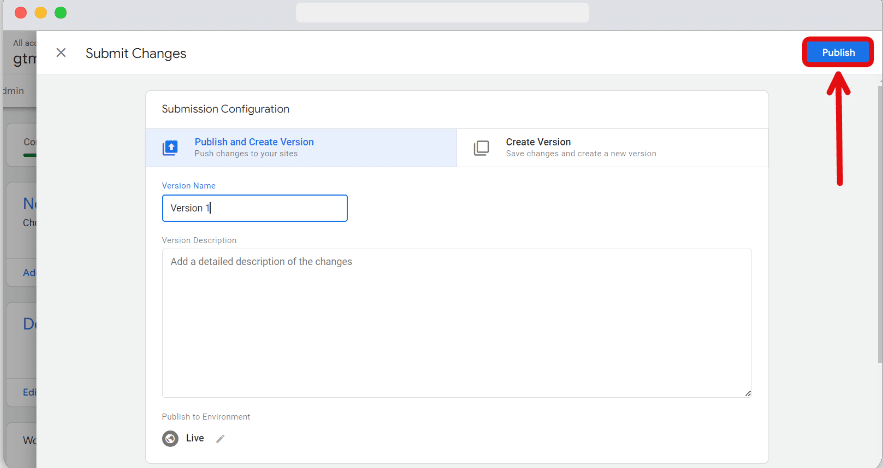
Congratulations, your container is now published and ready for use.
4. How do you check if your GTM is working properly?
Once the GTM code is implemented on your site, it’s essential to verify that it was installed correctly. There are several ways to do this. Here are two of the most commonly used methods:
Verify through your site’s HTML
Open your homepage or any other page on your site. Then right-click on the mouse and select “View Page Source” (or press CTRL + U). In the source code view, press CTRL + F to open the search function. Type “gtm.js” into the search bar and look for matching instances.
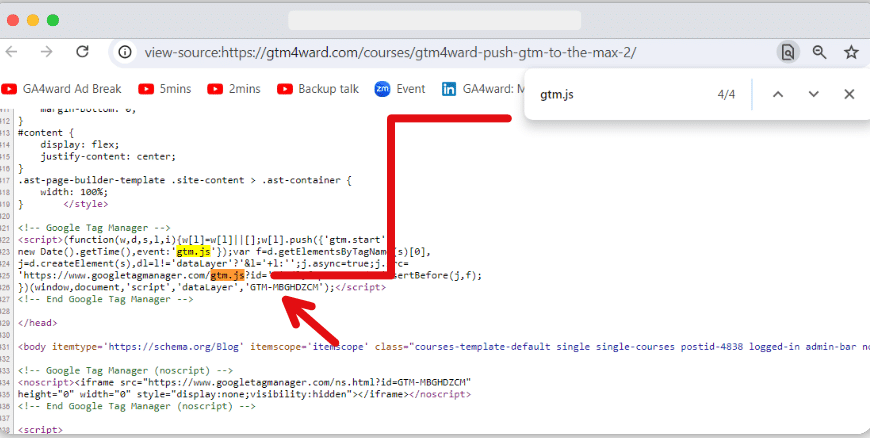
If the GTM code is present and properly formatted, then your GTM is working properly. It should be enclosed within <script> tags.
You’ll often see a second piece of code enclosed in <noscript> tags. This code is optional, but if you use it, ensure it’s placed immediately after the opening <body> tag as described earlier.
Use preview and debug mode
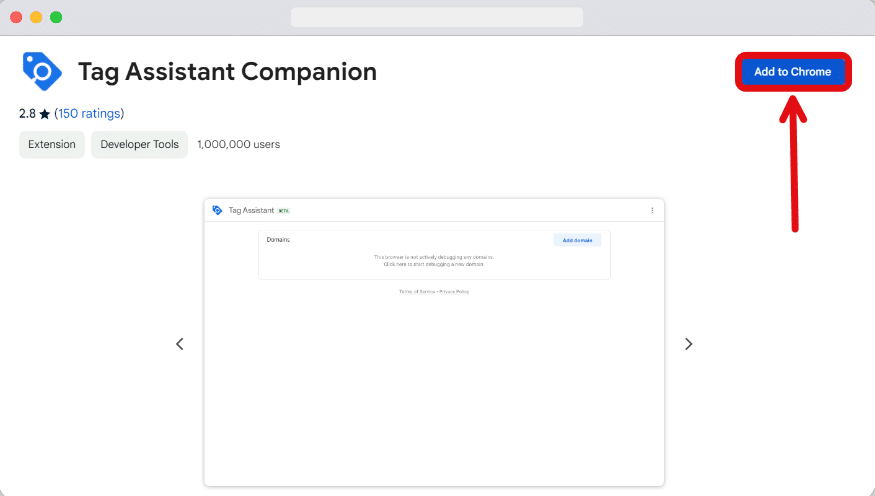
Another effective way to verify that Google Tag Manager functions correctly is to use Preview and Debug mode. First, install the Google Tag Assistant Companion extension from the Chrome Web Store on your Chrome browser.
Once installed, click the “Preview” button in the top right corner of your GTM interface, near the “Submit” button.
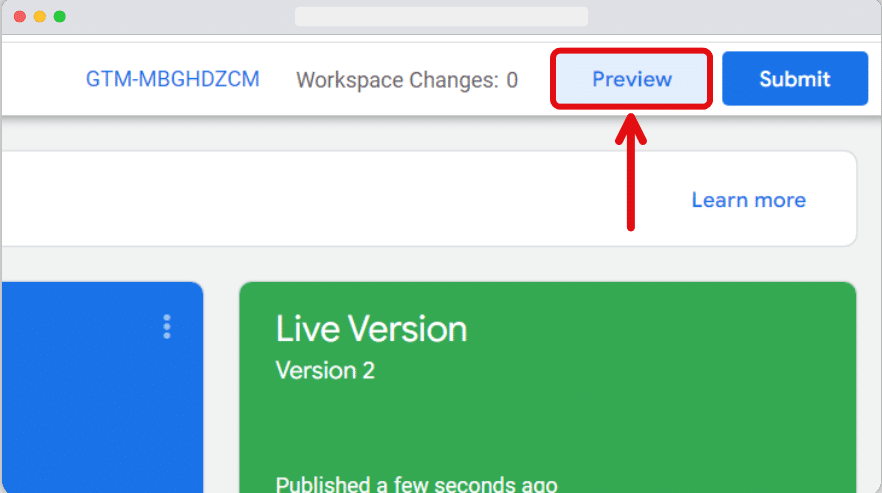
A new tab will open, asking you to enter your website’s URL. Enter the URL and hit “Connect”.
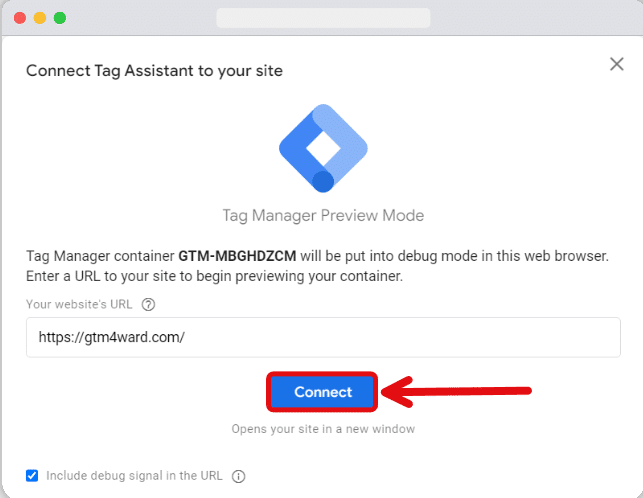
That will open your website in a new window, displaying your website with the preview mode enabled. You should see the word “Connected” in the current window, indicating that GTM is active.
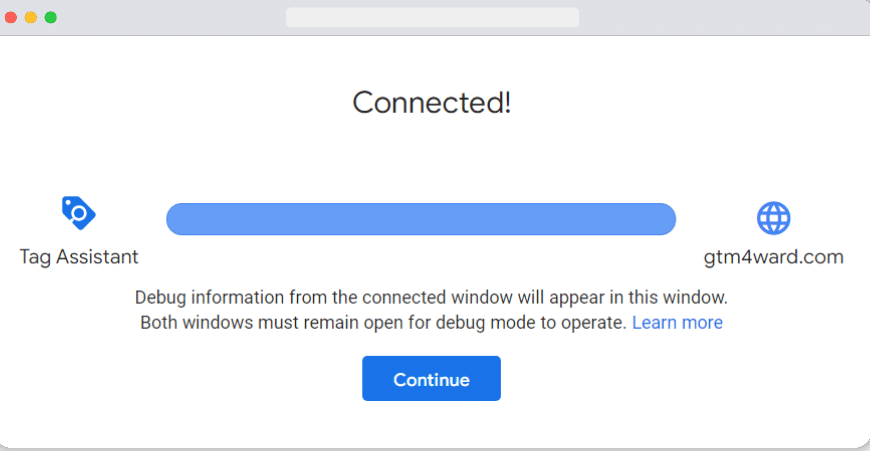
Additionally, a console will appear at the bottom of the browser window, showing real-time events as you navigate your site.
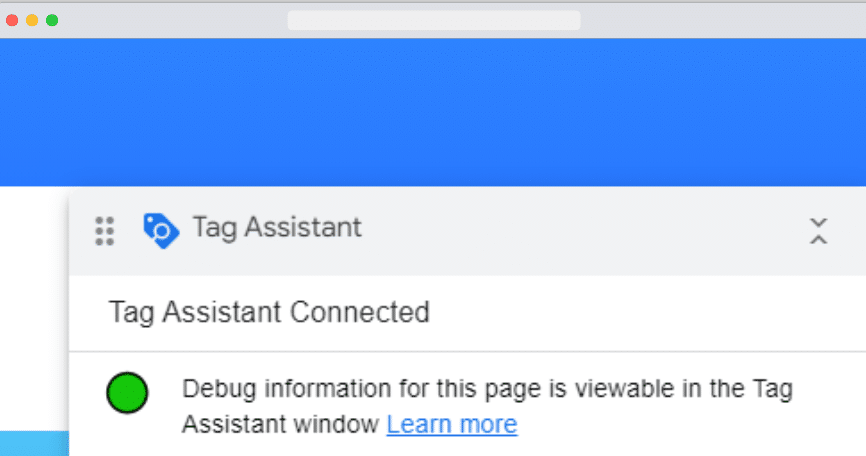
As long as you see events populating in the Preview and Debug console, it confirms that your GTM setup is working correctly.
Note: As you continue to develop your website and refine your GTM container, make it a habit to use the Tag Assistant Companion frequently. This will help you monitor the performance of your tags and ensure they are firing correctly.
Linking Google Analytics with Google Tag Manager
To install Google Analytics on your website. Read our article on how to set up Google Analytics 4.
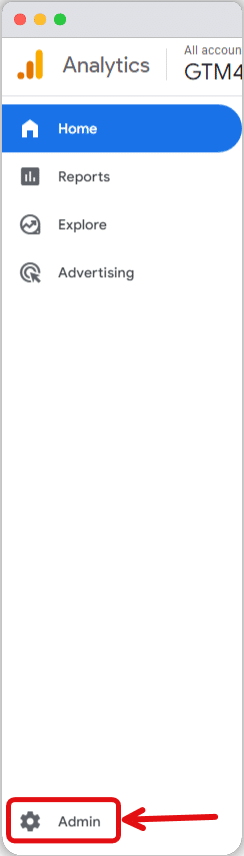
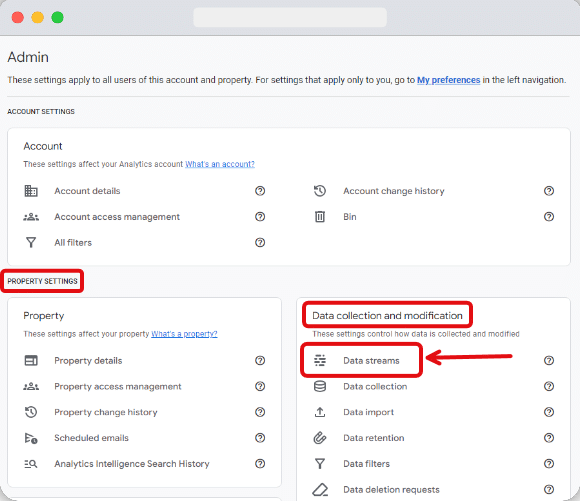
1. Go to admin in Google Analytics
This starts from your Google Analytics account’s admin section. To access this, go to your GA4 property and move your mouse to the left of the screen. A toolbar should appear. Select ‘Admin’ from the bottom of the bar.
2. Go to the setup assistant
This will bring you to a screen with two sections. From the “Property settings” section, select “Data streams”.
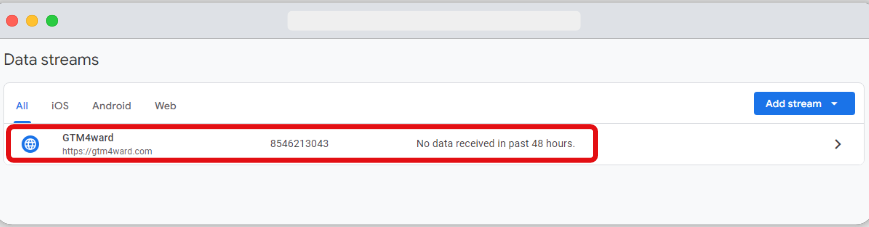
3. Copy your measurement ID
You should now see the list of data streams you have set up in your GA4 property; in this case, we only have one data stream. From this page, click on the web data stream that you want to install on your website.
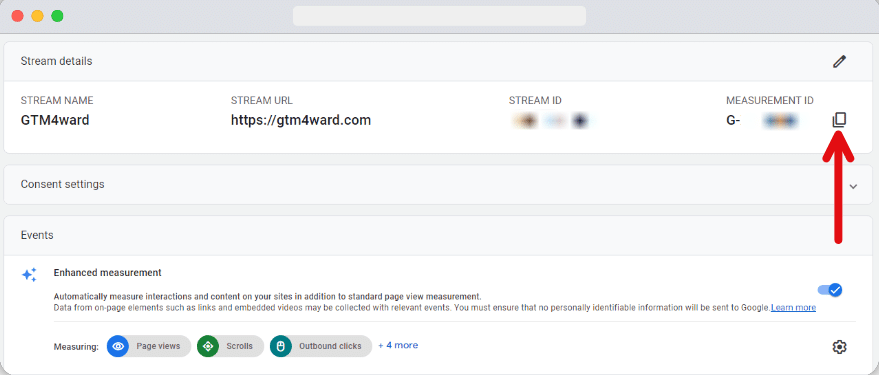
In the next step, you should see the web stream page with additional details. The measurement ID should be in the top right. Select the small copy symbol.
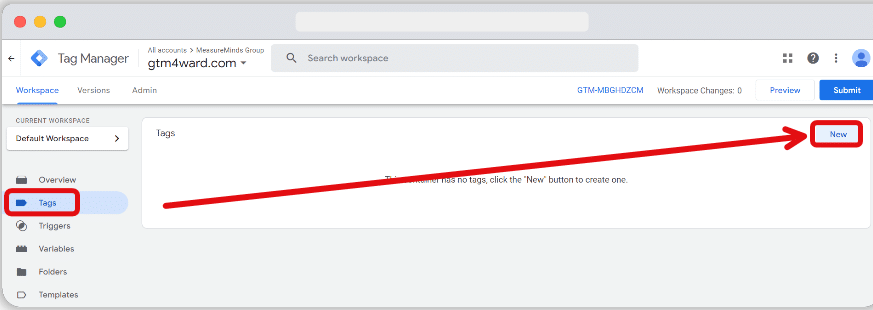
4. Add a new tag
Now it’s time to head over to your Google Tag Manager account. Then click “Tags” from the dashboard. Click the “New” button from the top right in the next window.
5. Name your tag
Name your tag and select tag configuration.
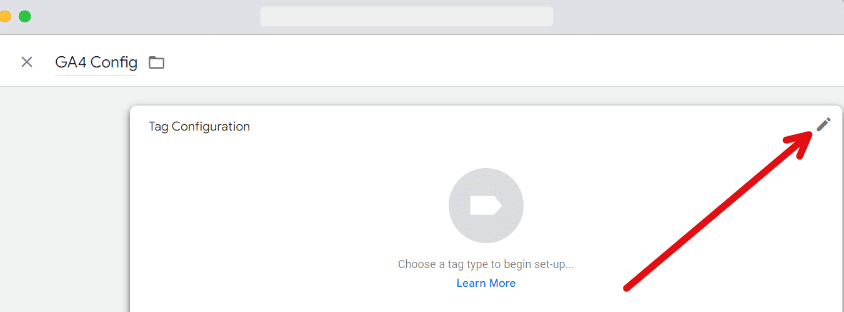
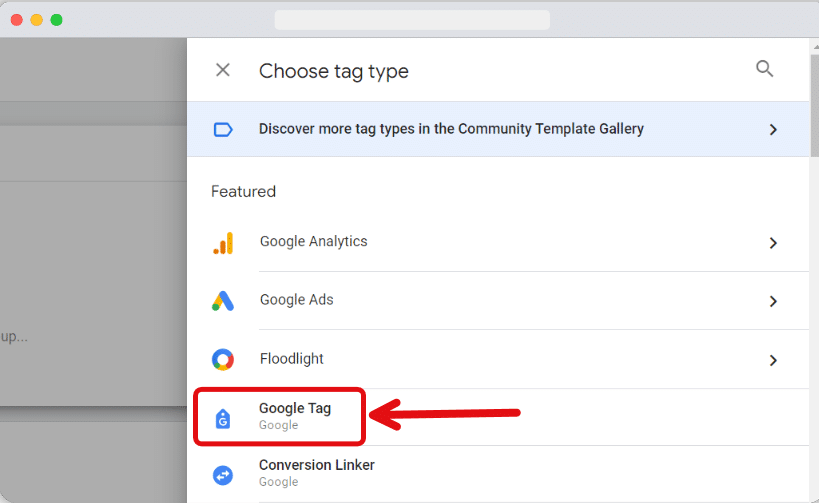
6. Configure your tag
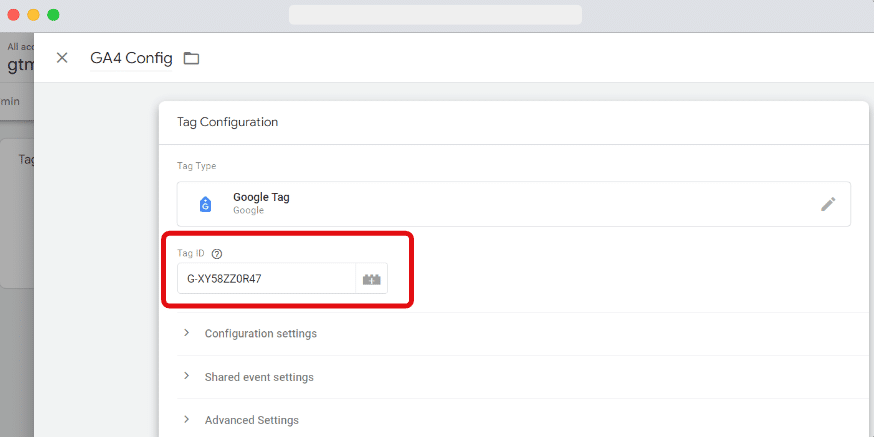
Now select “Google tag” as the tag type from the sliding window.
Paste your ID into the ‘Measurement ID’ box.
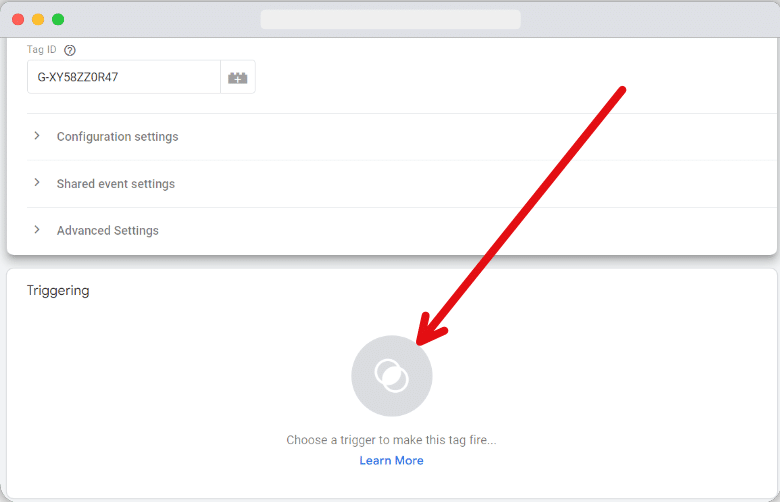
7. Add the Google Analytics trigger
Now, select the icon in the image below to add a trigger. This trigger notifies Google Tag Manager to send code to Google Analytics.
8. Select all pages
Select the ‘All pages’ as the trigger so that your GA4 tag is present on all pages of your website.

And there you have it – job done. You can now explore more to set up custom event with your desired parameters.
As with Google Analytics, we provide Google Tag Manager Consultation and Training. If you are struggling with managing your GTM account, we can improve your knowledge of the tool. We can also enable you to generate more marketing and re-marketing opportunities.