How to Easily Identify and Remove PII in Google Analytics

Every year, businesses are issued mammoth fines for infringing GDPR. In many cases, this is because of leaks of PII (Personally identifiable information). We’ve created a free API that deletes PII from Google Analytics. In this article, you’ll learn why we did this and how to use it.
Why did we make this API?
- Google doesn’t like hosting PII because it means they are liable for a fine of 4% of their global revenue… ouch!
- Hence, when they detect PII, which is a violation of the GA terms of service, they always delete the account, which obviously causes business disruption and the loss of benchmarked performance.
- We’re a fan of Mark Edmondson’s method, however, his solution was missing some key steps, including how to find the affected ClientIDs. You may not always know which clientIDs you want to purge.
Solution
Thus, for our clients, we add preventative filters that purge an account of PII without affecting the underlying data. For example, we don’t use the drop table feature because this deletes all landing pages and disables funnel analysis.
A special thank you to Mark for this inspiration on this article.
Please leave a comment if you found this script helpful or you if you have any feedback.
Here is how you can protect your account from infringing GDPR…
Step 1: Check if you have PII in your GA account
The simplest but not complete way is to use regex on all page reports (Behavior / Site contents / All page) in GA.
To do this, you can go to your all pages report in GA. Then click advanced, click the dropdown menu and then select ‘matching regex’.
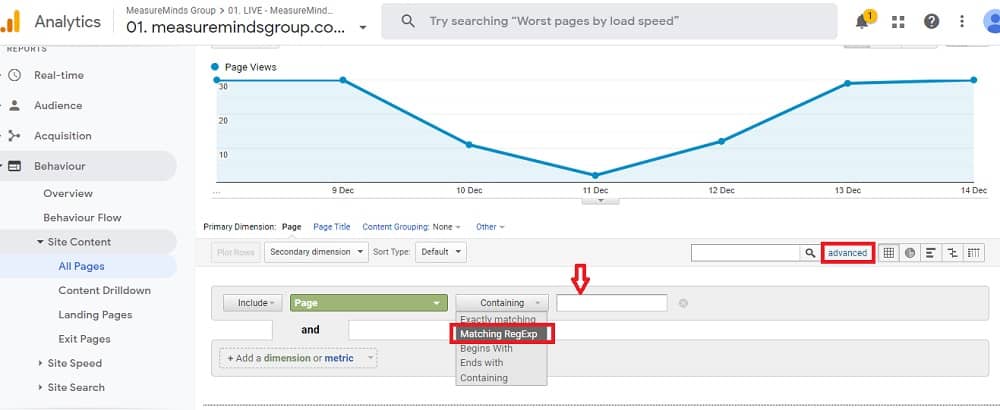
Then copy and paste any of the regex from below:
.*?@.*
or
^\S+@\S+\.\S+$
If you find emails in your landing page report – you have PII in your Google Analytics account.
Google actually has their own user deletion API. So we can wrap up the article now, right? …Not quite, because:
- You need the GA client id (or user id) to delete the user
- You can delete only 500 users per day
Step 2: Get clientID to delete the user
You probably haven’t set up a custom dimension for client ID collection, and we wouldn’t blame you. Simo Ahava did create a guide on how to do this and we will too. But if there’s a PII problem with your new client and they know nothing about custom tasks, PII, and even Simo – you can’t do all the deletion API stuff because you don’t have client ID in your GA export… Epic fail.
Solution
But Phil, the Analytics Director and Founder of MeasureMinds suggested a great remedy. There’s one report in GA where we can grab client IDs. It’s a User Explorer report (Audience / User Explorer), and we can filter this report by the same regex .*?@.* we used before.
Let’s create a segment:
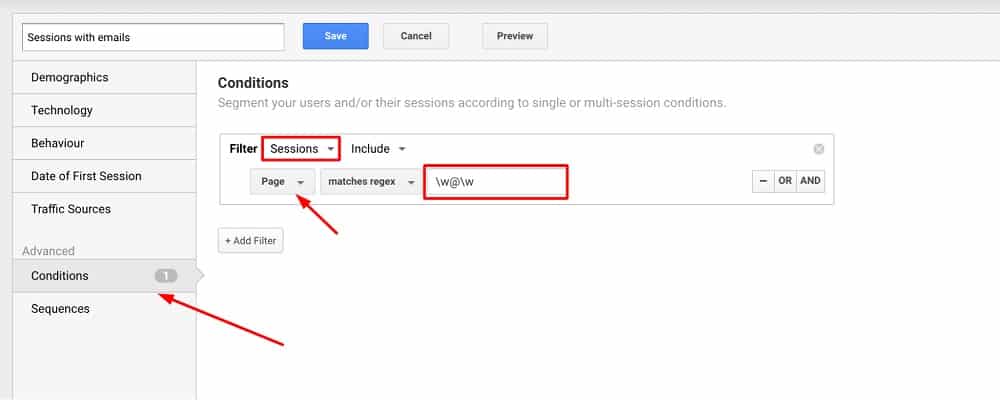
And apply this segment to the User Explorer Report.
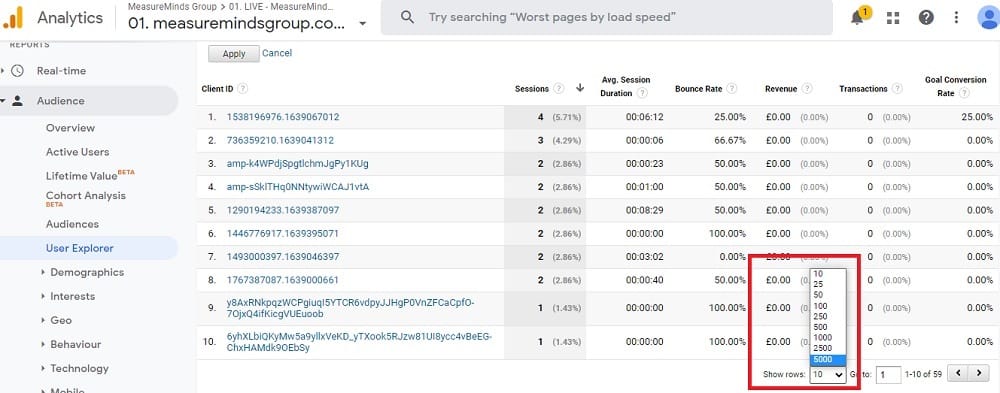
 Now, we can get a list of all users we need to delete. In this screenshot, there are no users with emails and, therefore, no PII.
But… The sampling is coming to foil our plans… If your client has a lot of traffic, the only way to fight sampling is to get a report only for one day. And if you need to check 10 years of data – you have to export the report 10 * 365 = 3,650 times. Multiplied by 10 seconds, it’s about 10 hours of monkey work. And if you are a senior web analyst, you can’t waste your time on that.
But there is a publisher of a JS library… puppeteer that can help. We can create a script which will click 3 thousand times and download all the necessary client IDs. Of course, you will face two-factor authentication, and GA’s complicated interface can also cause complications.
Before we go any further, just clone the repository with all the code samples from the article:
git clone from the MeasureMinds github here
Then, all we need is a link to the report that we want to automate. Find the user explorer report that has the PII in it. Apply the segment we created above. Then, select the maximum value for the “Show rows” parameter. See the screenshot below:
After that, copy the report URL and set it into the client_id_download.js as URL variable value at the very end of the script.
Now, let’s have a look inside the puppeteer script.
Solving the 2-step authentication problem
The two-step authentication problem can be solved this way:
const page = await browser.newPage();
console.log("download2");
await page.goto("https://accounts.google.com/");
await page.waitForTimeout(500);
Before scraping, the script will go to https://accounts.google.com/, where you will have to enter your credentials manually. The script will wait for 5 seconds, and after that, create a new tab and continue.
How to make the script export client IDs into Excel files
The next step that the script takes is getting the information out of the iframe.
const page1 = await browser.newPage();
 await page1.goto(url);
 await page1.waitForSelector("iframe");
 const elementHandle = await page1.$("#galaxyIframe");
 const frame = await elementHandle.contentFrame();
Inside the iframe, we can select a date range and click a few times to download the report.
 await frame.waitForSelector(".ID-view._GAVr");
 const dateButton = await frame.$(".ID-view._GAVr");
 await dateButton.click();
 console.log("clicked dateButton");

 const startDateEl = await frame.$(".ID-datecontrol-primary-start");
 const endDateEl = await frame.$(".ID-datecontrol-primary-end");

 await endDateEl.click({ clickCount: 3 });
 await endDateEl.type(date2);
 console.log("finished endDateEl");

 await startDateEl.click({ clickCount: 3 });
 await startDateEl.type(date1);
 console.log("finished startDateEl");
 const applyButton = await frame.$(".ID-apply");
 await applyButton.click();
 console.log("click applyButton");
Don’t forget to select the end date first or the UI won’t let you select the dates you need. Now the dates are selected, you can simply click the export button and our mission is complete.
 const exportButton = await frame.$(".ID-exportControlButton");
 await exportButton.click();
 console.log("click exportButton");
 const excelButton = await frame.$(".ACTION-export.TARGET-XLSX");
 await excelButton.click();
If you aren’t interested in how exactly the script works, you can just run it like this:
node client_id_download.js
How to consolidate your exports into one file
You’ll be left with .xlsx files with client IDs for each day. Now, let’s start using Python and Pandas to consolidate all of the exports into one file. The code is really simple:
only_files = [f for f in listdir(in_path) if isfile(join(in_path, f))]

res = pd.DataFrame()

for file_name in only_files:

   df = pd.read_excel(join(in_path,file_name), sheet_name='Dataset1',dtype=str)
   df['file_name'] = file_name
   res = res.append(df, ignore_index=True)

res = res.drop_duplicates('Client ID', keep="first")

res.to_excel(out_path, sheet_name='Dataset1', index = False)
Run it by command:
python merge_xlsx.py
Delete the Client IDs
So we’ve just completed the hardest part. Now we have all client ids inside one .xls file.
Let’s return to the User Deletion API. This time, create a Google Colab notebook, which will delete 500 users and save the results to an .xlsx file in Google Storage.
If you have more than 500 users to delete, repeat the process every day until all PII data is removed. Here’s the Google colab. Copy it and set variables web_property_id, bucket_name in first cell.
There may be some confusion on how to connect Colab with the GA/GTM API – please write a comment if you are interested and we will create a new post on this topic.
But for now, here’s what the colab notebook will do:
First, creating a service object with the right scope:
from service import get_service, delete_user

# Define the auth scopes to request.
scope = ['https://www.googleapis.com/auth/analytics.user.deletion']

# Authenticate and construct service.
service = get_service('analytics', 'v3', scope, 'client_secrets.json')
The script will then copy the file with clientIDs from storage, read the file and go through the clientIDs that weren’t sent:
!gsutil cp gs://{bucket_name}/{client_id_file_name} /content

df = pd.read_excel(client_id_file_name, sheet_name='Dataset1',dtype=str)
df = df.sort_values('file_name')

# Check if file has undeleted client ids

if len(df[df['state'] == NOT_DELETED_LABEL]) > 0:
 requests_counter = 0
 MAX_DELITION_REQUESTS_DAILY = 480

 for index, row in df.iterrows():

     if row['state'] == DELETED_LABEL:
       continue

     requests_counter += 1

     if requests_counter > MAX_DELITION_REQUESTS_DAILY:
       print("Daily requests limit")
       break

     try:

       result = delete_user(service,web_property_id,row['Client ID'])
       logger.info(f"Deleted user with ClientID: {row['Client ID']}")

     except Exception as e:
       print(e)
       break

     # Mark file as deleted
     row['state'] = DELETED_LABEL
As the script achieves the daily API limit or gets to the end of the file, it will save the results to the .xlsx file and copy them to the storage
# Save to file
df.to_excel(f'/content/{client_id_file_name}', sheet_name='Dataset1', index = False)
# Copy to Google Storage
!gsutil cp /content/{client_id_file_name} gs://{bucket_name}/{client_id_file_name}
To conclude
If you follow all these steps, your clients will be much better protected from infringing GDPR and GA policies. Which, as we said before, could be a big help in preventing your client from being hit with a huge fine!
Thanks for reading, and please share how you solve PII problems with your clients’ data, as we’re interested to hear some innovative tactics in this changing landscape of data privacy in 2023.
You can find GitHub links to all code examples from the article here.
- Top 24 Google Analytics Chrome Extensions & Sheets Add-ons - 21/05/2026
- Best Consent Management Platforms (CMP) - 19/05/2026
- Google Signals and Consent Mode: What This GA4 Change Really Means - 23/04/2026