How to Set Up GTM Server-Side Properly in 2026

GTM server-side promises many benefits to Google Tag Manager users, developers and analysts. Some of which include:
- Improved web performance due to fewer measurement tags and thereby leaner code.
- Improved security due to being collected in a customer-managed GTM server-side environment.
- Reduce the risk of Personally Identifiable Information (PII) leaks.
- Extend how long cookies can be stored on Safari which is great for combatting Intelligent Tracking Prevention (ITP).
And that’s just to name a few. So as you can see, this could potentially be really positive for your business. So in this article we wanted to show you how to set GTM Server-Side.
These insights are mostly a write-up of Josh Silverbauer’s talk at Privacy4Marketers. You can find his session’s recording below:
The problem with client-side data
When you use client-side tracking, you lose sight of what data is flying out the door. Third-party platforms (Meta, Google, TikTok, etc.) are like vultures — greedy and hungry for everything. Part of being data privacy conscious is making sure that certain pieces of information don’t reach these platforms.
Lots of problems arise from sending data without control, including
- Hard to enforce governance – You might accidentally deploy tags containing sensitive data without realising it.
- Risk of leaking sensitive information – For example, you might collect a request URL that contains a user’s email and phone number.
- Increased liability (privacy regulations) – If you operate in a region governed by data privacy laws, there can be big consequences for sending sensitive data without permission.
- Can’t modify information sent in request – Once a tag fires, there’s little you can do to prevent the transmission of data.
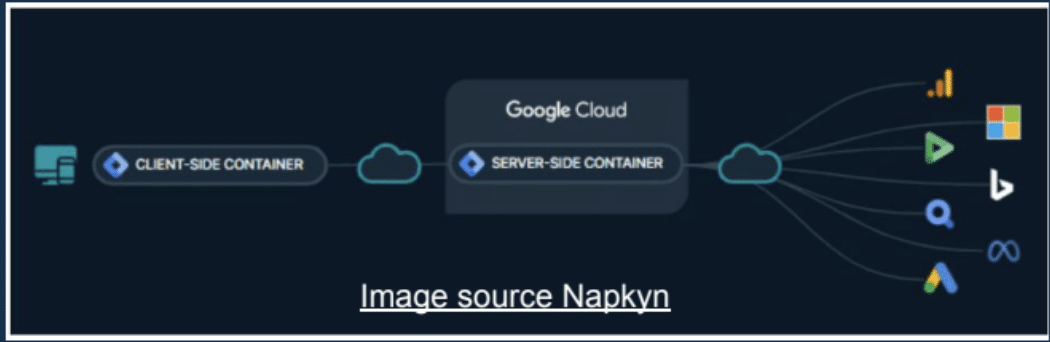
Enter server-side GTM
With server-side GTM, data is sent to a server that you control. Server-side lets you see, modify and decide what gets passed to third-party Platforms. In other words, you become the gatekeeper of your data.
Note: although the cost of GTM setup is free, there are some associated costs to be aware of. For example, you’ll need to set up both a Google Cloud platform and a tagging server, both of which incur additional costs.
How to set up server side Google Tag Manager?
Go to tagmanager.google.com & follow the below steps to set up server-side GTM:
Part 1: Create the Server Container
1. Initial Creation
1.1. Find your Account in Google Tag Manager.
1.2. Click on Create Container

1.3. Add your domain.
1.4. Select Server.
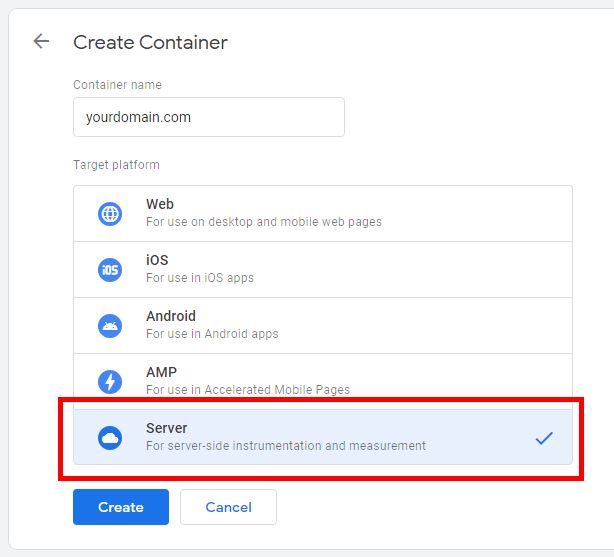
1.5. Click Create.
1.6. Accept the terms and conditions.

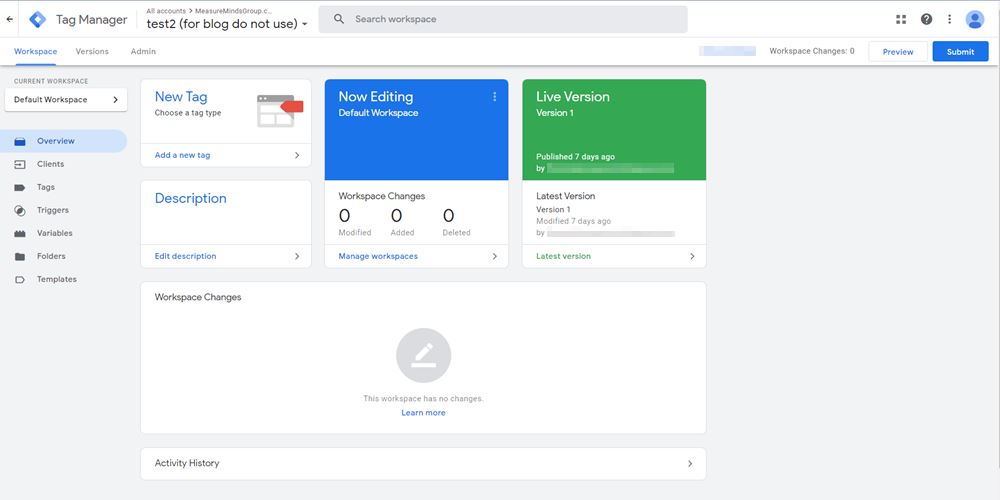
You can now see the default Workspace of the SERVER container.
Remember the container settings. It’s important in setting up the server later on.
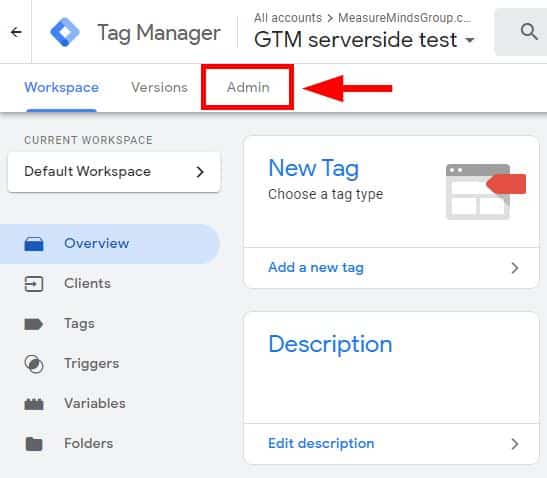
2. Set Up GTM Server-Side Configuration
2.1. Click on the Admin tab on the upper left.
2.2. Then click on Container Settings.
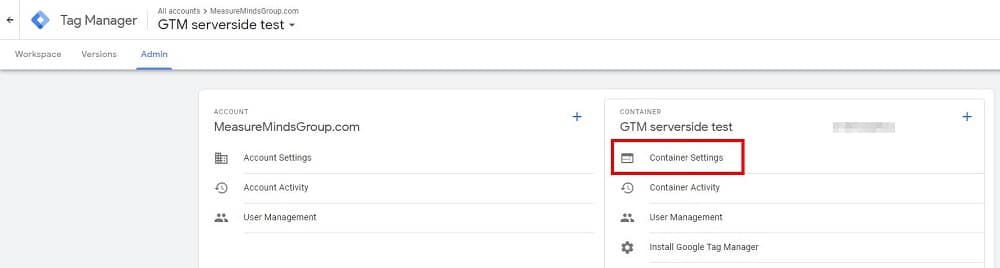
2.3. There’s an empty field there called Server container URL. Remember this field later on.
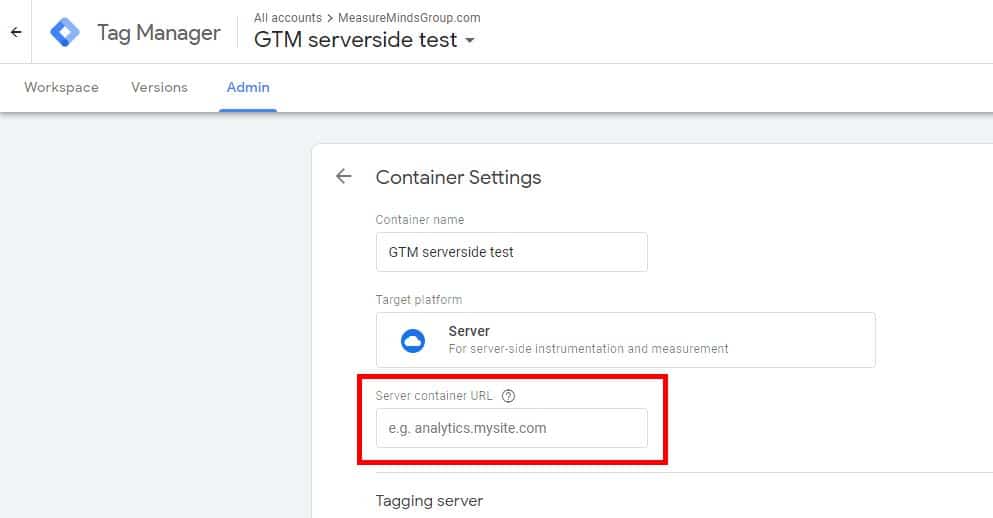
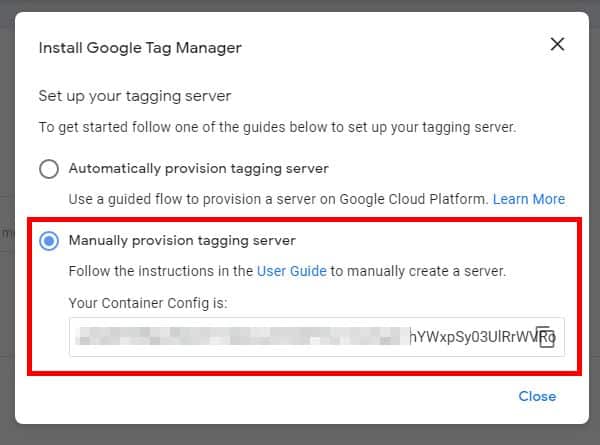
2.4. Under Tagging server, click on the Set up your tagging server button.
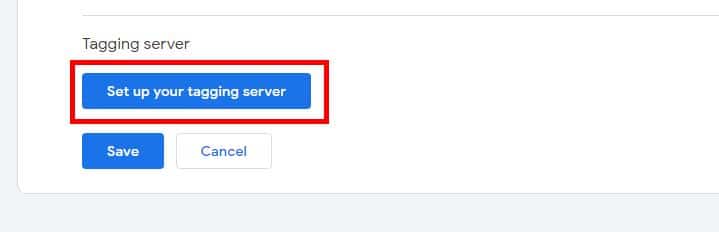
2.5. Once inside, select Manually provision tagging server.
Note: It’s recommended to use manual provisions because if you have an existing Google Cloud project, you override or erase the existing App Engine in that project. Manual provisions avoid project management headaches. See the “Creation of Google Cloud Platform” section of this article for more details.

Take note of the code under Your Container Config. This is needed for the Google Cloud Server we saw earlier. Go to Part 2, section 2.7 to add this Container Config.
3. Setting up the Server Container
3.1. Under the newly created SERVER container, go to Clients.
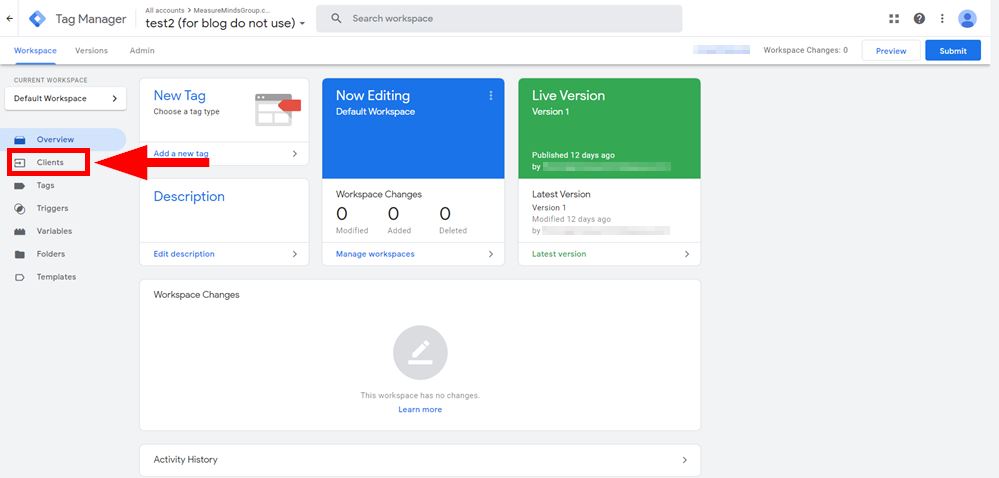
The ‘clients’ section is the most important part and it is unique to gtm server-side tagging. As a default, UA and GA4 are already set up. There are actually no other changes that you need to make here.
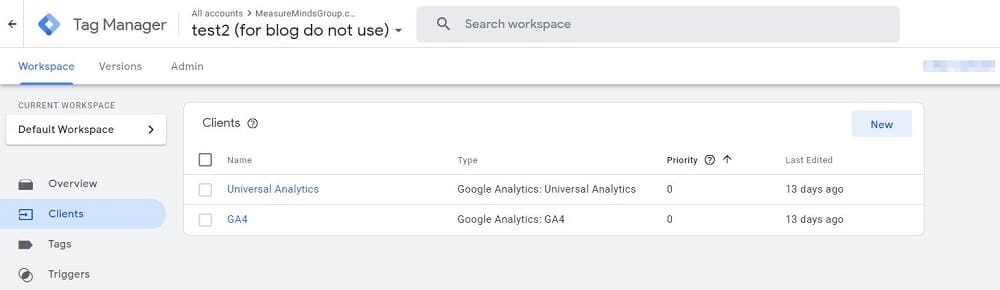
Take note of the Client name of Universal Analytics and Google Analytics 4. You need them when setting up tags later on.
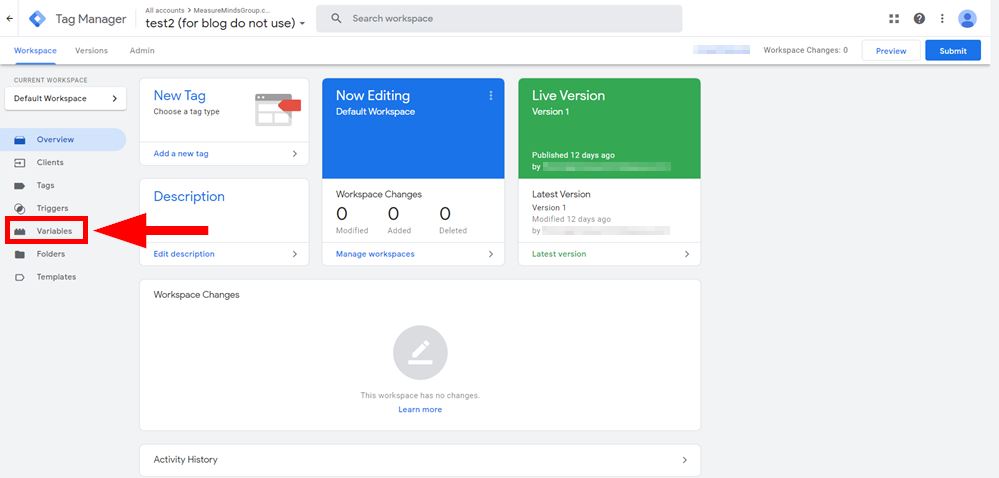
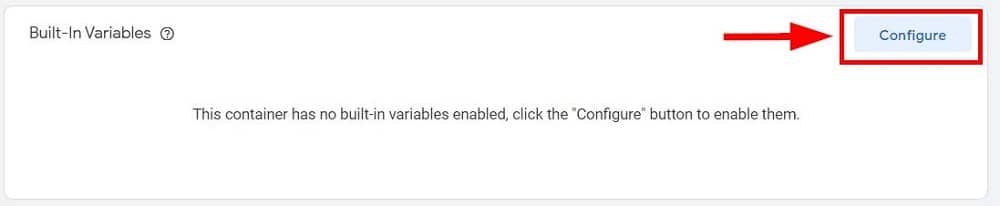
3.2. Go to Variables.
3.3. Once inside, select Configure.
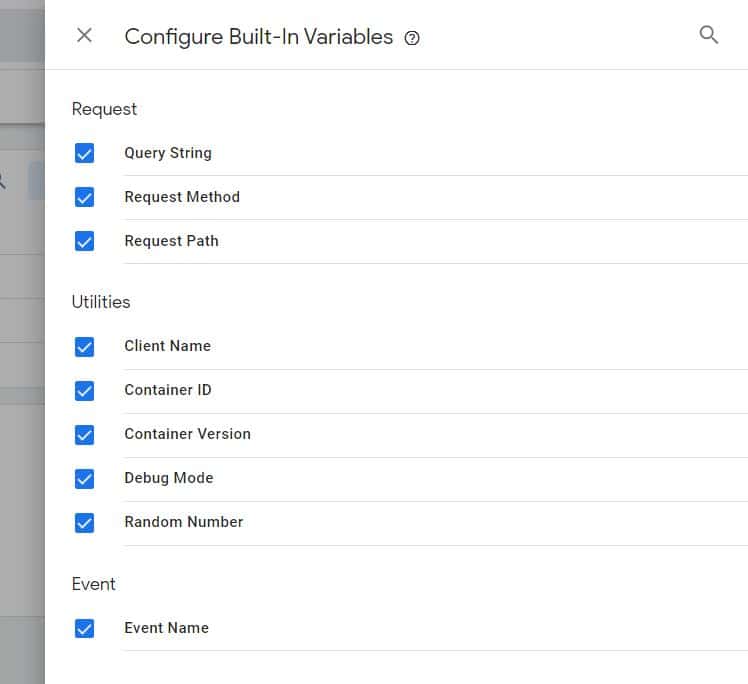
3.4. Once inside, select and tick every one of the Built-In Variables. The most important variable here is ‘Client Name’. This is related to the Clients we saw earlier.
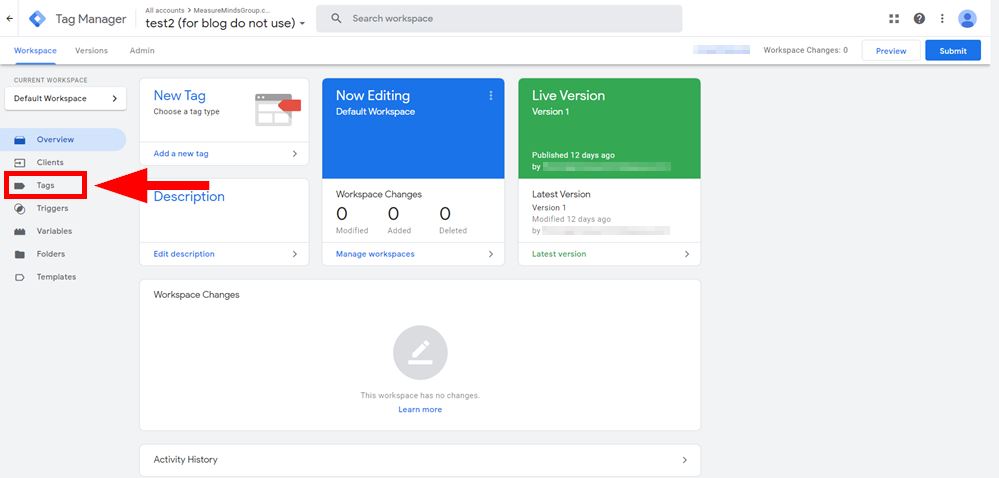
Let’s create the Universal Analytics Tag and Google Analytics 4 Tag. First I’ll show you how to set up the UA tag.
Setting up the Universal Analytics tag
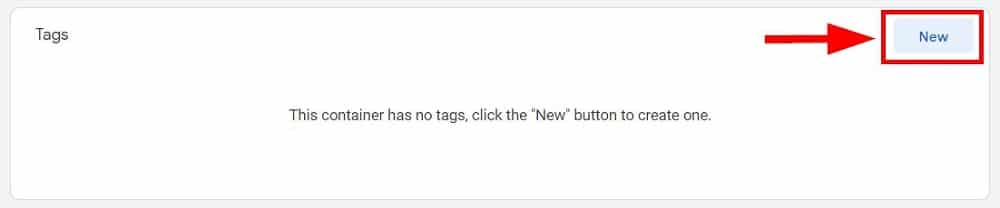
3.5. Go to Tags.

3.6. Click on New.

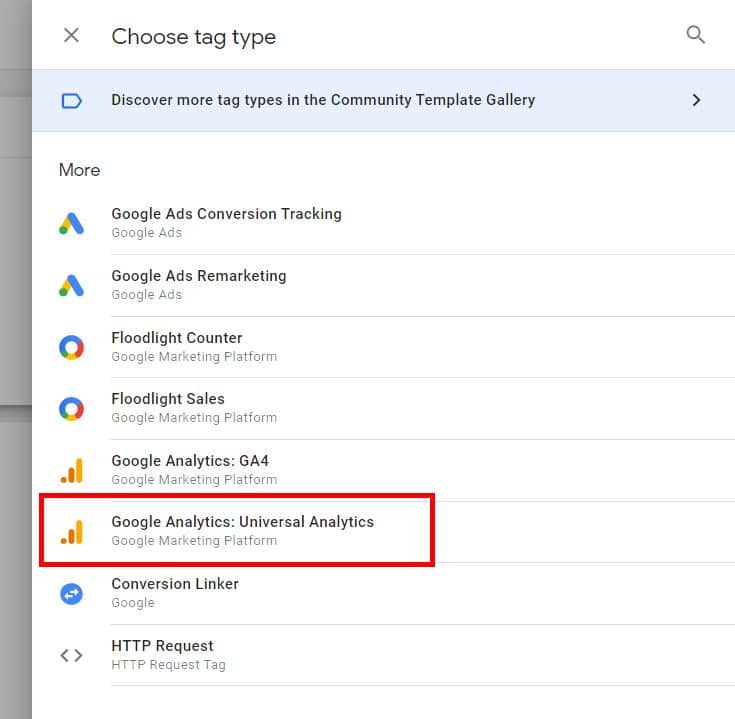
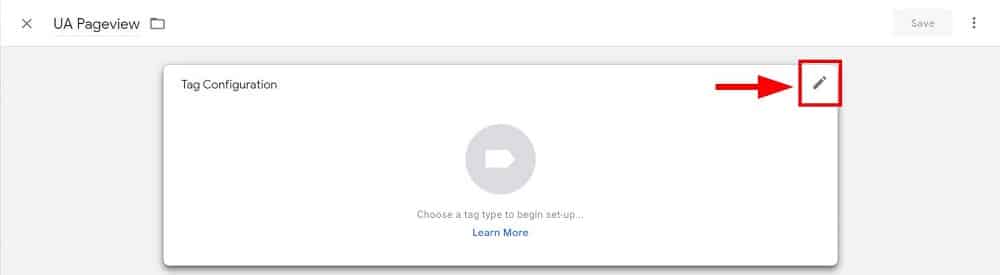
3.7. Name your tag. Then click on the Edit icon.

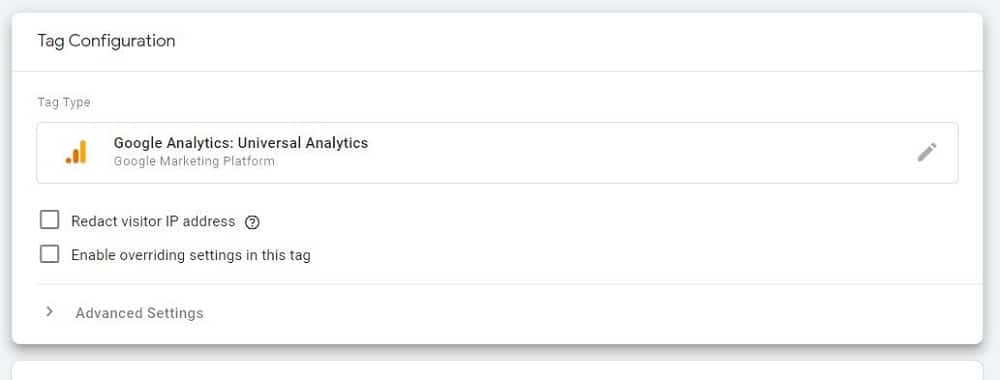
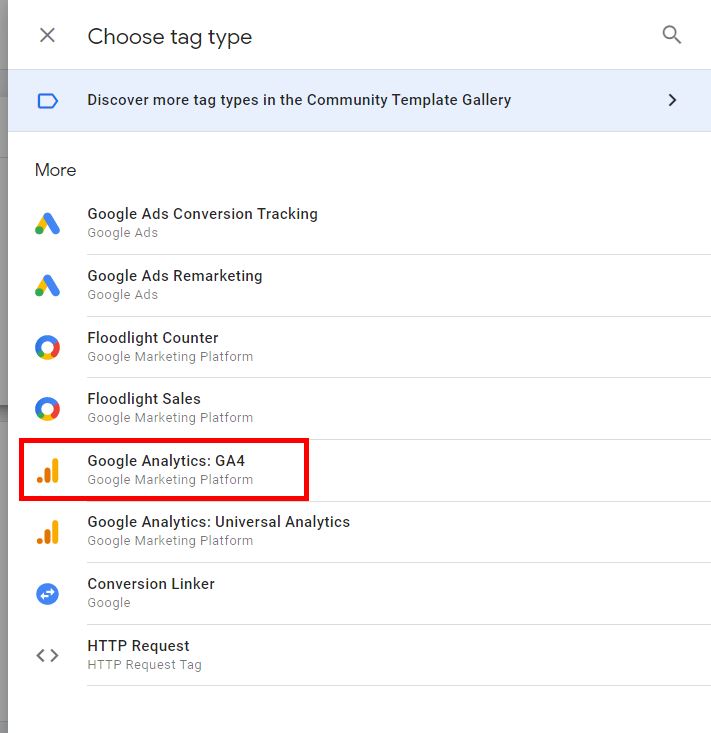
3.8. Select Google Analytics: Universal Analytics.
3.9. You don’t change anything on the settings. Leave everything as is.
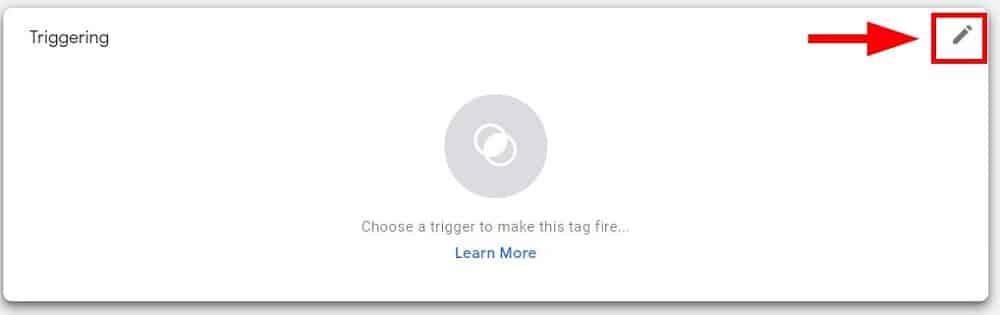
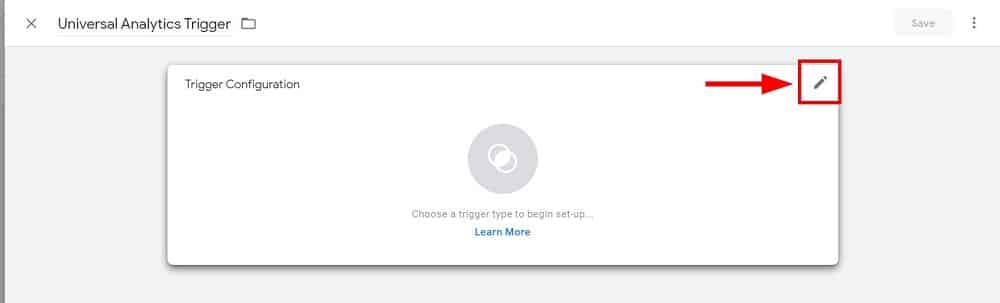
3.10. Under Triggering, click on the edit icon.
3.11. Click on the add a trigger button.

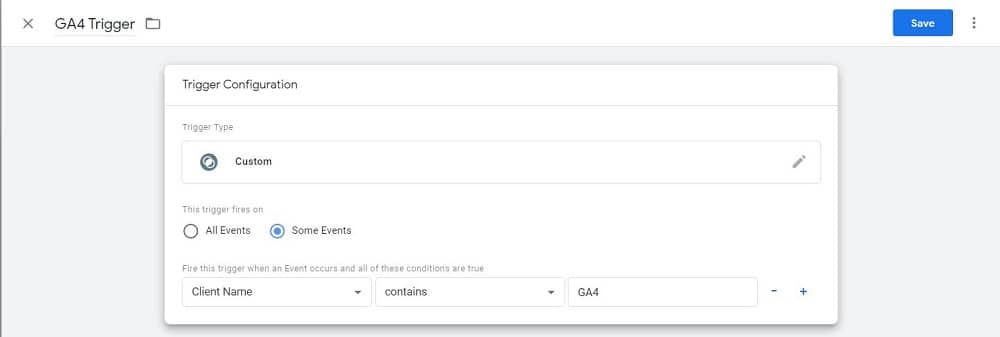
3.12. Name your trigger. Click on the edit icon button to configure the trigger.

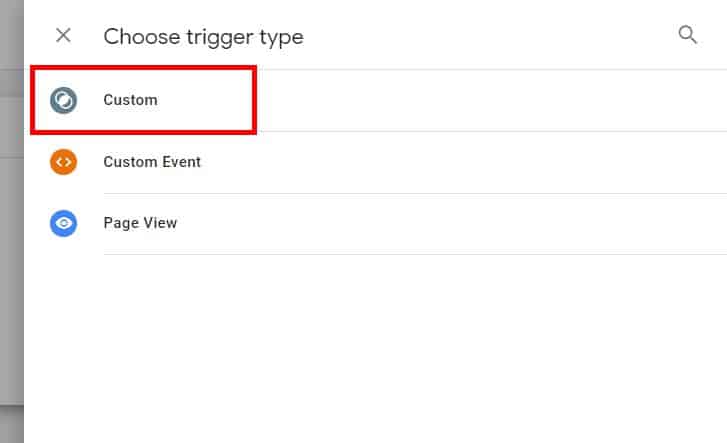
3.13. Select Custom
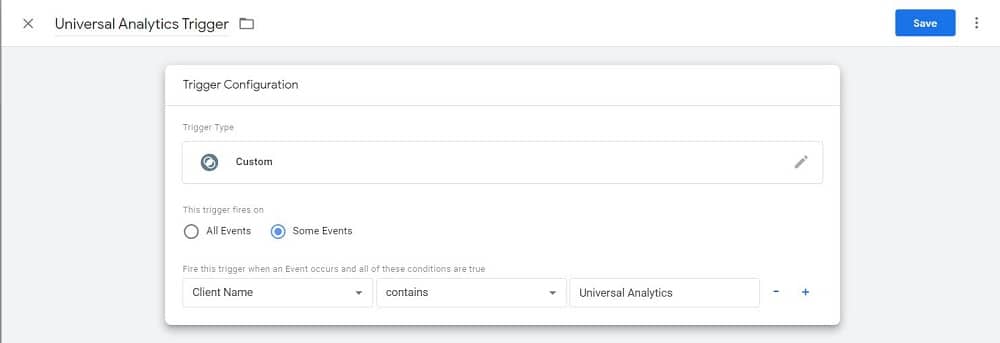
3.14. Then select Some Events.
3.15. Change the parameters as follow:
Client Name > Contains > Universal Analytics
3.16. Click on Save.
Setting up the GA4 tag
You need to do the same thing for the Google Analytics 4 tag.
3.17. Go to Tags.
3.18. Click on New.
3.19. Name your tag. Then click on the Edit icon.
3.20. Select Google Analytics: GA4.
3.21. You don’t change anything on the settings. Leave everything as is.
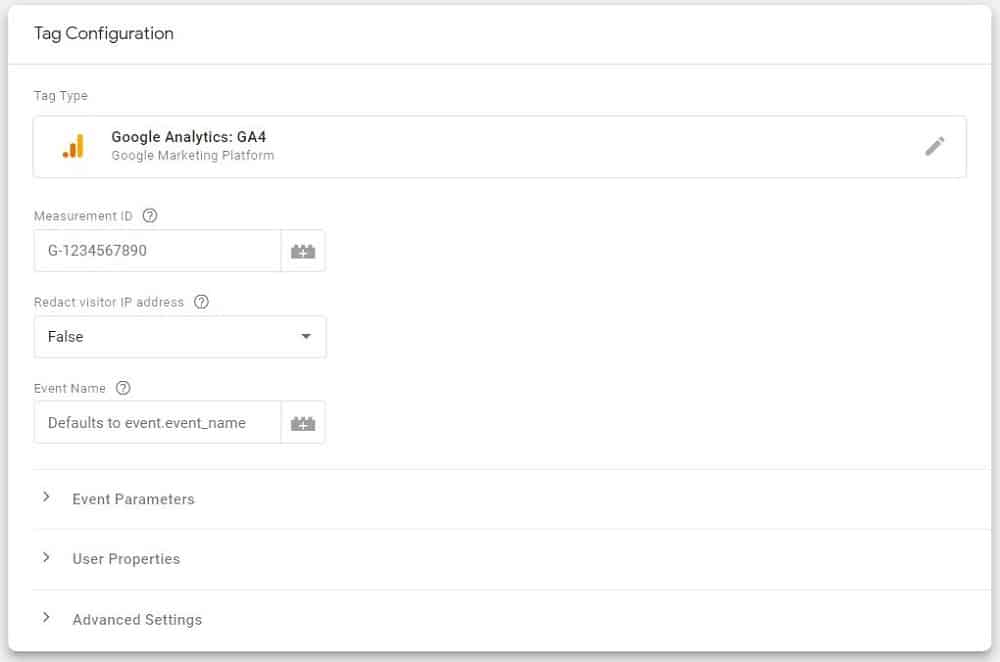
3.22. Under Triggering, click on the edit icon.

3.23. Click on the add a trigger button.

3.24. Name your trigger. Click on the edit icon button to configure the trigger. We suggest (GA4 Trigger).
3.25. Also, choose the trigger type. Select Custom.

3.26. Then select Some Events.
3.27. Change the parameters as follow:
Client Name > Contains > GA4
3.28. Click on Save.
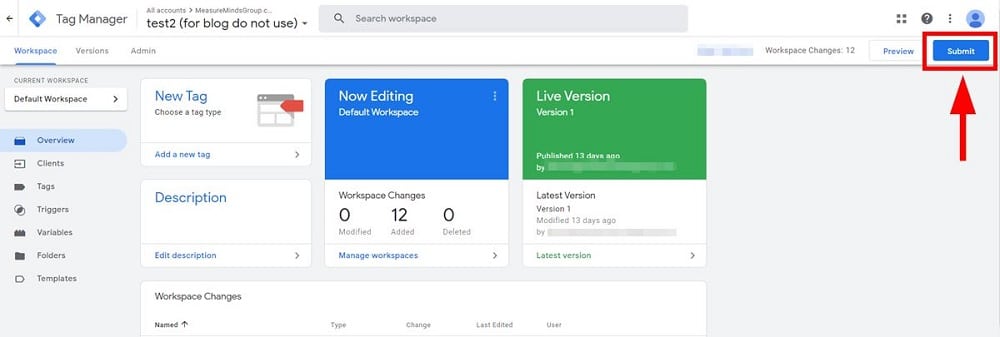
Once everything is good to go, don’t forget to Publish the server container.
Part 2: Creation of Google Cloud Platform
1. Initial Requirements
1.1. Go to https://cloud.google.com/
1.2. Click on Select a Project on the upper left.
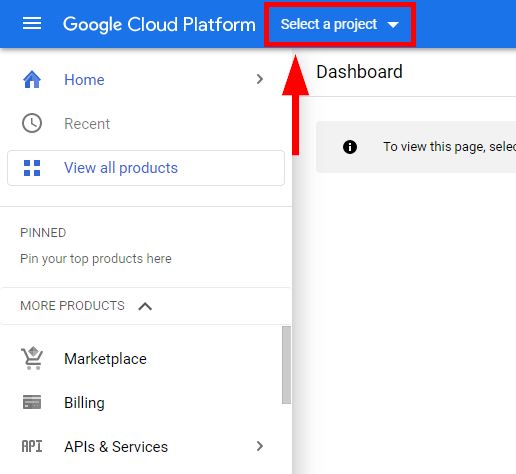
1.3. Click on NEW PROJECT.

1.4. Give your project a Project name, Project ID, and Location.
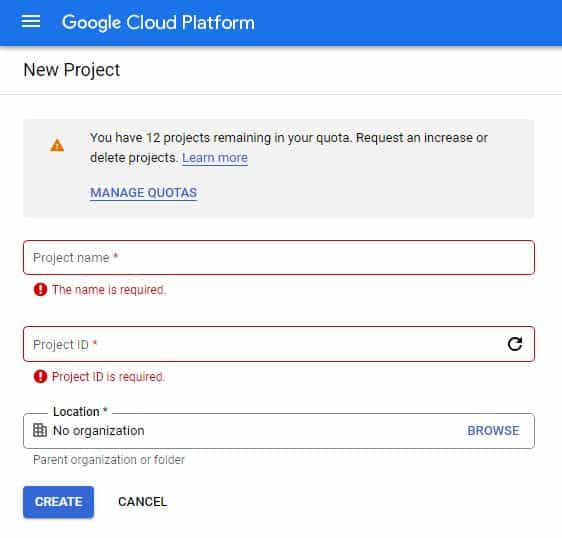 1.5. Click on Create.
1.6. Then create your Billing account.
1.7. Go to the Cloud Build API page, then click on Enable.
NOTE: It’s better to create a new Google Cloud project because if you have an existing one, you override or erase the existing App Engine project. Creating a new project prevents any data loss or any project management headaches.
2. Activating the Cloud instance
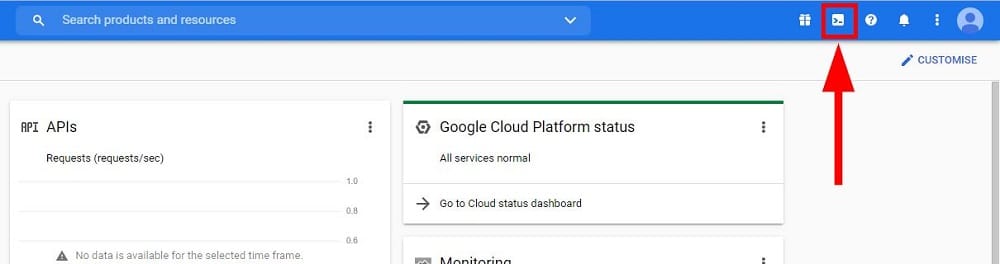
2.1. Once the project is created, click on the Activate Cloud Shell icon.
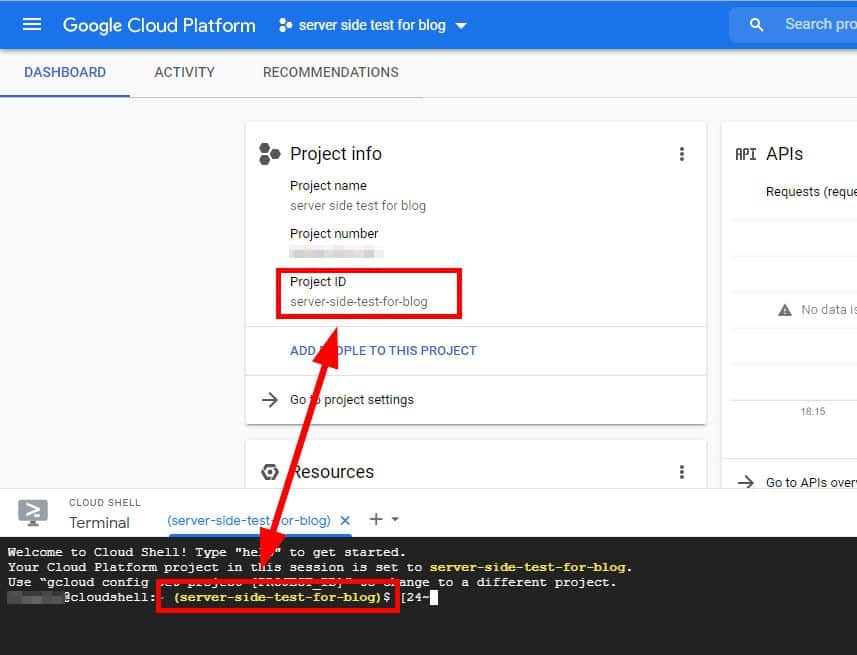
For sanity checks, make sure you are working on the correct project. The project ID you inputted should be the same as the one you see inside the cloud shell console.
2.2. Next, copy the code from the Google documentation, and paste it into the console:
bash -c "$(curl -fsSL https://googletagmanager.com/static/serverjs/setup.sh)"
2.3. Press Enter.
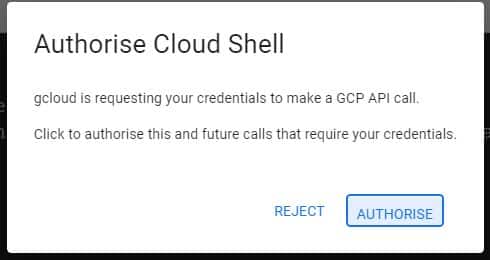
2.4. Select Authorize.
2.5. Press Enter to continue as instructed.
2.6. Container Config (Required): appears.
2.7. Go back to your GTM server-side container settings and copy the Container Config code.
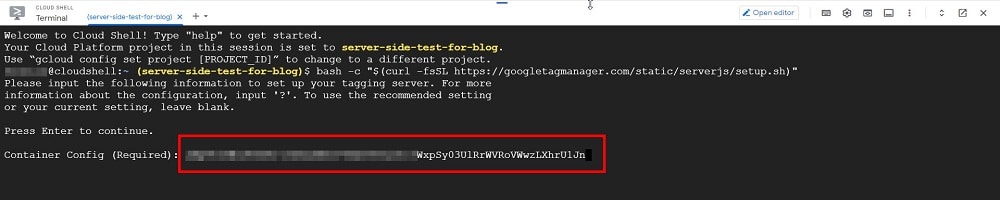
NOTE: Further down this article there’s a section on where to find this Container Config.
2.8. Policy Script URL (Optional) appears.
2.9. If you have Policy Script, add the URL then enter. Otherwise, you may leave this empty and just press enter. This is Optional.
2.10. Request Logging (Current: on/off) appears.
2.11. Type off for now and press Enter
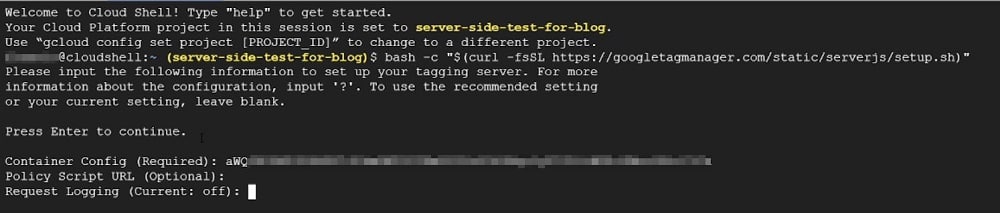
2.12. Deployment Type (testing/production) appears.
2.13. Type testing then press Enter.

NOTE: Deployment type production begins the billing of your Google Cloud project (100 EUR). In summary, production requires technical expertise on how to handle server instances and logs. But for now, we can start with testing. Consult with a Google Tag Manager agency to learn more.
3. Setting up DNS Records
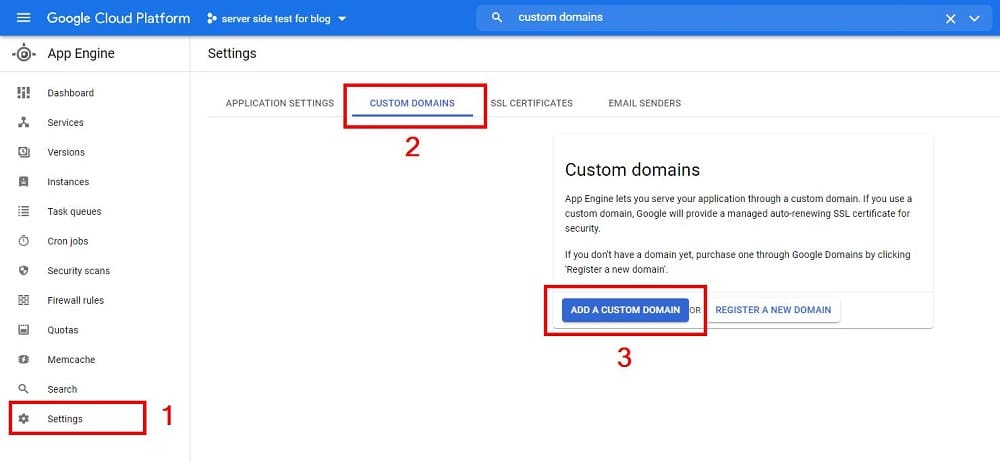
3.1. Look for App Engine or search for Custom Domains.

3.2. Select Settings, then select Custom Domains, then select Add a Custom Domain.
3.3. Under Select the domain that you want to use, select Verify a new domain. Then under the next field, add your domain.
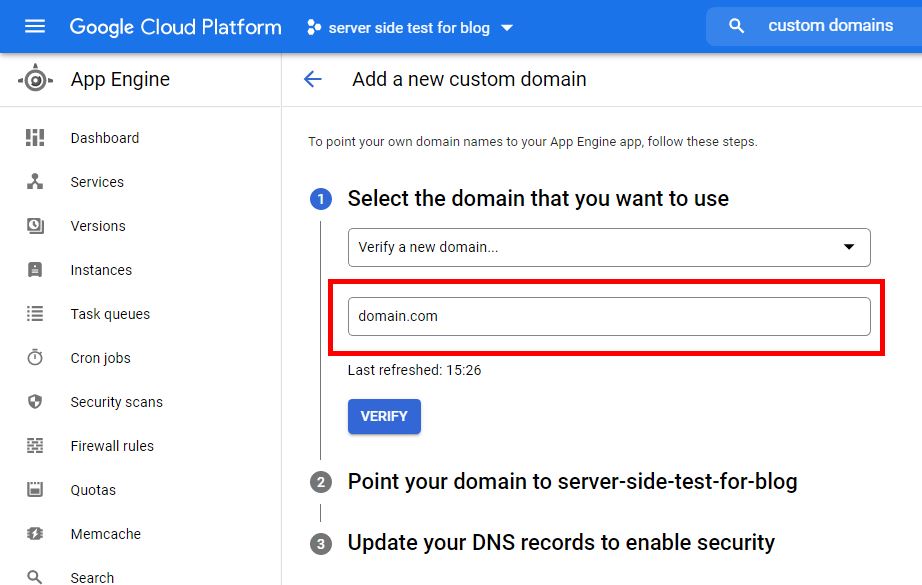
3.4. Click on the blue Verify button.
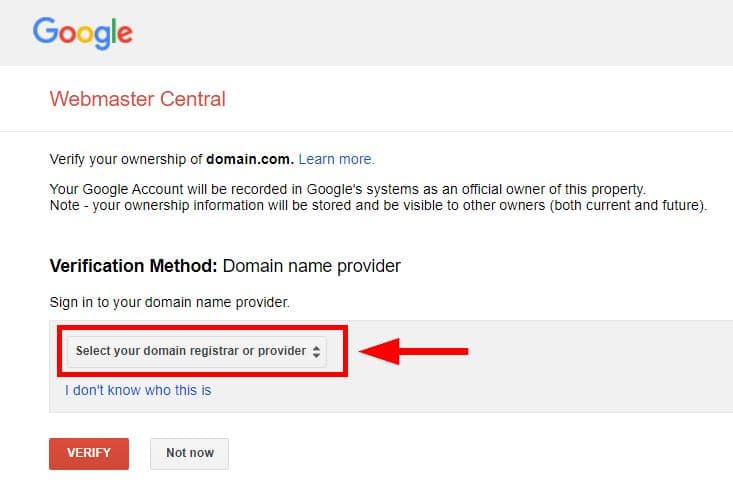
3.5. You’re redirected to a new tab.
3.6. Select the server you are using.
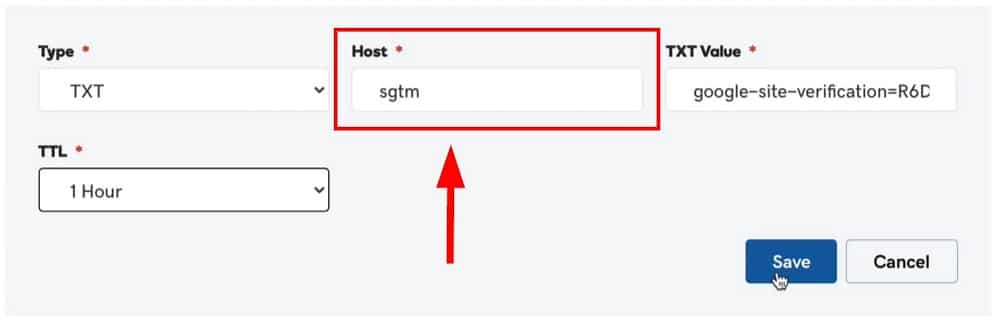
Setting up a TXT record
3.7. A TXT record appears for DNS configuration. Send this to your web developers if you don’t know what to do here. They should know what to do with it.
3.8. NOTE: When uploading the DNS records, you need to decide the subdomain for your server-side instance for Google Tag Manager. An example is data or sgtm or ss. In the end, your server-side endpoint might look like the following:
data.domain.com
sgtm.domain.com
ss.domain.com
3.9. After the TXT DNS record has been added to your server, click on the Verify button.

3.10. Go back to Google Cloud. Click on Refresh domains.

3.11. Under Point your domain to gtm-xxxxxxxx-xxxxx: close (click x button) on the www.sgtm.domain.com. Only one subdomain should be mapped.
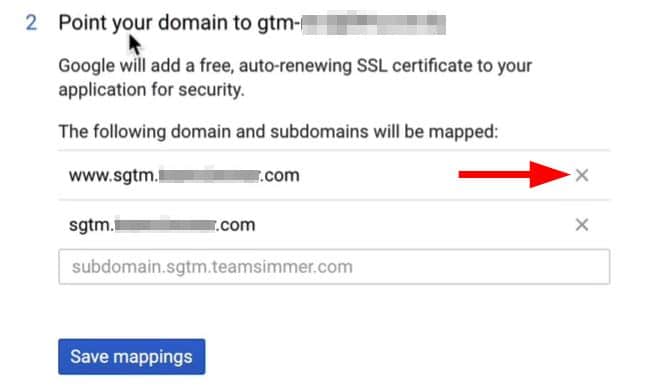 3.12. Click on Save mappings, and then Continue.
Setting up A and AAAA records
3.13. Under ‘Update your DNS records to enable security’ are the A and AAAA records. Send these to your web developers, they should know what to do with them.
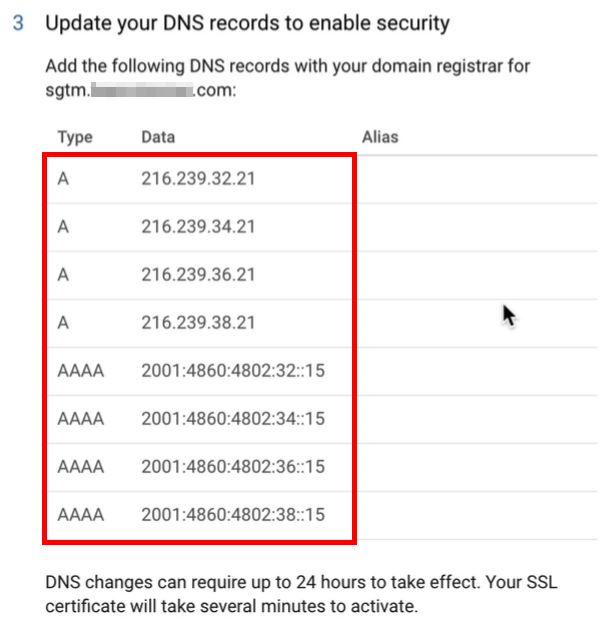 3.14. Click on Done.
3.15. Wait until mapping is completed. Best not to close the browser tab. This includes SSL certification.
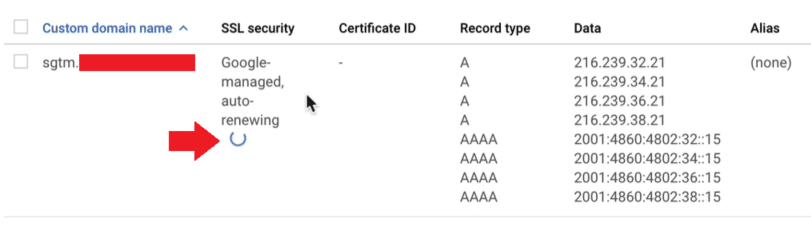
3.16. Endpoint should be responding once completed. To check, go to the endpoint. For example, sgtm.domain.com/healthy
3.17. You’ll see an ‘ok’ text on the screen if everything is implemented correctly.
Part 3: Connecting Web Container with Server Container
1. Initial Setup
1.1. Go to your Google Tag Manager WEB container. Note that you should already have Google Tag Manager set up already.
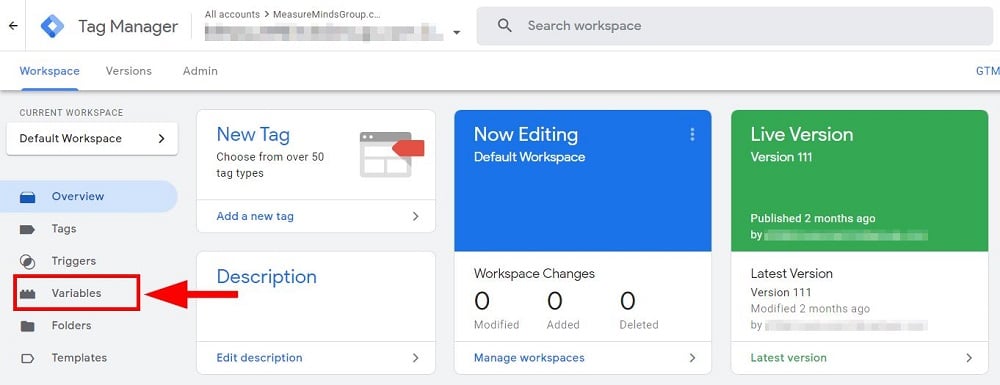
1.2. Go to Variables
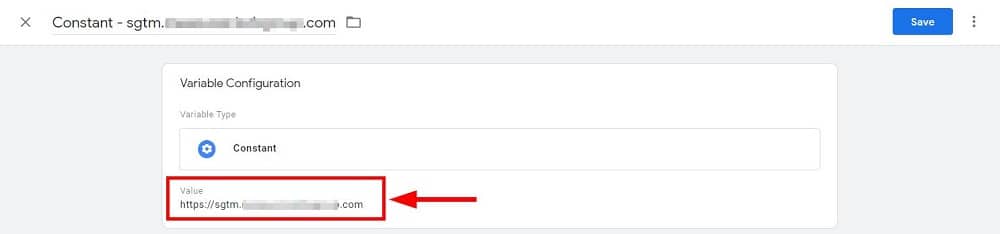
1.3. Create a new User-Defined Constant variable for your server-side endpoint.
NOTE: Include the https://. A mistake in setting up GTM server-side tagging is NOT including it. Without it, the HTTPS requests are misconfigured.
2. Setting Up Transport URL
For Universal Analytics
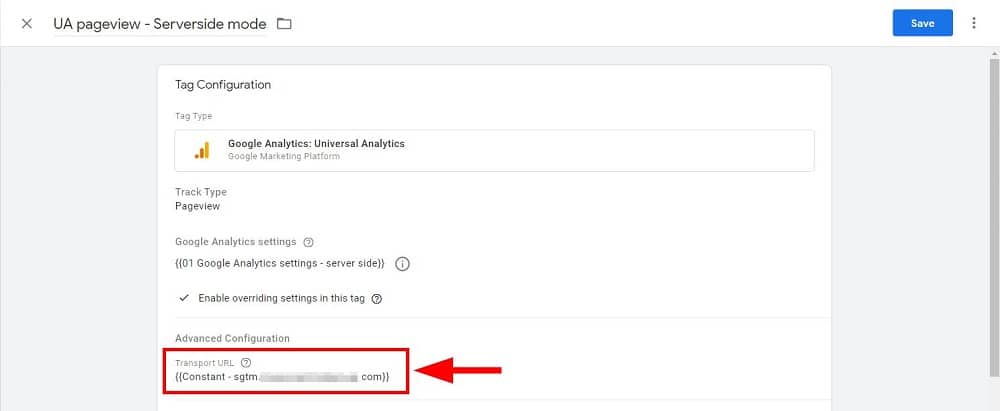
2.1. Go to your Universal Analytics pageview Tag.
2.2. Under your UA pageview tag, go to More Settings. Then go to Transport URL.
2.3. Add in your constant Variable that represents your server-side endpoint.
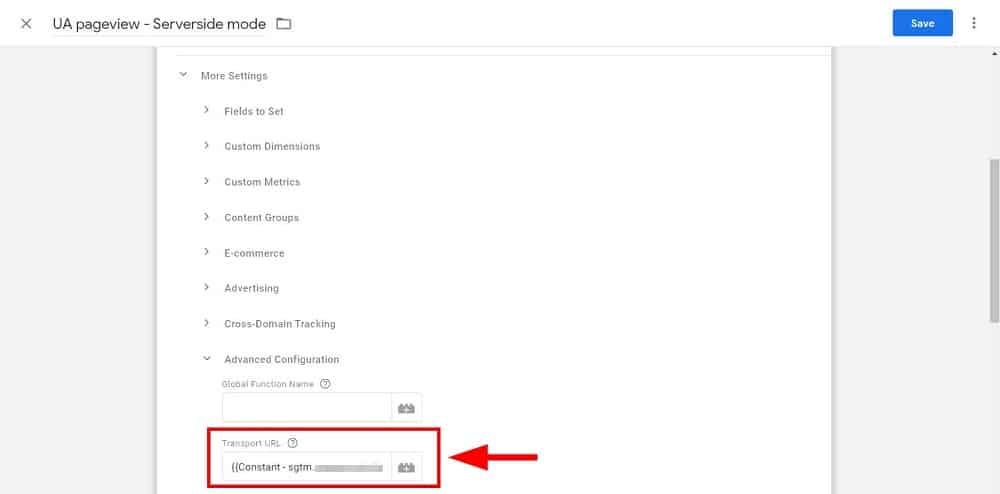
2.4. Click Save. Your current Universal Analytics pageview should be good to go.
For Google Analytics 4
2.5. Look for your GA4 (Google Analytics 4) pageview tag. Do the same.

2.6. Under your GA4 pageview tag, look for and tick Send to server container. After which, add in your constant Variable that represents your server-side endpoint.
2.7. Click Save. Your current Google Analytics 4 pageview should be good to go.
2.8. Publish the WEB container.
Part 4: How to Preview or Debug GTM Server-Side Tracking
For this section, we’ll look at how to debug the GTM server-side container if everything is working or configured properly.
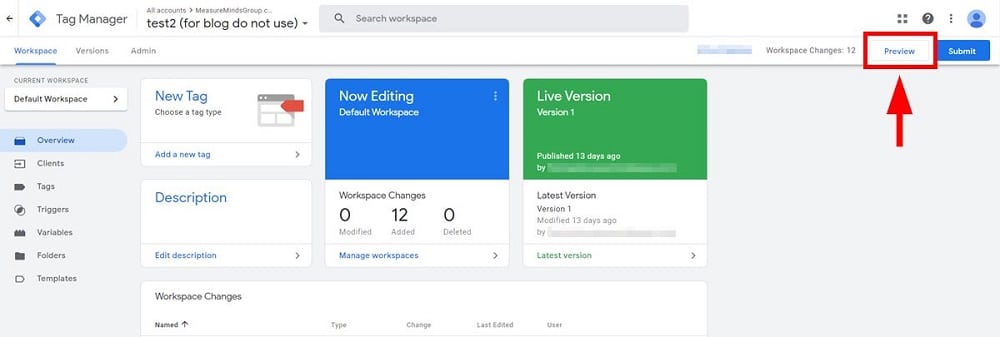
1. Clicking the Preview mode
1.1. Go to your Server container.
1.2. Click on Preview.
2. Debug View
2.1. You have landed on the debug view.
2.2. Go to your website on a separate tab. This allows a pageview hit.
2.3. Go back to the debug view and you will see HTTP requests on the server container.
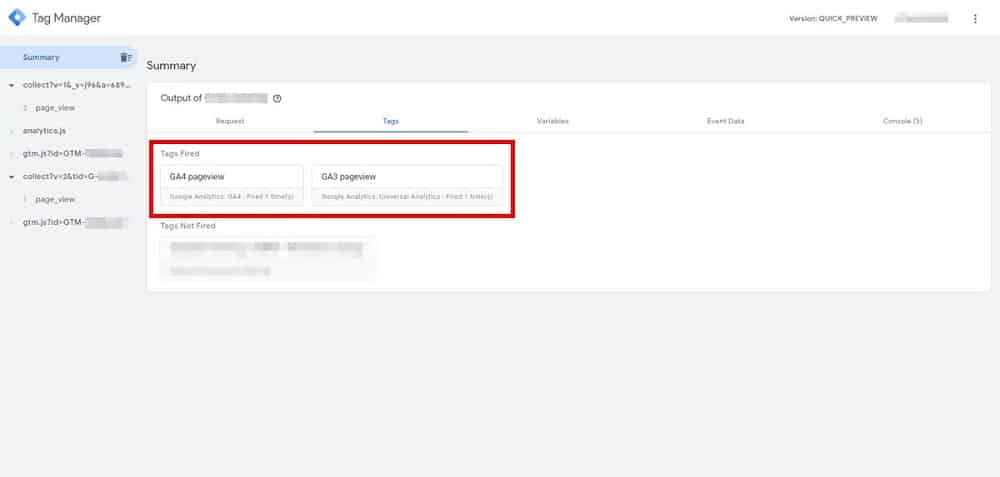
If everything is configured properly, the tags are fired. This means that pageview hits from the website are sent to the server, then sent to respective vendors in this case it’s Google Analytics.
Note that it might be different in your containers if the naming is different. Any custom HTTP request hits also get reported in the debug view.
How can you control data through server-side GTM?
After you set up server-side GTM, data is sent from the GTM client-side container to the server-side container. Once the request reaches the container, it can be modified before being sent to the third-party platform.
We’re able to modify data thanks to a feature called transformations. There are three different layers of transformations that let you control exactly what data gets sent to third-party platforms.
These enable you to decide what passes through, what gets blocked, and what gets modified
The three main transformation types are:
- Allow – Only let through what you approve.
- Exclude – Remove anything you don’t want shared.
- Augment – Add or modify information to enhance or fix your data.
Let’s look at each type of transformation in more detail and look at some use cases for each.
Allow
You might choose to allow only certain fields to be sent to a third-party platform. There are several benefits to this approach, including
- You have high control over the data you send.
- You can protect users’ privacy more easily.
- You alter the information you transmit in line with data privacy legislation.
There are also some drawbacks to this approach, including:
- You risk missing critical data impacting your tracking and attribution capabilities.
- This approach requires a lot of maintenance to keep up to date with changing parameters and data.
- It’s much harder to scale. You may need to create multiple allow lists for each vendor, which can be difficult to keep track of.
Example scenario
You could use the allow transformation to ensure that Facebook only receives the necessary fields. You’d simply input the parameters you’d wish to send (shown below).
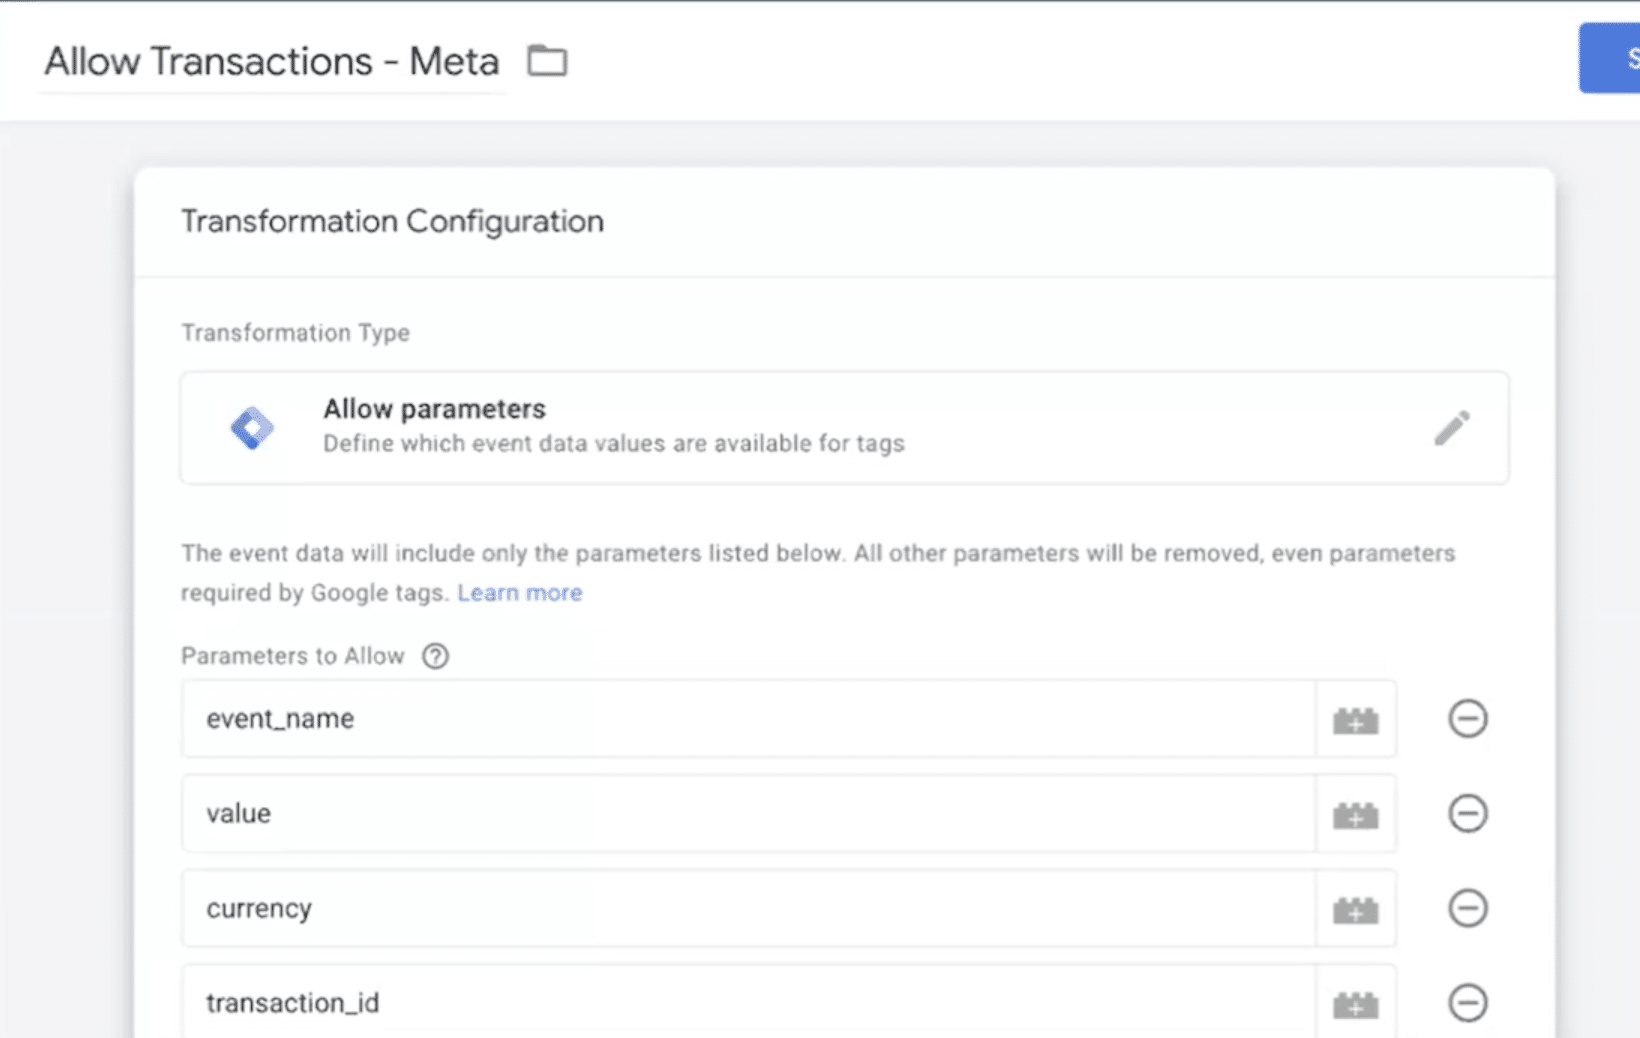
Note: For better tracking, it’s important to also add some additional parameters such as Facebook click ID and Facebook Pixel.

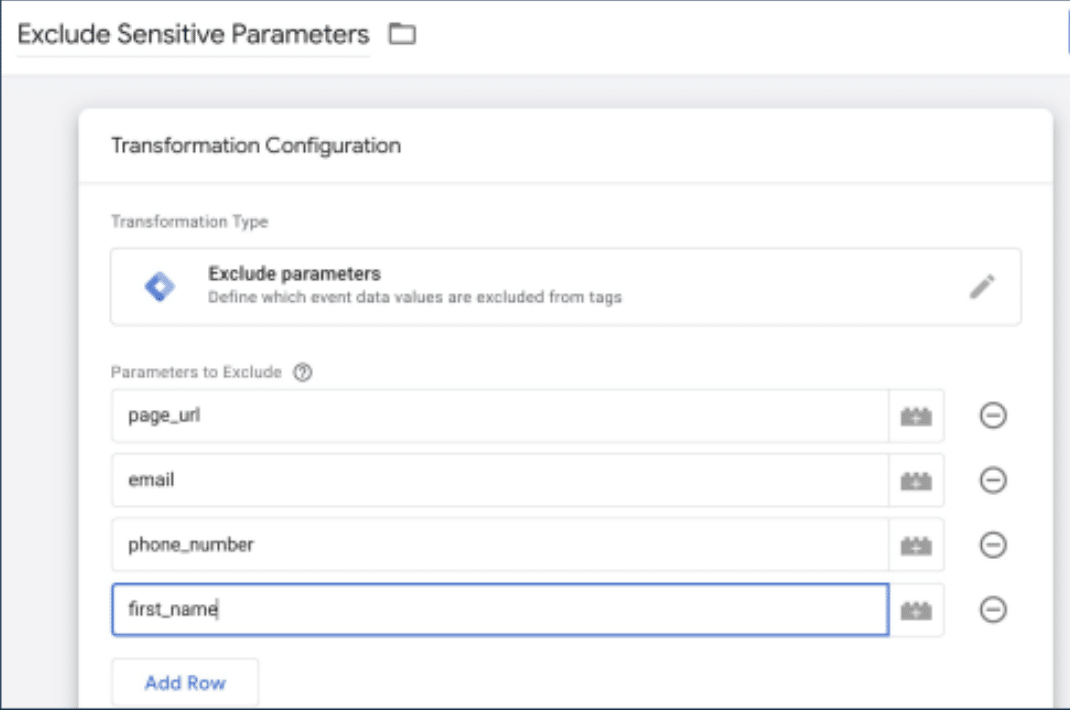
Exclude
The reverse of the allow transformation, exclude allows you to specify fields you don’t want to send to external sources.
This approach also comes with several benefits, such as
- It’s more flexible, as you only include parameters you don’t want to send.
- It makes it easier to meet data privacy legislation, as you can easily exclude fields that might impact compliance.
- Unlike allow, you don’t need to touch everything. You only need to focus on the fields that you don’t want.
Once again, there are some drawbacks to the exlude transformation. These are
- You need to know what bad data exists if you want to block it. There’s a risk you could miss something and fail to be compliant.
- It requires ongoing monitiring. As new forms and fields are added, you may need to update your exclusion list.
- There’s a risk you may accidentally exclude an important parameter (eg, GCLID) and damage your tracking.
Example scenario
Your CMS automatically injects email, full name & phone number directly into the page URL on send. Excluding this parameter ensures that Meta doesn’t receive unnecessary user data.
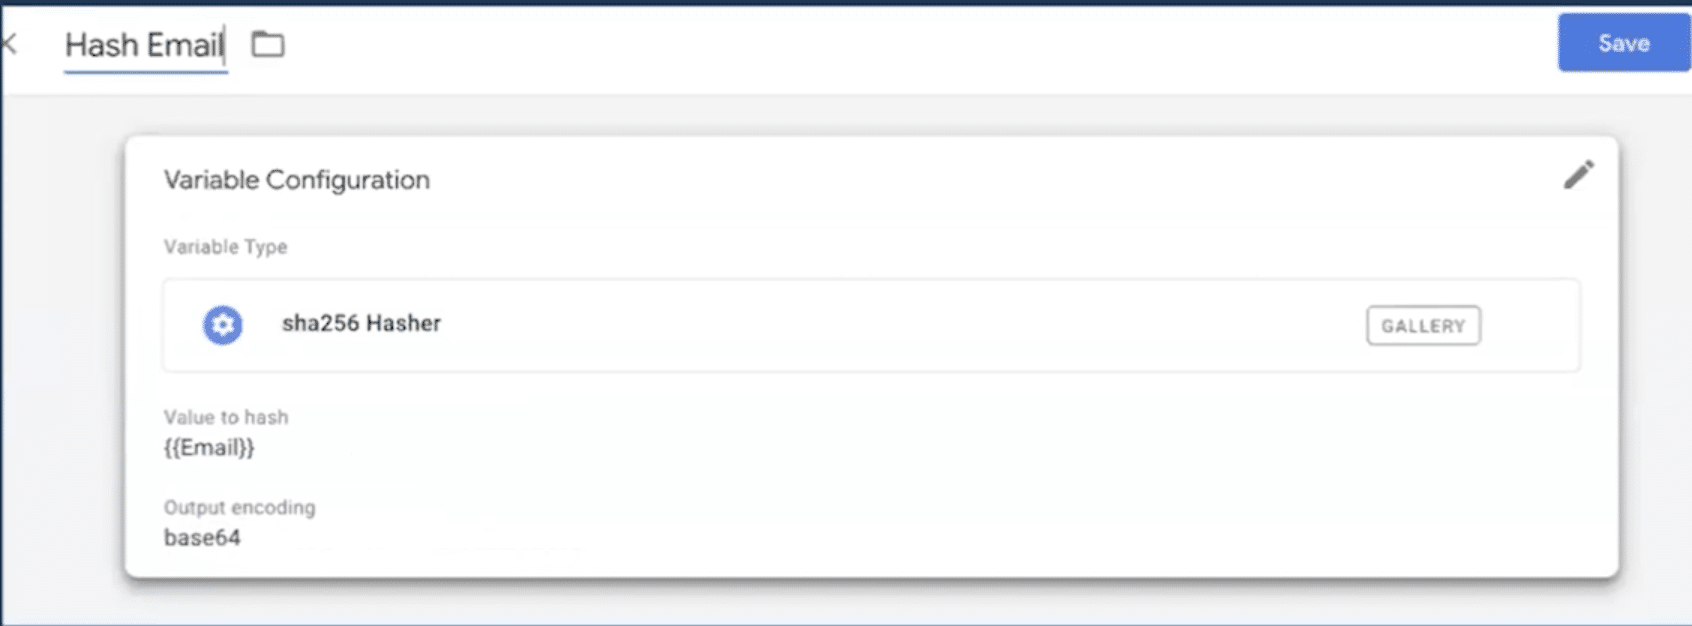
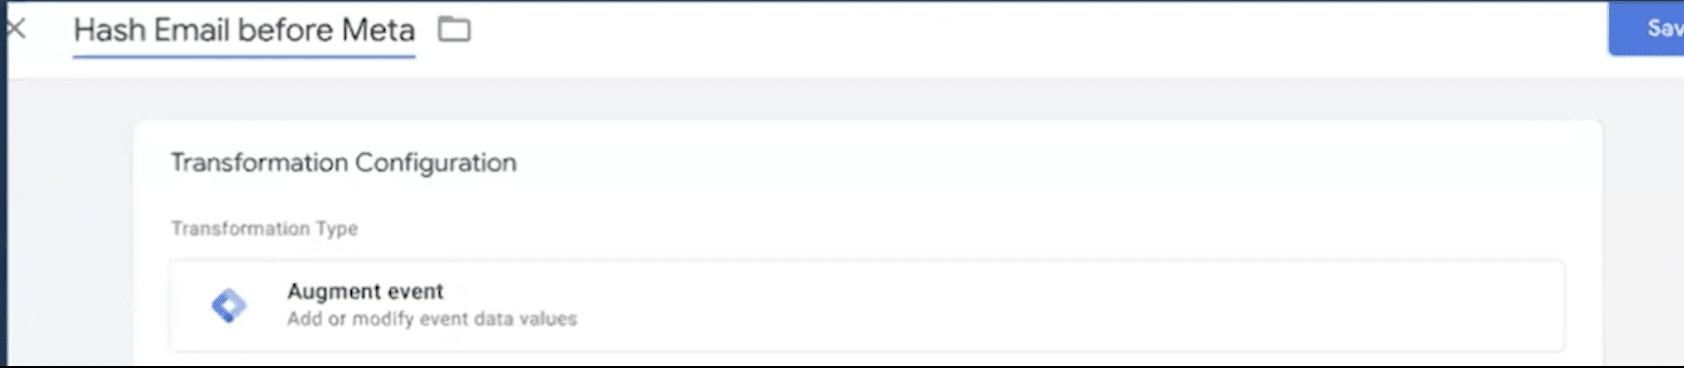
Augment
The augment transformation allows you to change data before it goes out. You can disguise data in a way that is valuable to you, but doesn’t reveal sensitive information to the platform.
As with other transformations, this brings many benefits, including
- This is a very customisable approach. You can change data feeds however you’d like (eg, hash IP addresses, add additional information, etc).
- You can fix different data gaps without exposing information to the client side.
- You can carry out data enrichment to make insights more robust.
Some of the drawbacks of augmenting parameters include
- The process of pulling in and enriching data can be highly complex.
- It requires a comprehensive setup.
- It’s easy to make simple mistakes that impact your insights.
Example scenario
Your client-side event is lightweight — it only sends a user_id (not email, not phone number). You want to send a hashed email for Enhanced Conversions to Meta or Google, but you don’t want to expose emails client-side. You can add via a query to the Firestore look-up table using user_id as a key.

Before you send an email to Enhanced Conversions, you may want to modify and hash the request with a SHA256.
What data do you need to send to third-party platforms?
You don’t need to send everything to get good attribution. There’s a lot of information contained within the client request that doesn’t need to be sent.
The essential fields are listed below
- GCLID / FBCLID (click IDs).
- Event names (like purchase, lead).
- Conversion value (optional but important).
- Timestamp.
- User identifier (hashed emails, if using Enhanced Conversions).
Remember, you are in control of your data. To create a healthy relationship with third parties, only send the necessary data.
Take control! Be smart!
Serverside provides governance, visibility, and control. Transformations are your toolbox for precision. So, why not take control of your data and start using transformations to your benefit?
Want more? Check out our blog on how to integrate GTM server-side and CAPI.
About the speaker
Josh Silverbauer is a strategist, creator, and Head of Analytics at From The Future. With over 10 years in marketing analytics and CRO, he helps businesses turn messy data into meaningful insights and better customer experiences. Blending comedy, music, and storytelling, Josh brings energy and clarity to every project he takes on.

- Top 24 Google Analytics Chrome Extensions & Sheets Add-ons - 21/05/2026
- Best Consent Management Platforms (CMP) - 19/05/2026
- Google Signals and Consent Mode: What This GA4 Change Really Means - 23/04/2026