A Comprehensive Guide for Creating GA4 Audiences | GA4 Guide

GA4 introduces an updated audience creation and analysis approach, offering marketers and business owners deeper insights into their target market. But what exactly are GA4 audiences, and why are they so crucial? If you’re looking for how to create and edit audiences, you can skip to that part here or by using the contents section.
What are GA4 audiences?
A GA4 audience represents a group or subset of users who share common characteristics or behaviours. These could be demographic details like age and location, or they can also be created based on specific actions they’ve taken on your website, such as purchasing a product or signing up for a webinar.
How does the audience differ from GA4 to UA?
If you’ve been using Google Analytics for a while, you might be familiar with Universal Analytics and its approach to audiences. As GA4 replaced Universal Analytics on July 1st, 2023, One might wonder how audiences differ from GA4 to UA.
Data model
GA4 utilises an event-based data model, while UA uses a session-based data model. So GA4 audiences are defined based on events, such as a user clicking a button or purchasing.
Universal Analytics defined audiences based on sessions, which are groups of events that occur within a specific time period.
Audience triggers
GA4 allows you to create audience triggers, which fire an event when a user meets certain requirements such as visiting your blog more than 10 times. This could trigger them to become classified as an engaged reader. Then you can use automation to send other promotional materials..
Real-time data
Unlike UA, where audiences are typically updated every 24 hours, GA4 provides real-time data, enabling quicker decision-making.
Integration with Google Ads account
GA4 audiences can be seamlessly integrated with Google Ads for retargeting, expanding the potential reach of your PPC campaigns. While there are many differences between GA4 and UA, GA4’s approach to creating audiences is more advanced, providing deeper insights and more customisation options.
Audiences vs. segments in GA4
In digital analytics, the terms “audiences” and “segments” often get used conversely. However, they have distinct meanings and applications in GA4.
Audiences in GA4
Audiences are groups of users defined by specific criteria. Once you create an audience, it starts collecting data from that point onward. For instance, you might create an audience of users who visited a particular product page but didn’t make a purchase.
Segments in GA4
On the other hand, segments are subsets of your data, allowing you to create reports in GA4 separately from the rest of the data. Unlike audiences, segments are retroactive. This means that when you create a segment, it applies to all your historical data. For example, you might segment your data to view the behaviour of users from a specific country or those who use a particular device.
Difference between segments and audiences in GA4
While utilising Google Analytics 4, you might have noticed similarities between segments and audiences. Here’s a breakdown to help clarify the distinctions:
Purpose and usage
The primary difference between audiences and segments is their application. Audiences are designed to be shared across Google’s advertising products for targeted ads. In contrast, segments are more about analysing specific subsets of data within GA4 exploration reports. The advertising aspect is the main difference here.
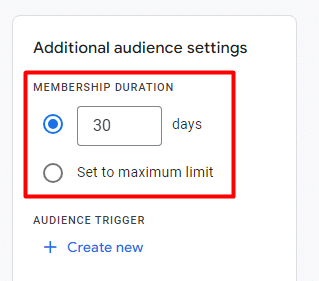
Membership duration
Audiences have a membership duration, which indicates how long a user can be part of that audience. This feature is not present in segments. Membership duration in audiences is often tied to sales cycles, ensuring that ads are relevant to users during appropriate periods. For instance, if you’re promoting a movie, you wouldn’t want to advertise it once it’s no longer in theatres. Conversely, your ad duration might be longer if you’re selling houses.
Retroactivity
Unlike segments, GA4 audiences are not retroactive. This means that once you create an audience, it starts accumulating users from that point forward based on the specified criteria.
Builder interface
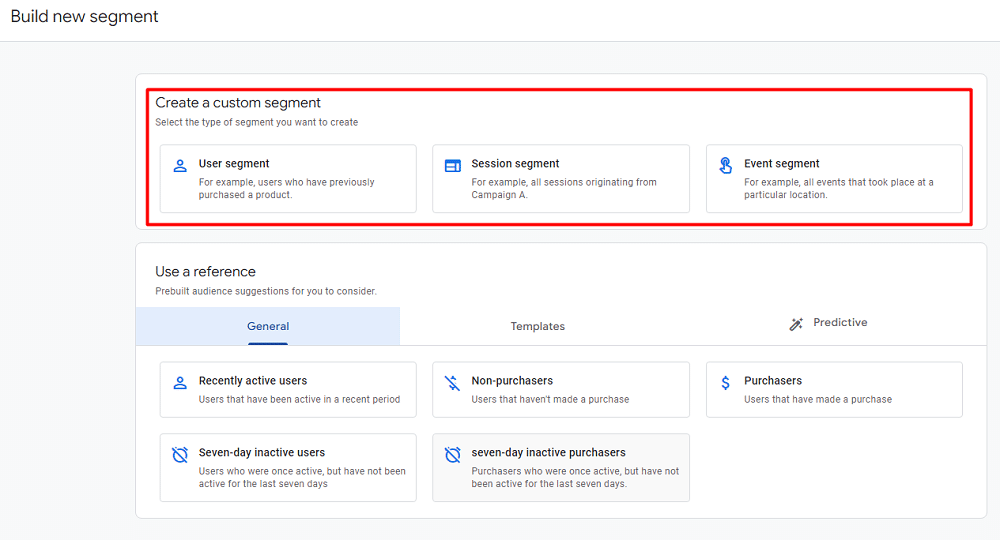
When creating a new segment or audience in Google Analytics 4, you’ll notice that their builders look strikingly similar. However, there are subtle differences. For instance, when creating a custom segment, you’ll see options like User Segment, Session Segment, and Event Segment.
Creating and customising audiences in GA4
Google Analytics 4 (GA4) offers a versatile approach to audience creation. There are primarily two methods to craft audiences in GA4: through segments within Exploration reports or by navigating to Admin > Data display > Audiences. Let’s clarify both options.
How to create an audience from segments
In GA4, segments are pivotal in refining your data, allowing you to acquire more profound insights into specific user behaviours. Segments are available within explorations and can be converted into audiences. Let’s look at how to do that.
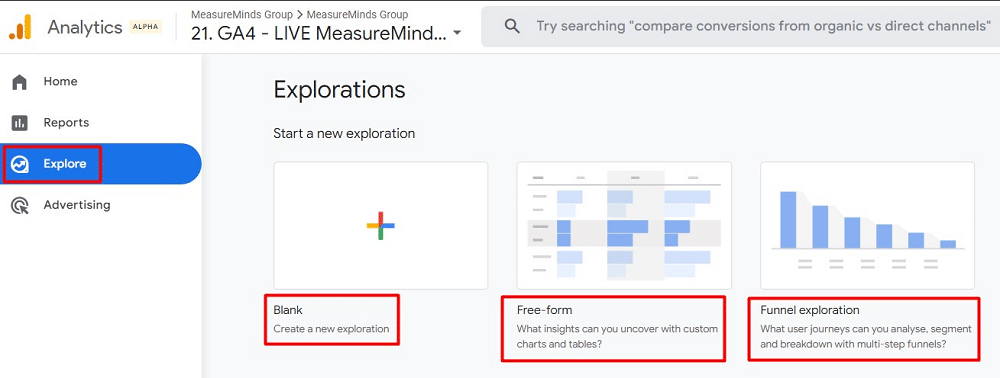
Step 1. Accessing segments in explorations
Navigate to the ‘Explore‘ section on the left side of your GA4 account’s interface. Here, you can select any option from ‘Blank‘, ‘Free form‘, ‘Funnel exploration‘ and other available explorations.
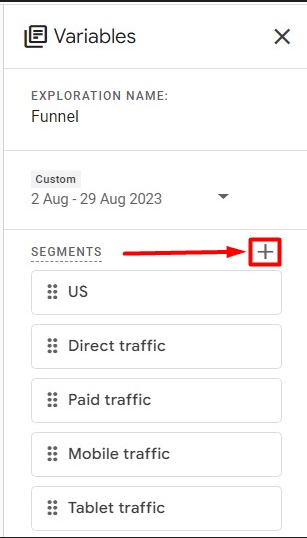
Step 2. Initiating segment creation
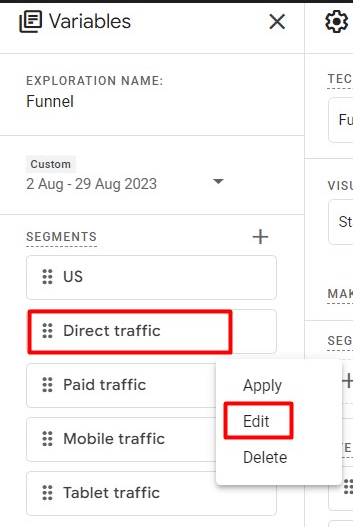
You’ll find the ‘Segments‘ section in the’ Variables’ column inside an exploration report. Click on the plus(+) icon to create a new segment.
If you’ve previously created segments and wish to convert them into audiences, click on the three dots adjacent to them and select ‘Edit‘.
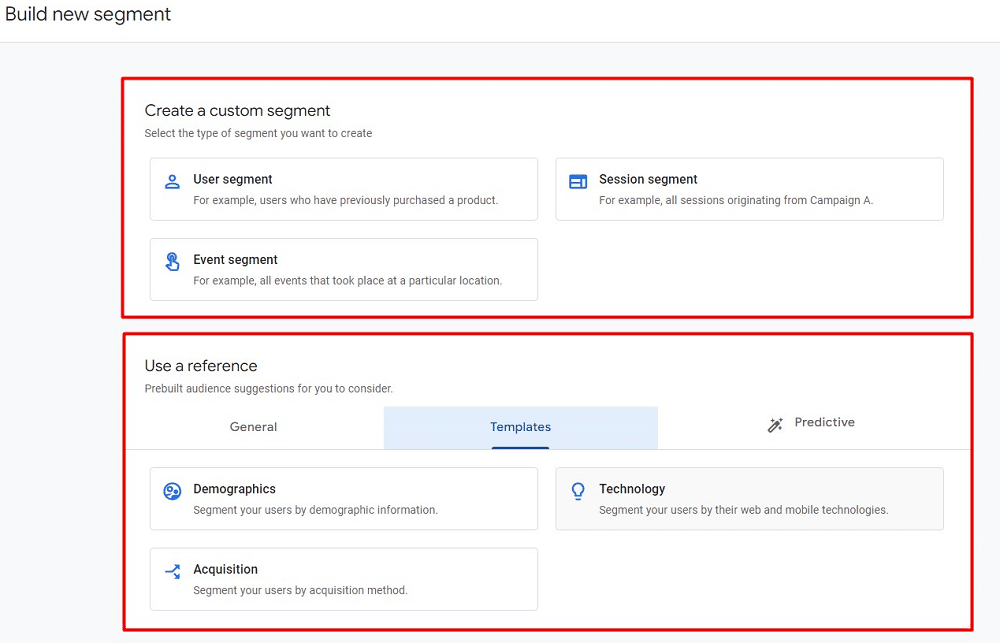
Step 3. Selecting segment types
When initiating segment creation, you have two primary options. For those looking to design a segment tailored to specific needs, ‘Custom Segments’ is the way to go. Alternatively, GA4 offers suggested segments, which are pre-defined templates based on common user behaviours and patterns.
If you’re modifying an existing segment, it’ll take you directly to the segment builder. For a deeper understanding, additional resources on segments from Google are available.
Step 4. Building an audience from segments
There’s a ‘Build an audience‘ checkbox on the right side of the segment builder. Ticking this box reveals additional settings, allowing you to define a user’s duration in the audience once they meet certain criteria. The duration can range from a minimum of one day to a maximum of 540 days.
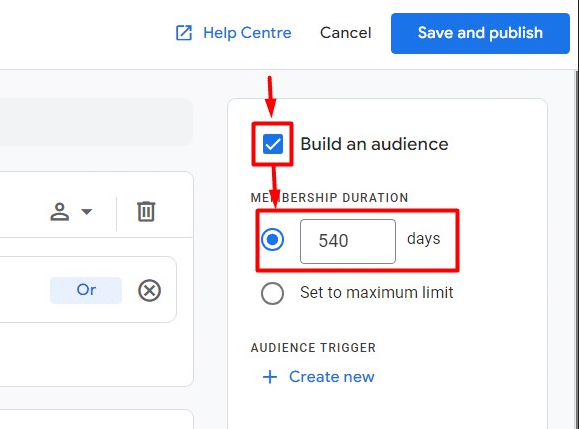
The ‘Audience trigger‘ is another crucial setting. This feature will be will be discussed later in the article.

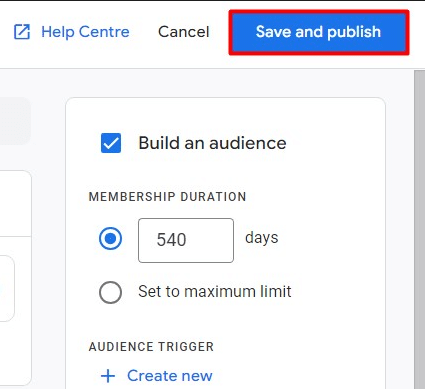
Step 5. Saving and data accumulation
Once you save your segment, an audience generates automatically. It’s essential to note that audiences begin accumulating data from the point of creation and are not retroactive. It means past data won’t be included in the audience.
The right side of the audience builder offers a preview of the estimated audience size. However, it’s vital to understand that these numbers are based on the last 30 days and are merely estimates for audiences.

Set up an audience in GA4.
Google Analytics 4 offers two primary categories for audiences: Predefined Audiences and Custom Audiences. There are 2 ways to set up custom audiences in GA4. Let’s delve into each of them.
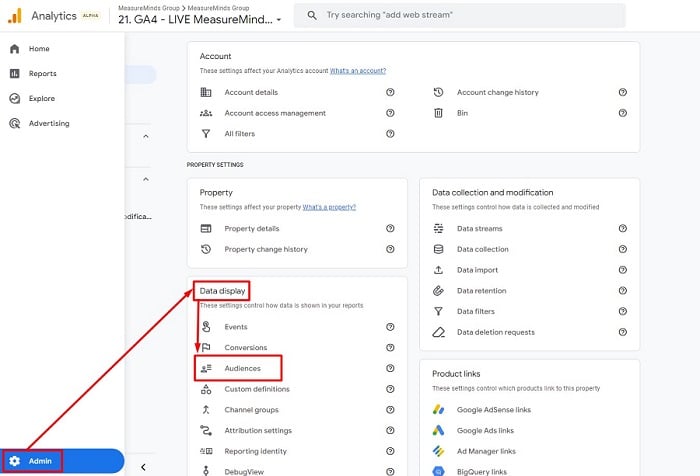
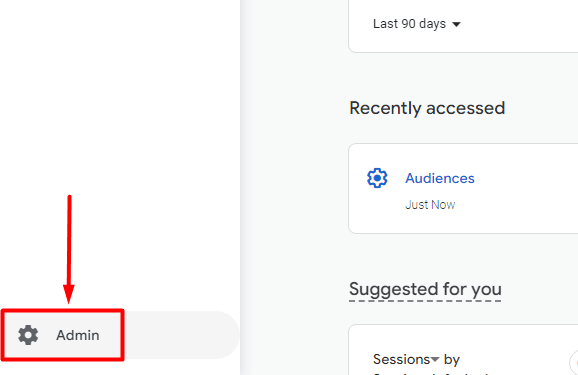
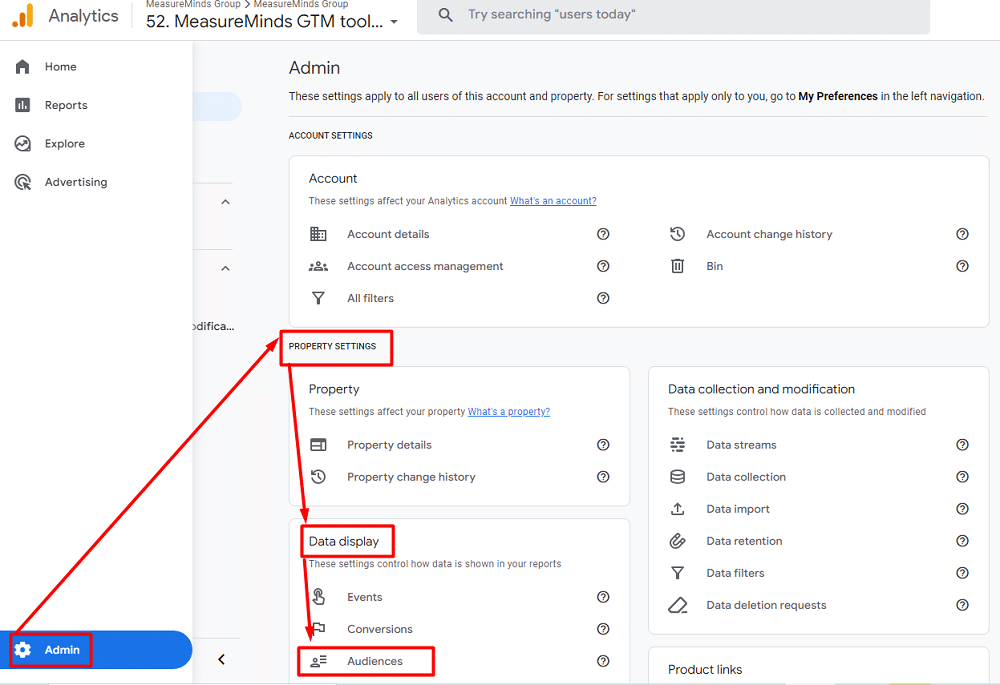
First, head over to the “Admin” section. From there, click “Audiences” under the “Data display” section.
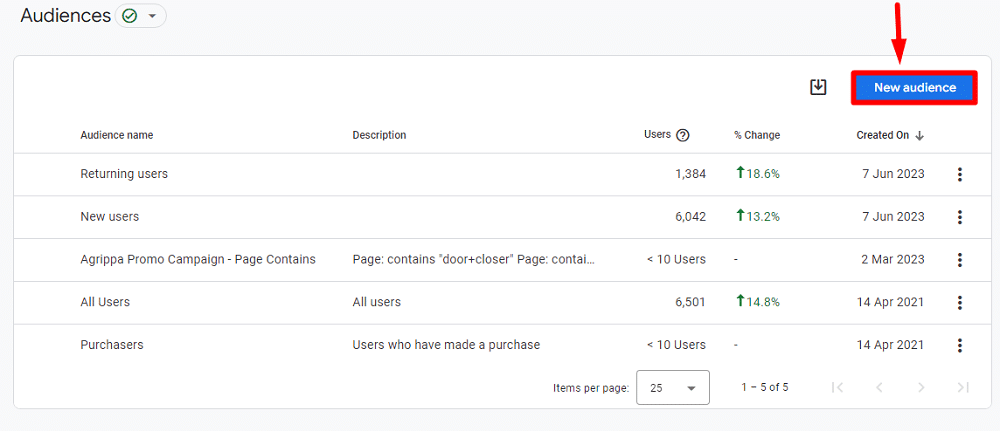
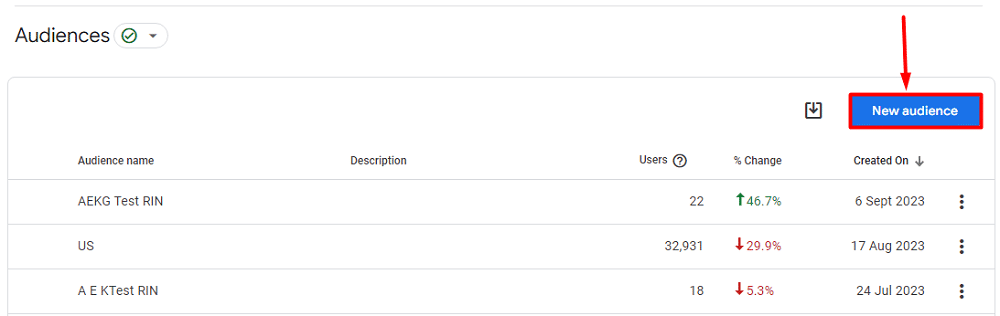
Click on the ‘New audience‘ option from the next window.
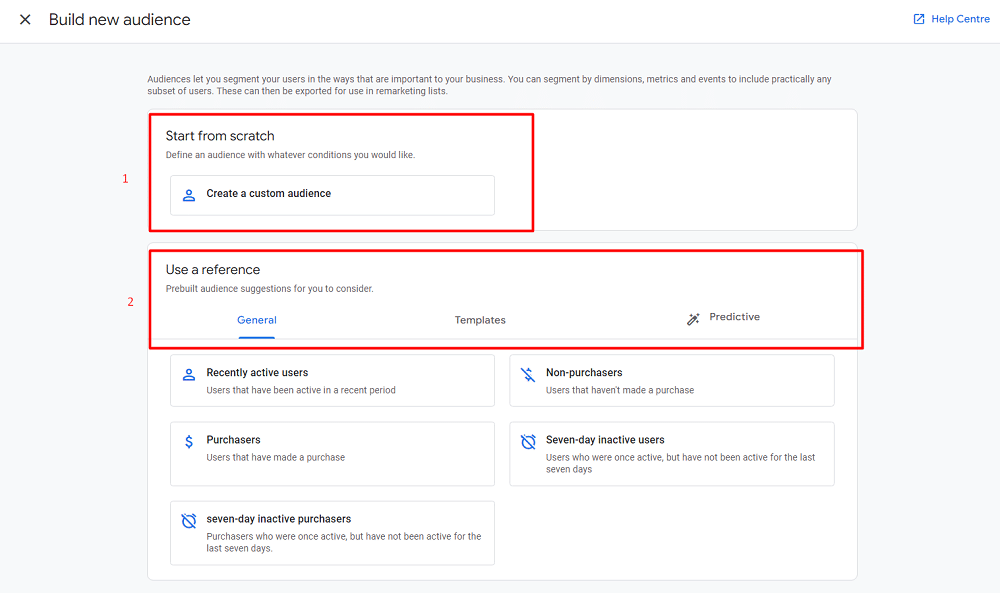
Now, You’ll see 2 choices that you can choose from to create a new audience:
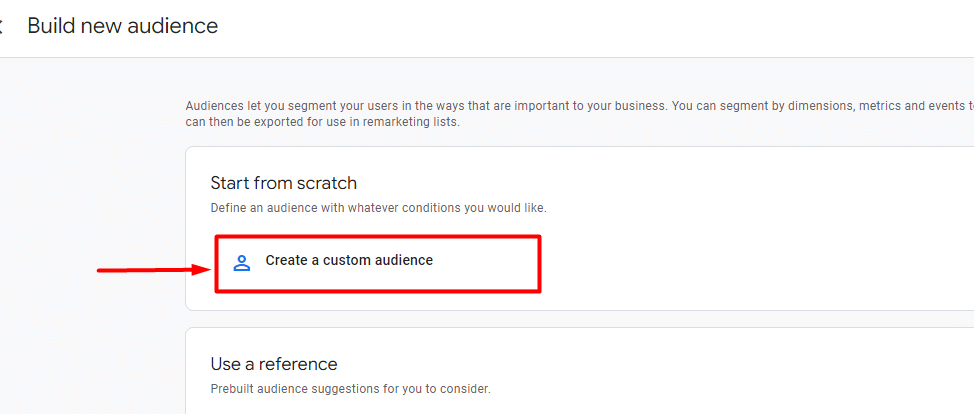
- Start from scratch: If you want to start from the ground up, then select this option to create a new audience.
- Use a reference: Alternatively, you can leverage Google’s prebuilt audience suggestions, which might already align with your requirements or can be tweaked for a quicker setup.
Building a custom audience
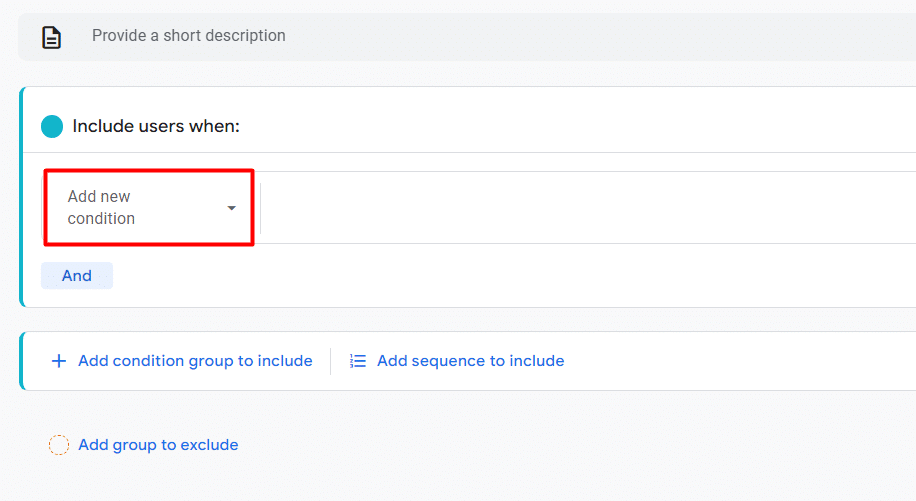
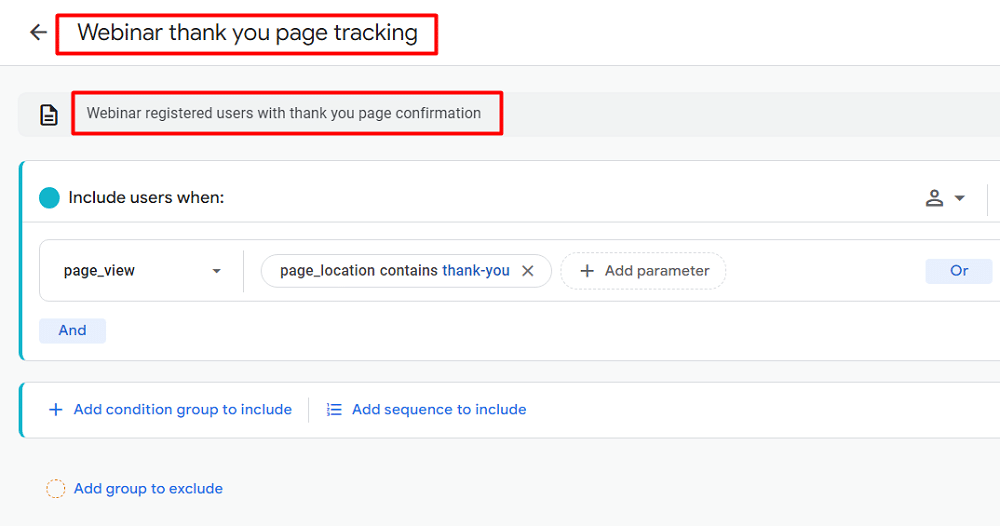
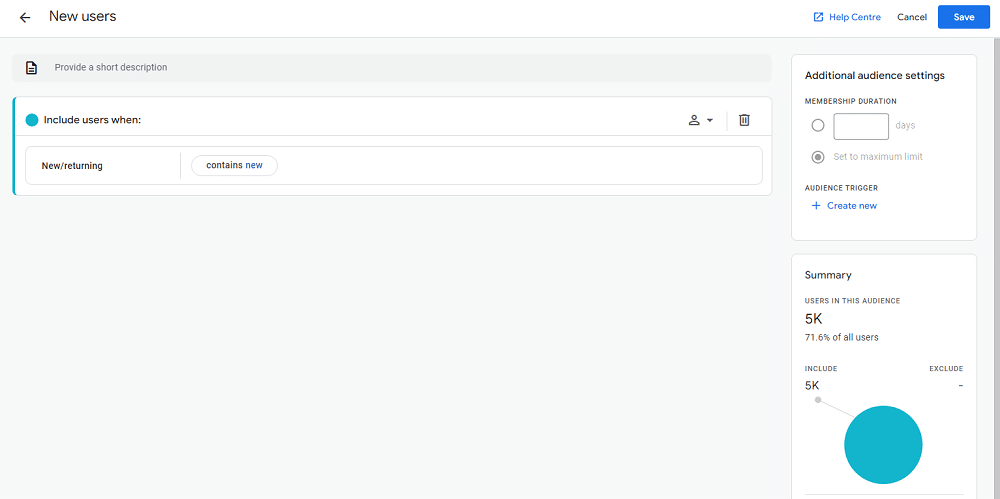
Let’s say you want to monitor users who’ve registered for a webinar, and you didn’t enable form submission tracking. In such cases, the ‘thank-you’ page can serve as an indicator of successful sign-ups. In the Audience builder, click ‘Create a custom audience.‘

From the next window, click ‘Add new conditions‘.
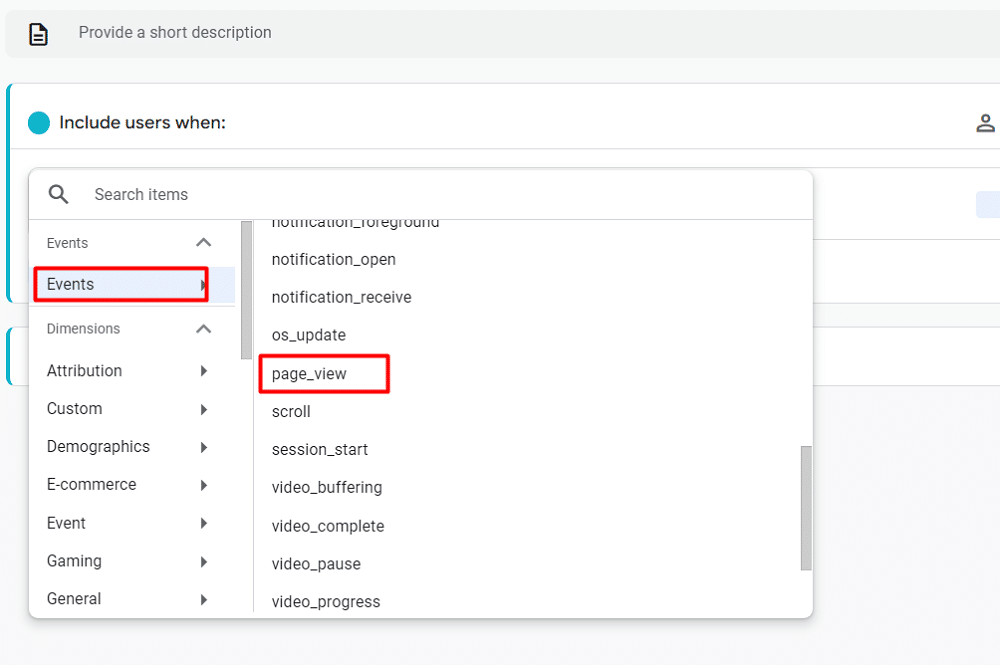
Under Events, choose the ‘page_view‘ event.
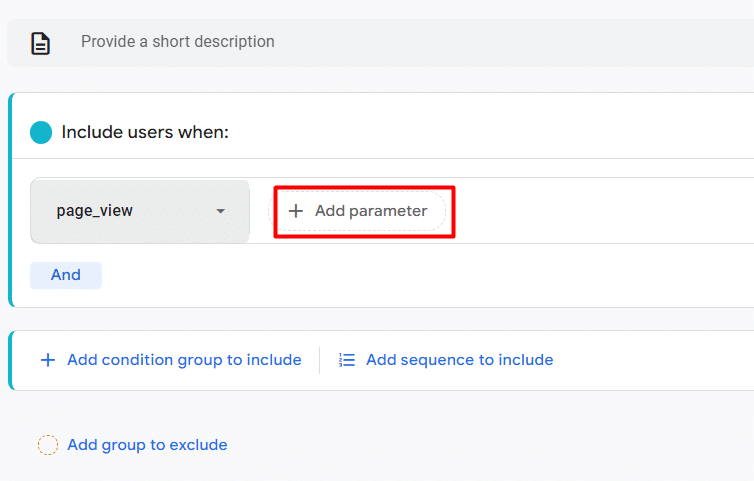
Then add a parameter by clicking on ‘+ Add parameter.‘
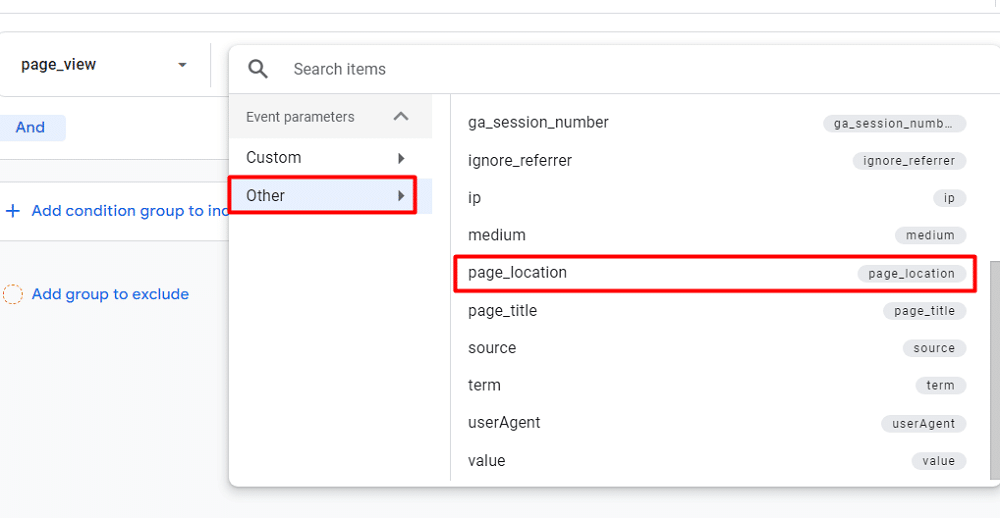
Go to ‘Other‘ & choose ‘page_location‘ as the parameter.
As we are tracking a thank-you page. So we can set the condition to “thank-you” and click “Apply“.
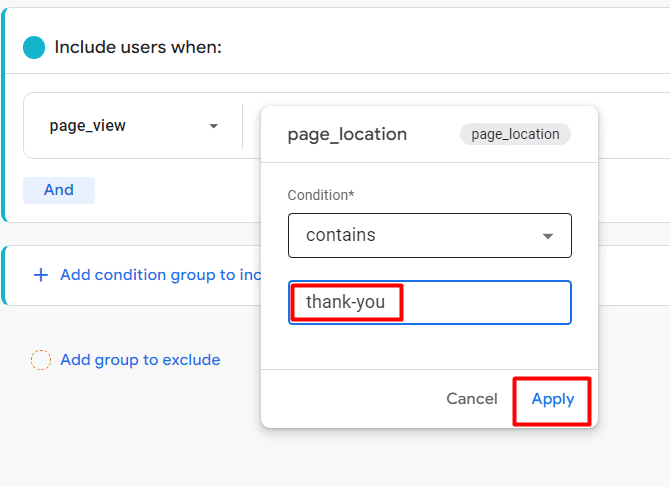
If you have multiple ‘thank-you‘ pages, ensure your conditions are specific to capture the right audience. Name your audience and save it. You can also add a brief description for future reference.
Using an audience reference
Under the prebuilt audience suggestions section, you might find a suggested audience that aligns with your business objectives. These can be modified as per your needs. There are 3 types of prebuilt audience suggestions you can choose from:
- General
- Template
- Predictive Audience
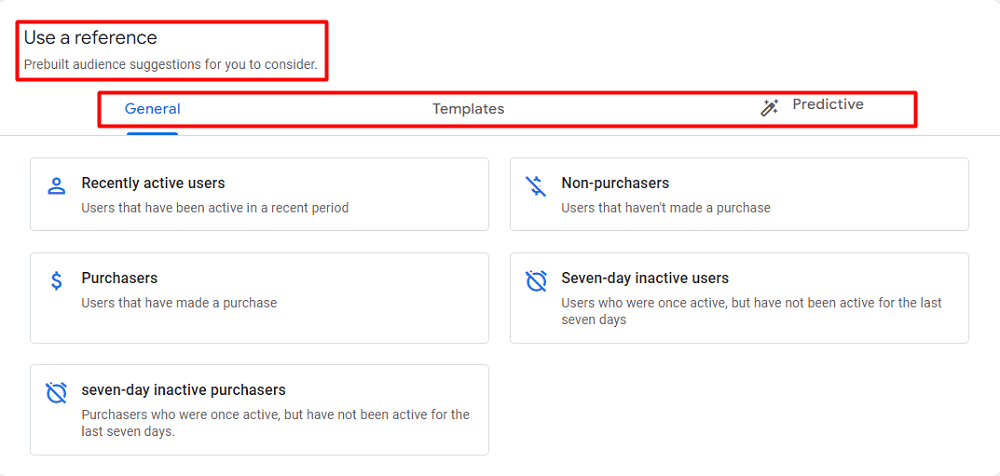
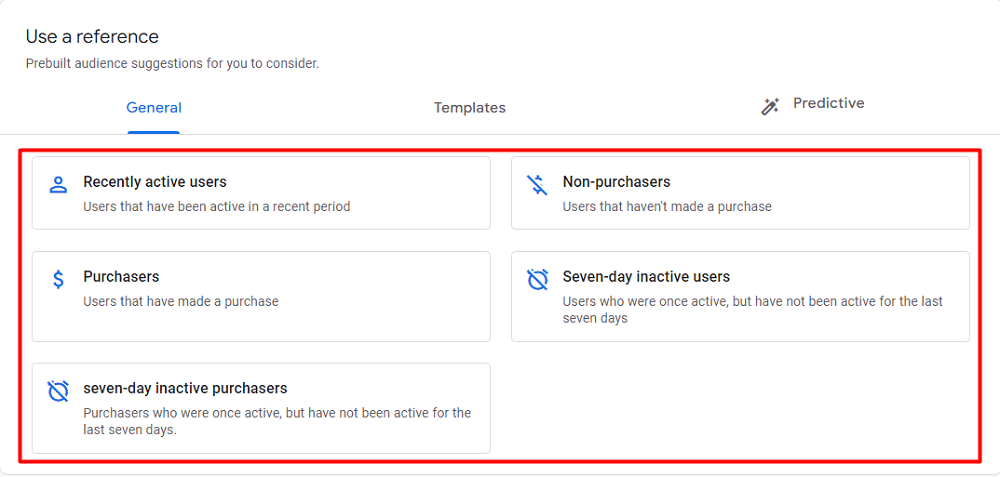
General audiences
General prebuilt audiences are a set of audiences that are automatically created by Google Analytics 4 based on common user behaviours. These audiences can be used to understand your users and their activities and to create targeted marketing campaigns.
The following are the general audiences available in GA4:
- Recently active users
- Purchasers
- Non-purchasers
- seven-day inactive purchasers
- seven-day inactive users
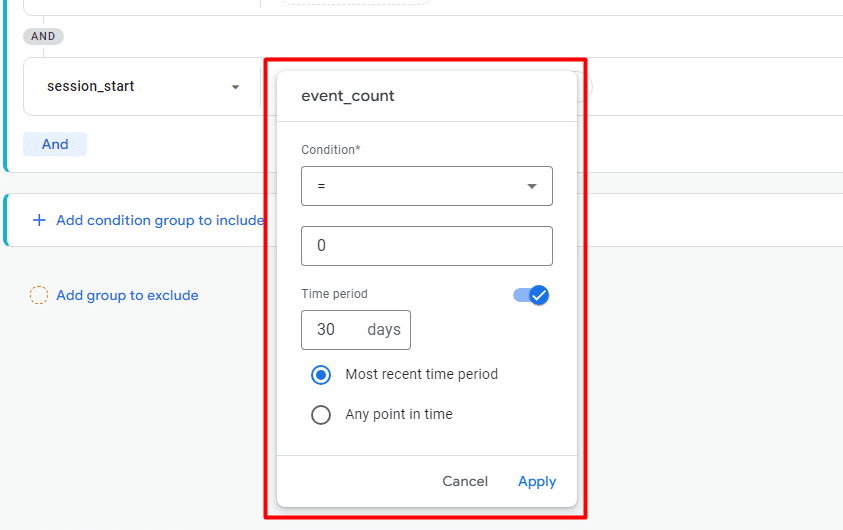
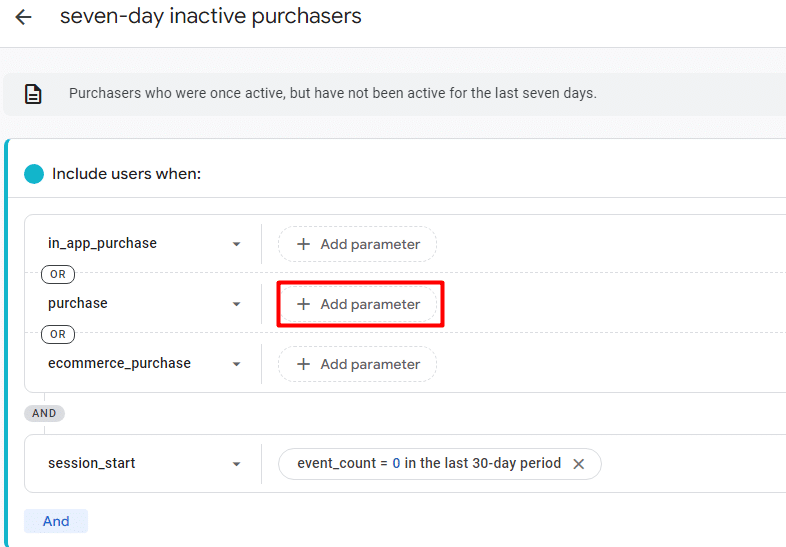
Imagine you run an e-commerce platform that sells skincare products. One of your best-selling items is a facial serum that, on average, lasts about a month. You want to remind and encourage customers to repurchase this serum or related products once they’re likely to be running low. Here’s how you can tweak the “seven-day inactive purchasers” audience in GA4 for this purpose. Once you select that general audience, it’ll take you to a page as the following:
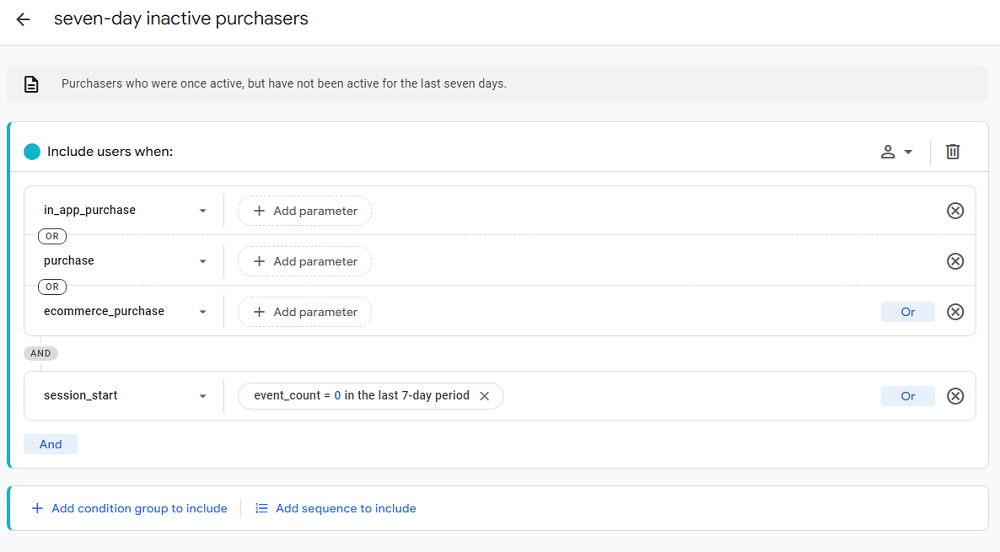
Now you need to make some changes. First, change the “event_count” parameter of “session_start” to a 30-day period.
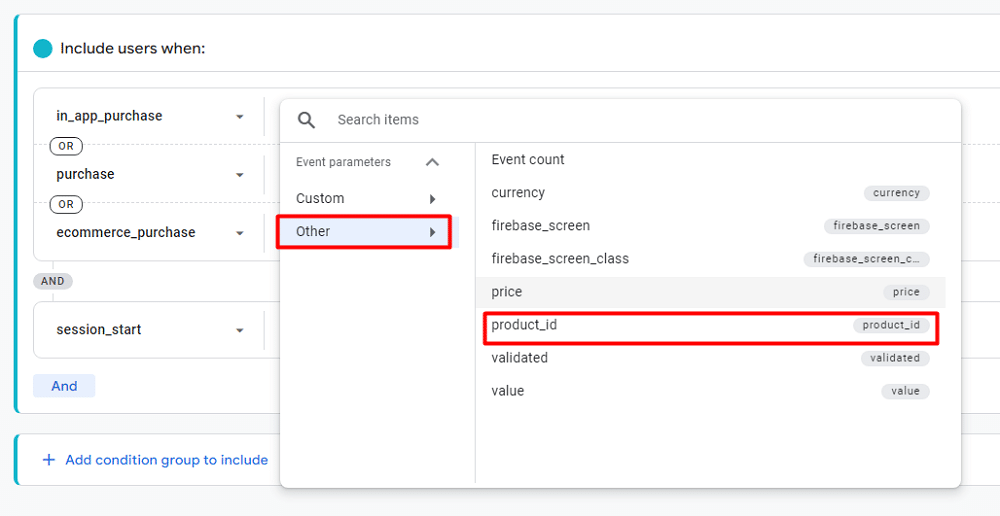
Next, you need to refine the audience further to include visitors who purchased your facial serum. To do that, click on “+ Add parameter”
Now go to “Other“, & from the drop-down list of parameters, select “product_id“.
Since we’re interested in a specific product, the condition will be “exactly matches (=)”. In this case, we assumed the product ID is “99”.
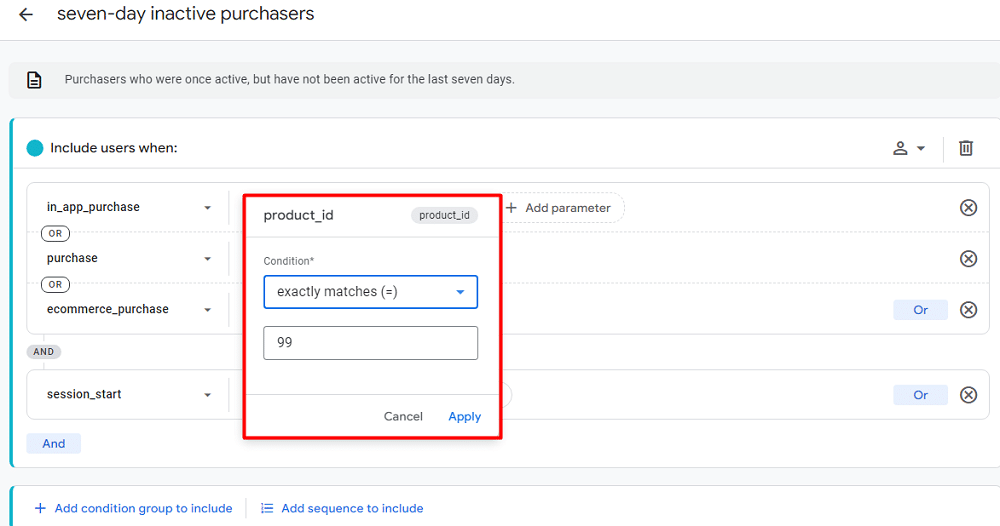
You can now rename your audience and hit “Save“. This is one way to utilise the general prebuilt audience. There are many different use cases, so have a play around and try them out.
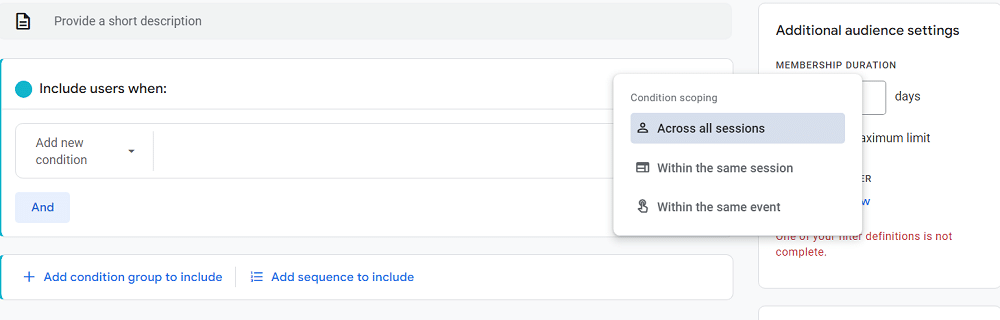
You can further refine your marketing strategies using the condition scoping feature of GA4. This feature allows you to specify the extent to which the conditions for a segment apply, offering you more control over audience segmentation. Here are the types of scopes you can utilise.
- Within the same event: This scope ensures that all specified conditions are met during a single event. For example, if a user views a product and adds it to the cart in one event, they meet the conditions.
- Within the same session: Conditions set with this scope must be fulfilled within a single session. This is ideal for tracking behaviours in a single visit, such as viewing a product and completing a purchase before the session ends.
- Across all sessions: This scope tracks whether the set conditions are met at any point during the user’s lifetime. This could be useful for identifying long-term behaviours, such as repeat purchases over the user’s lifetime.
By applying these scopes, you can create segments that are as broad or as narrow as your strategy requires. For instance, if you wish to engage users who viewed the facial serum and made a purchase within the same session, you would set the scope for the first condition (view product page) to “Within the same event” and the scope for the second condition (make a purchase) to “Within the same session.”
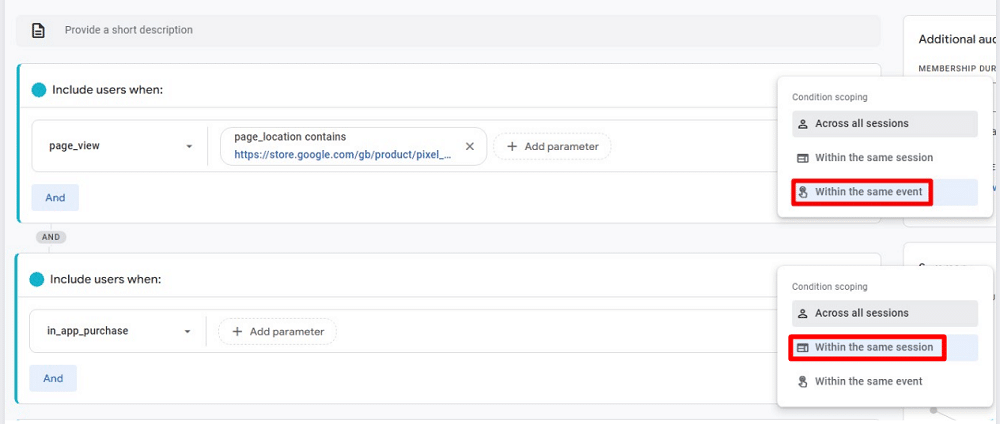
This precise segmentation ensures that your marketing efforts are focused on users already demonstrating a high intent to purchase.
Audience templates in GA4
These templates help marketers and analysts quickly create audiences without starting from scratch.
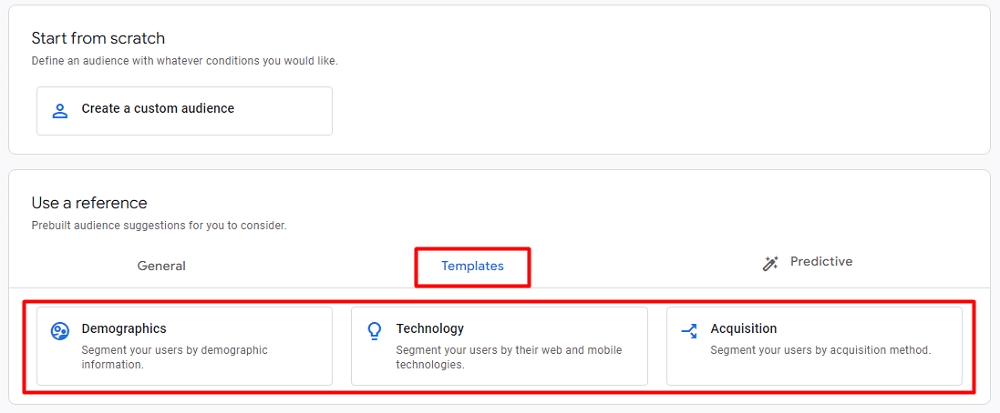
Here’s a deeper dive into the three primary types of audience templates available in GA4:
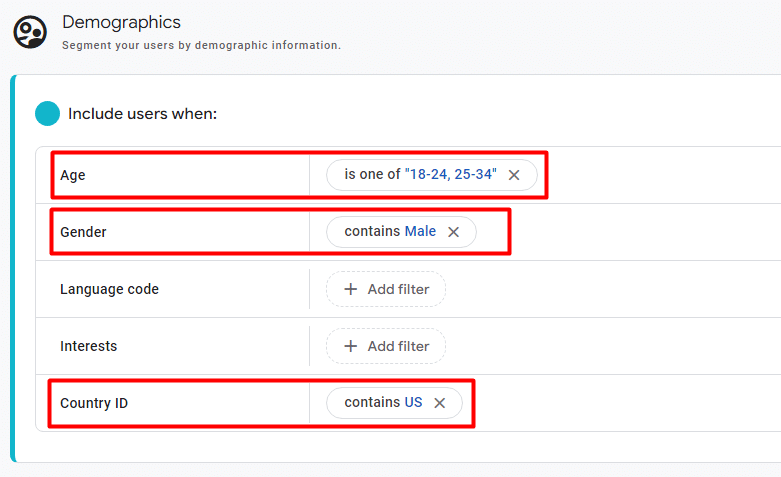
Demographics
Demographics templates allow you to segment audiences based on user demographics like age, gender, and location. Utilising this information can enhance your understanding of your audience and facilitate the creation of targeted marketing campaigns.
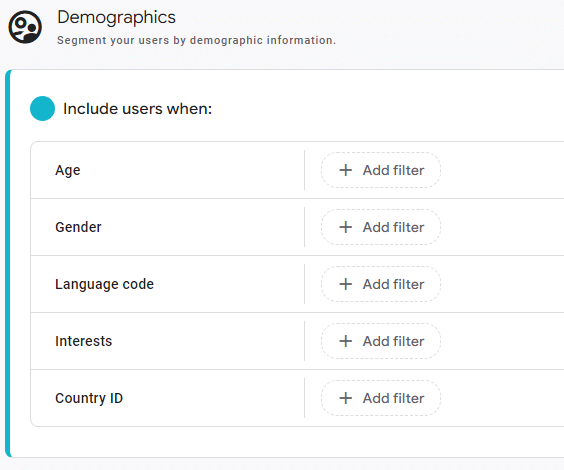
Imagine you want to target a younger demographic for a new product launch. With the Demographics template, you can easily create an audience containing users aged 18 to 34. On top of that, your products are specifically for men in the United States. You can tweak the demographic template to target that exact audience.
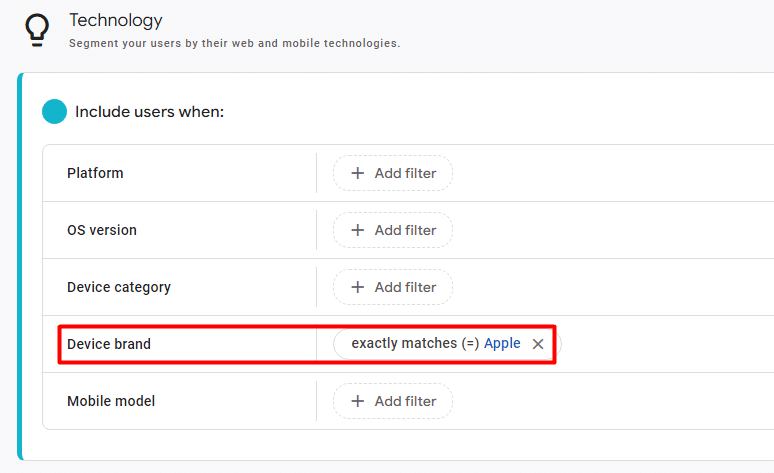
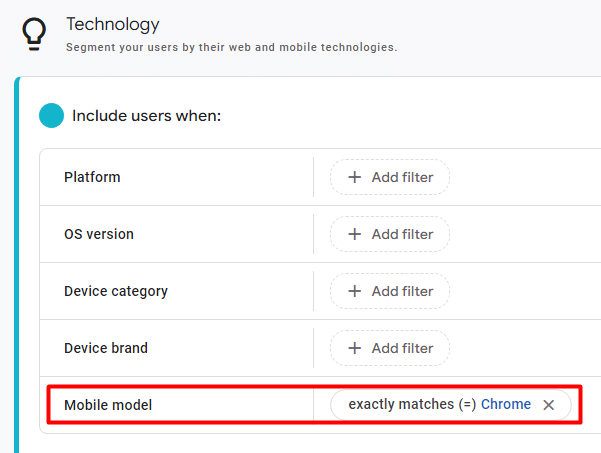
Technology
With Technology templates, you can create audiences based on user technology attributes, including device type, browser, and operating system. This segmentation is particularly useful for troubleshooting technical issues and ensuring your website or app’s compatibility across various devices and browsers. Suppose you’ve developed a new feature for your mobile app and want to test its functionality on iPhones. Using the Technology template, you can create an audience of iPhone users.
Alternatively, if you’re running a browser-specific promotion, you can target users predominantly using the Chrome browser.
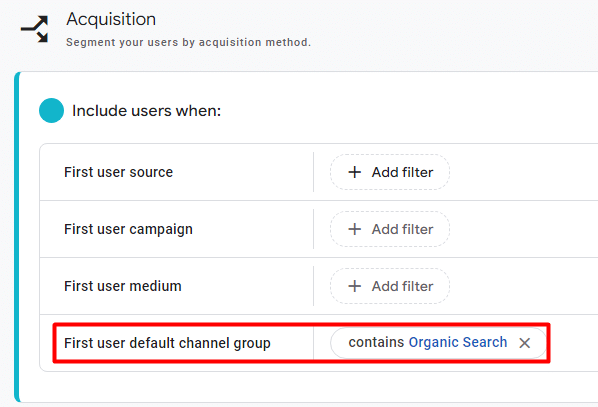
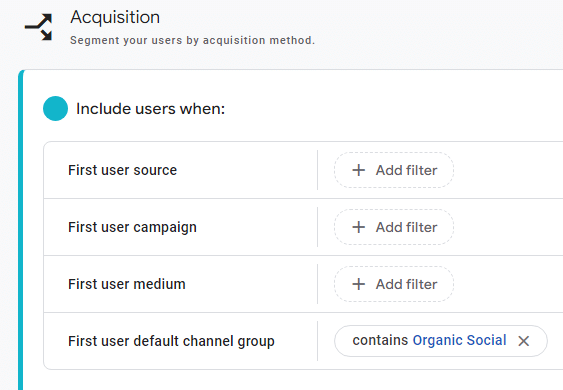
Acquisition
Acquisition templates help you segment audiences based on their acquisition channels, such as search, social media, or referrals. This data provides insights into the most effective marketing channels driving traffic to your site or app. If you’re running a campaign to boost your website’s organic traffic, you can use the Acquisition template to create an audience of users who discovered your site through search engines.
On the other hand, if you’re analysing the impact of your social media campaigns, you can segment users who landed on your site from platforms like Facebook or Twitter.
Predictive audiences in GA4
GA4 can identify users with a high probability of certain behaviours, either purchasing or churning, especially those in the top 10%. Here are the suggested predictive audiences:
- Likely 7-day churning purchasers: These are purchasing users who are not likely to visit your website or app in the next 7 days.
- Likely 7-day churning users: Users who are not likely to visit your website or app in the next 7 days.
- Likely 7-day purchasers: These users will likely purchase on your website or app in the next 7 days.
- Likely first-time 7-day purchasers: These users will likely make their first purchase on your website or app in the next 7 days.
- Predicted 28-day top spenders: Users predicted to generate the most revenue in the next 28 days.
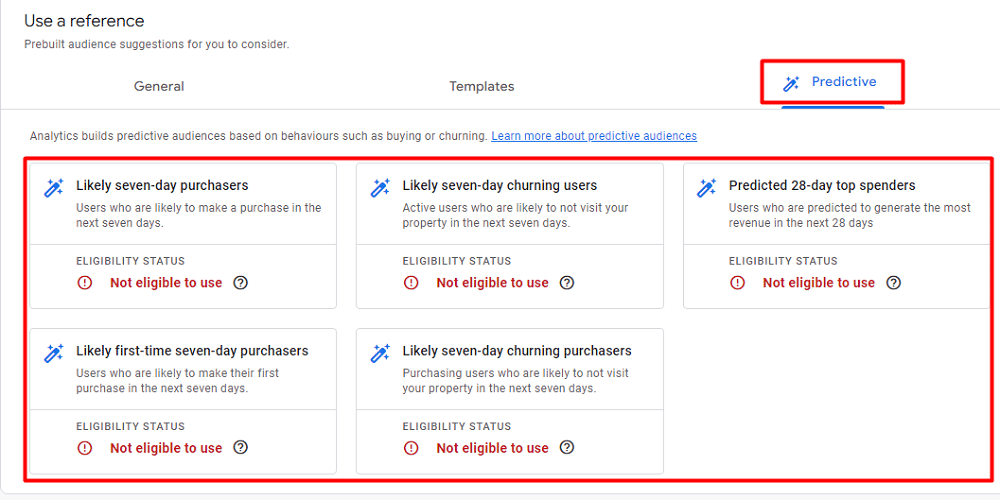
Predictive audiences in GA4 empower businesses to be proactive rather than reactive. By anticipating user behaviours, businesses can craft more effective, targeted, and timely marketing strategies that resonate with their audience and drive desired outcomes.
How to view, edit, duplicate, and delete Audiences in GA4
After setting up an audience, you may want to view its details, edit its attributes, duplicate it for similar tracking, or even delete it altogether. Here’s a step-by-step guide to assist you in these tasks:
How to view your GA4 audience details
Follow the steps to view a specific audience’s details or report comprehensively.
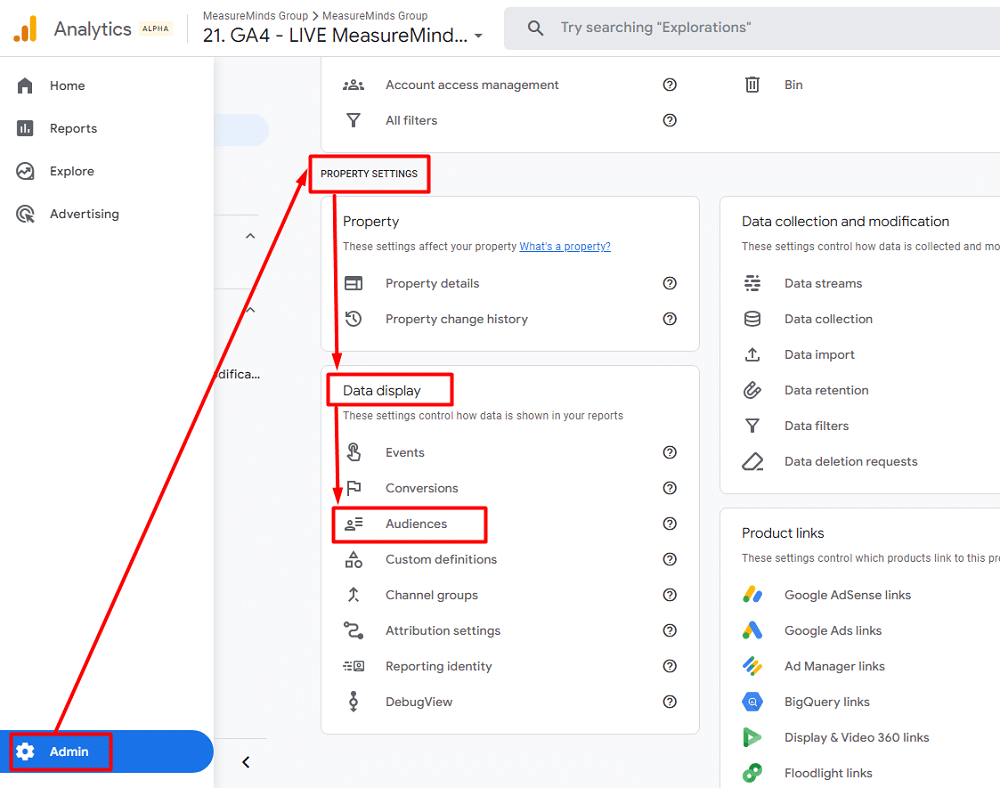
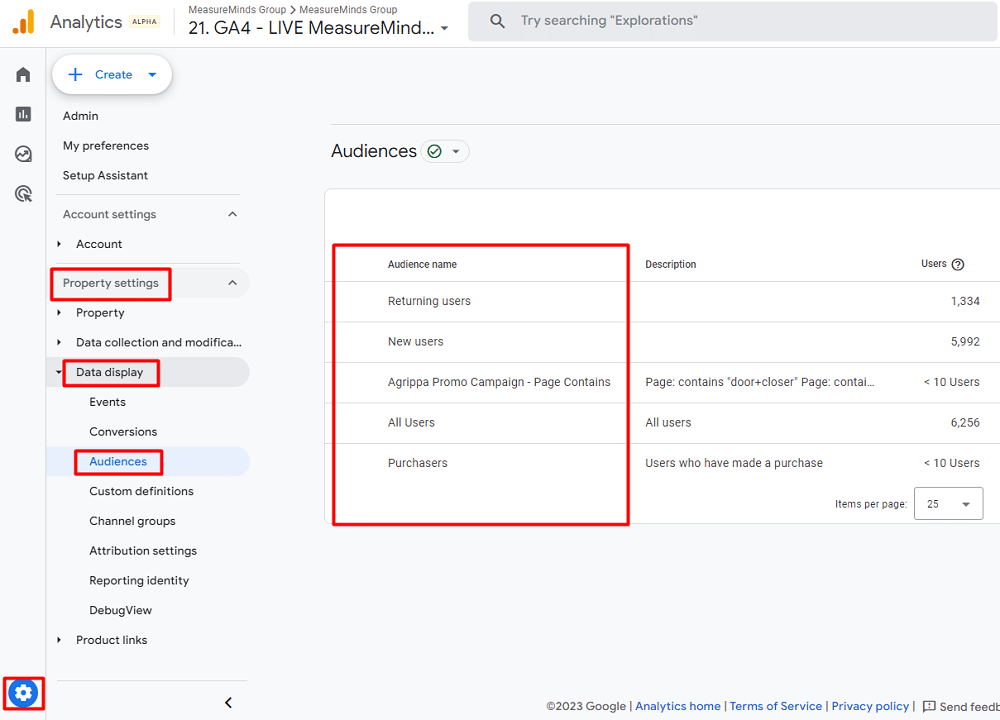
Step 1: Navigate to the “Admin” section of your GA4 account.
Step 2: From the next window, Head over to the “Property Settings” section. Then Click “Audiences” from the “Data Display” section.
Step 3: Click on your desired audience.
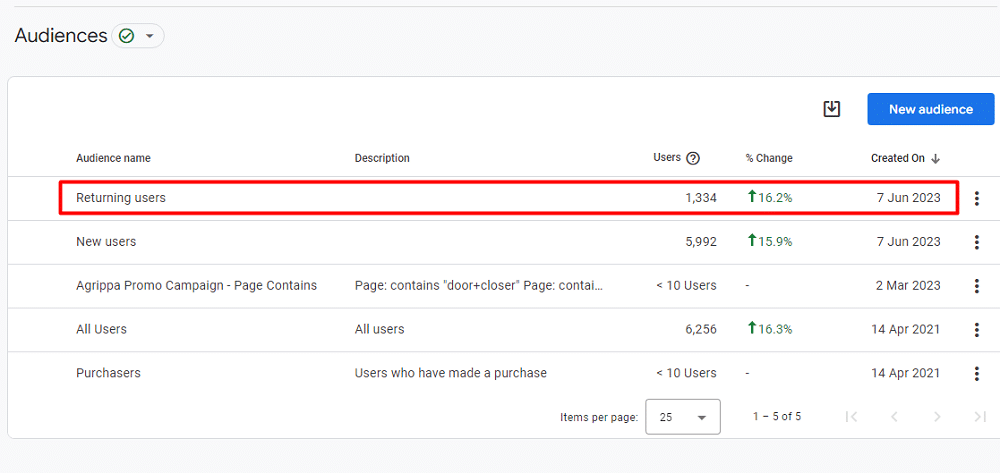
Once you click, it’ll take you to another window with an overview report of that particular audience.
How to edit your GA4 audience
GA4 sets certain limitations when it comes to editing an audience. Once an audience is created, you cannot modify its conditions, primarily because audiences are not retroactive. However, there are some basic details that you can edit, such as:
- Changing the audience name.
- Updating the description.
- Adding an audience trigger (if it still needs to be done).
You can go through the following steps to make these edits:
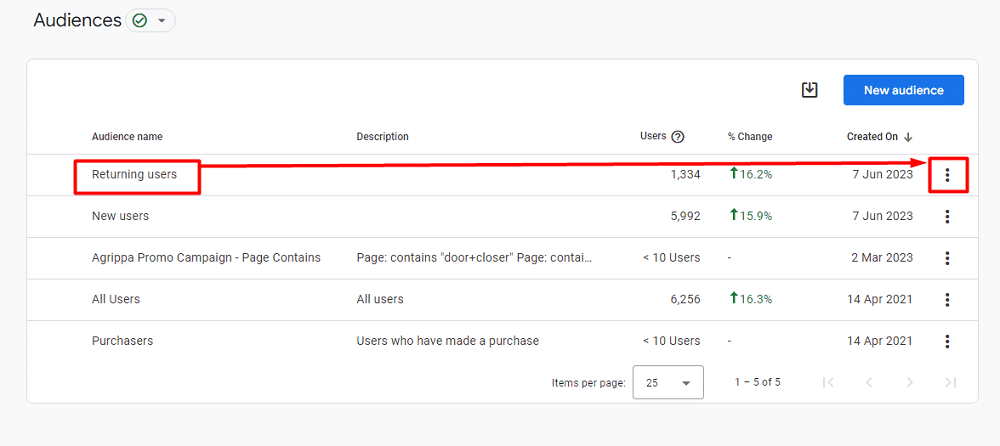
Step 1. Go to “Admin“, followed by the “Audiences” subsection under “Property settings“.
Step 2. Beside the audience you wish to modify, click on the three-dot menu.
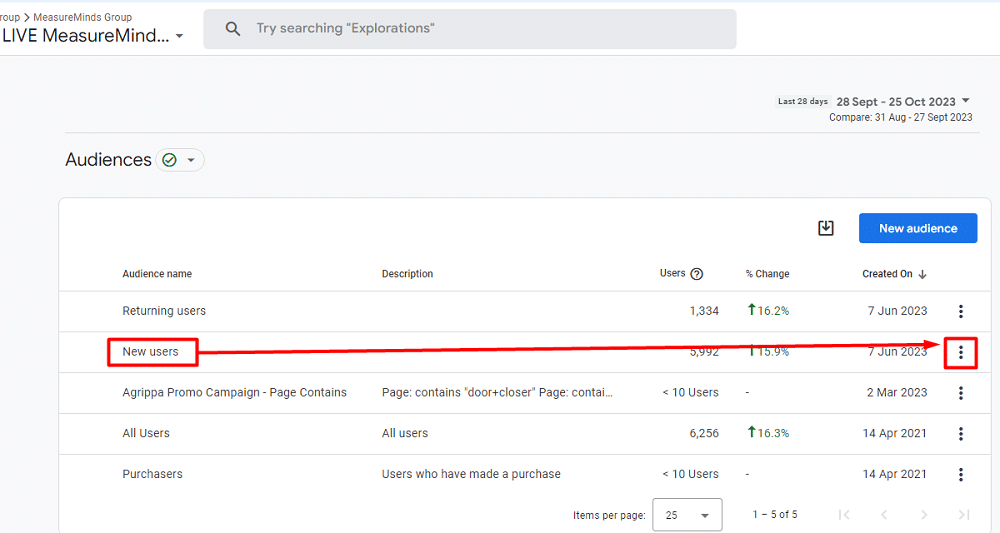
Step 3. Select the “Edit” option from the pop-up list.
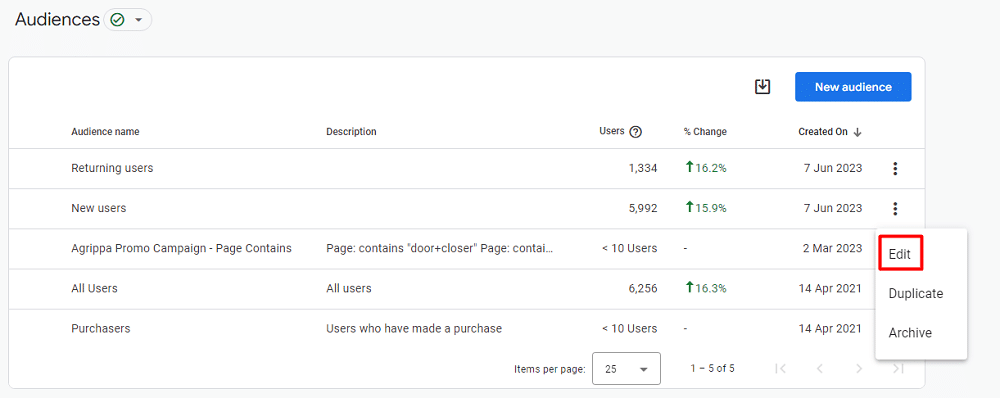
Clicking “Edit” will direct you to the audience/segment builder, where you can make the desired changes.
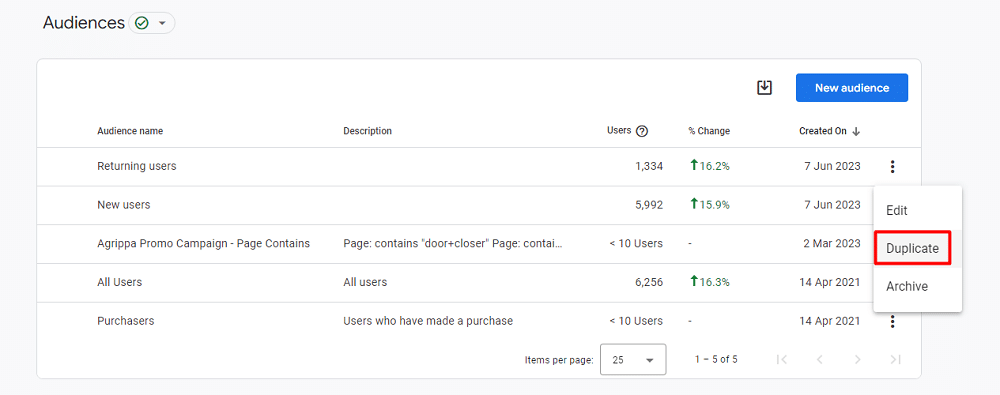
How to duplicate an audience in GA4
Duplicating is a handy feature, particularly when you want to create a similar audience with slight changes. However, remember that a duplicated audience is also NOT retroactive. Here’s how to copy Google Analytics audiences:
Step 1. Navigate to “Admin” and then to “Audiences” from the “Property settings” section.
Step 2. Click on the three dots next to the audience you want to duplicate.

Step 3. Choose the “Duplicate” option for the pop-up.
How to archive (delete) a GA4 audience
When you want to remove an audience from your GA4 view, you essentially archive it:
Step 1. Head over to the “Admin” section. Then proceed to “Audiences” under “Property settings”.
Step 2. Click on the three-dot menu next to the audience you wish to delete.
Step 3. Finally, select the “Archive” option.
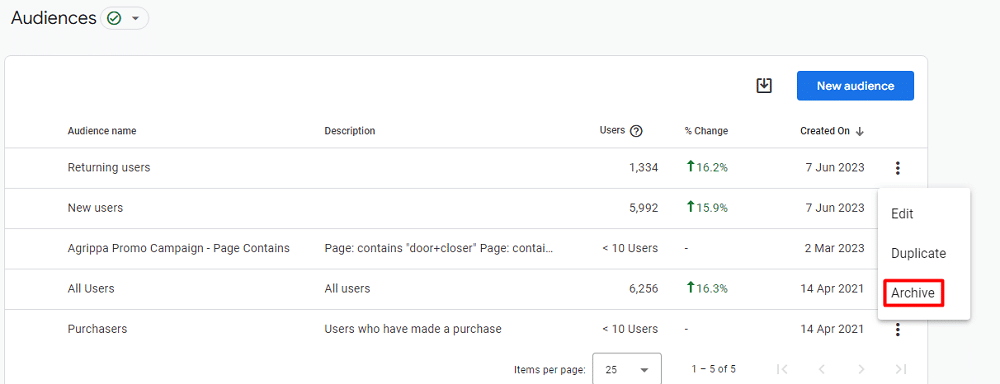
Note: It’s crucial to understand that the archive an audience in GA4 is akin to deleting an audience. Once archived, the audience will no longer be active, but you can restore it if needed.
Where and how GA4 audiences can be used
GA4 reports
One of the primary utilities of audiences is within your GA4 reports, including the Explorations feature. Here’s how you can leverage them:
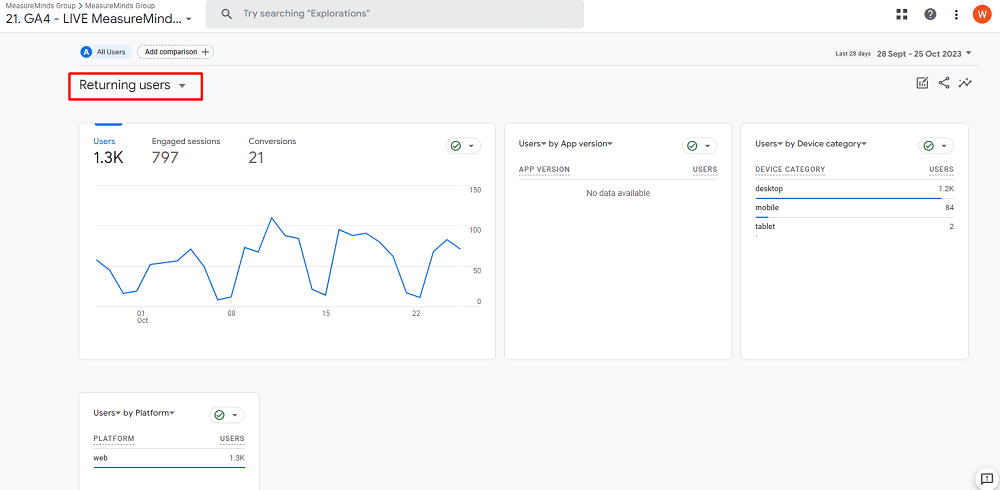
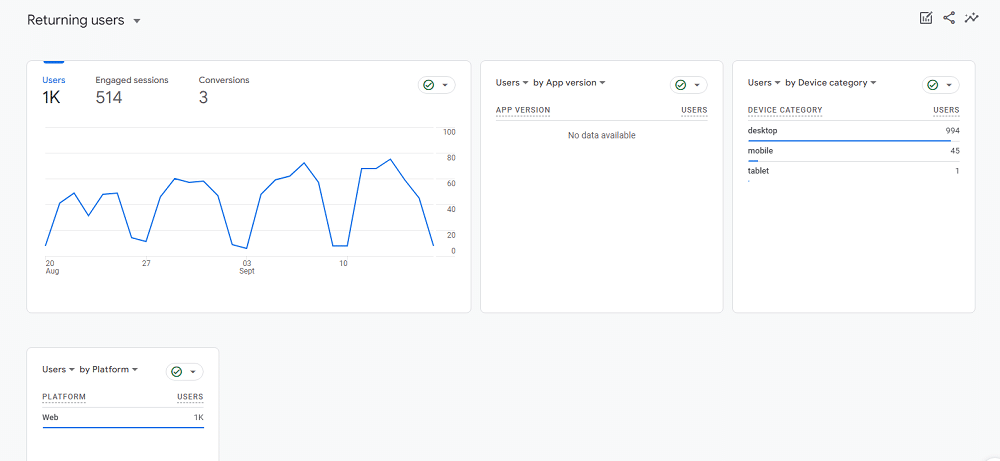
Audience overview
This provides a snapshot of your audience’s behaviour. It’s a basic setup that showcases metrics like the number of users, engaged sessions, conversions, and the devices they use. To access, navigate to Admin → Property settings → Data display → Audiences.
When you click any of the audience from the list, it will take you to a report page.
Comparisons
This feature lets you filter reports based on specific audience subsets. For instance, you can compare users’ behaviour using audiences. Click on the Comparisons icon in any GA4 report, then select your desired audience dimension and values.

Advertising campaigns
You can share audiences with Google’s advertising products, such as Google Ads, Display & Video 360, and Search Ads 360. Ensure your GA4 property is linked to Google Ads Links in the Product Links section to facilitate this.
Utilising audiences for remarketing
Remarketing is the art of re-engaging potential customers who have shown interest but have yet to convert. Sometimes, despite potential customers showing genuine interest in your product or service, they may need that little nudge to convert.
How to set up custom remarketing audiences in GA4?
GA4 offers a distinctive feature that allows marketers to create an audience based on specific sequences and exclusions to target these potential converters.For example, you can identify and target users who added a product to their cart but have yet to purchase within a determined time.
Step 1: Navigate to the “Admin“, then select “Audiences” from the “Data display” section, which is under the “Property settings“.
Step 2: From the next window, click “New audience.” button.
Step 3: Progress by choosing the “Create custom audience” option.
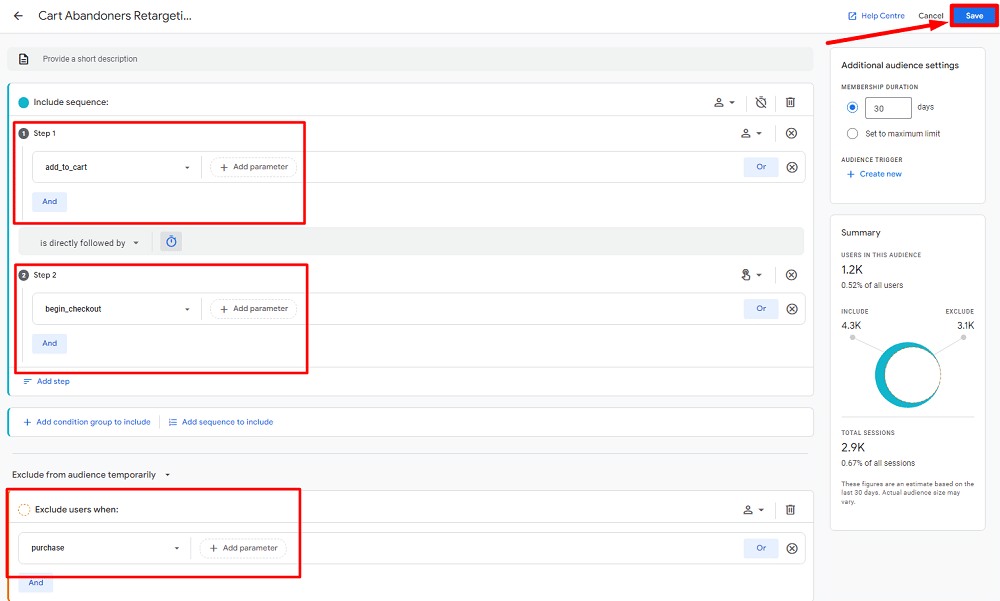
Step 4: Assign your audience a clear and indicative name, such as “Cart Abandoners Retargeting.”
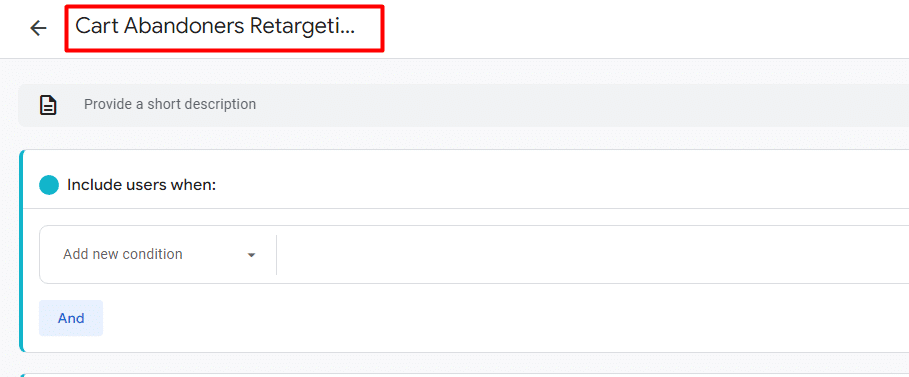
Step 5: Clearly outline the desired sequence of actions in the “Description” box. By doing so, you can collaborate better with your team.
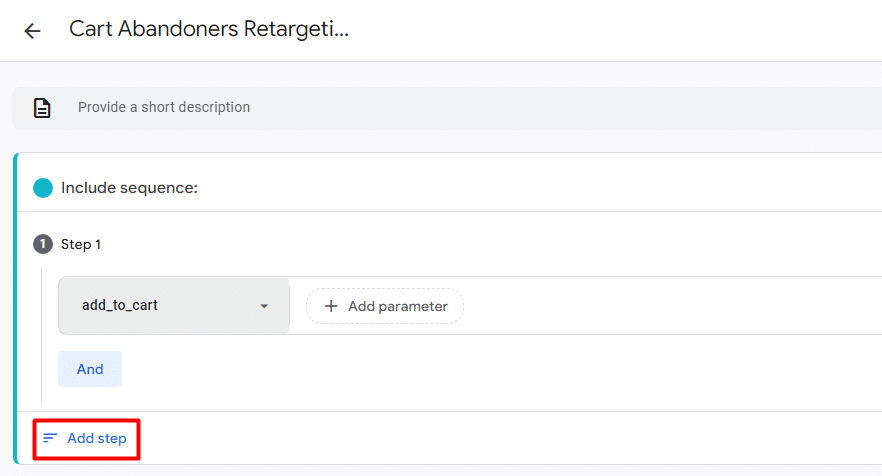
Step 6: Begin building this sequence by clicking “Add sequence to include.”

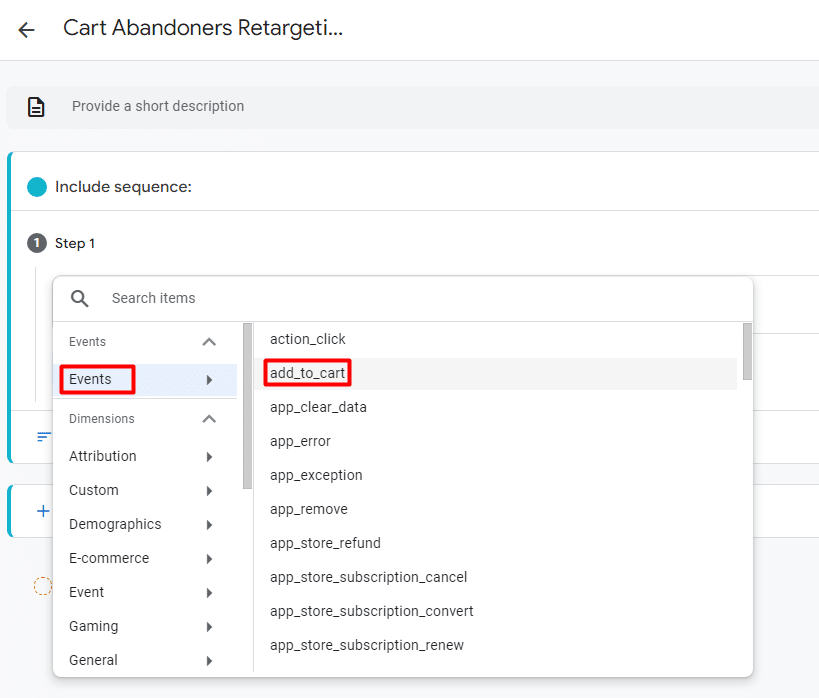
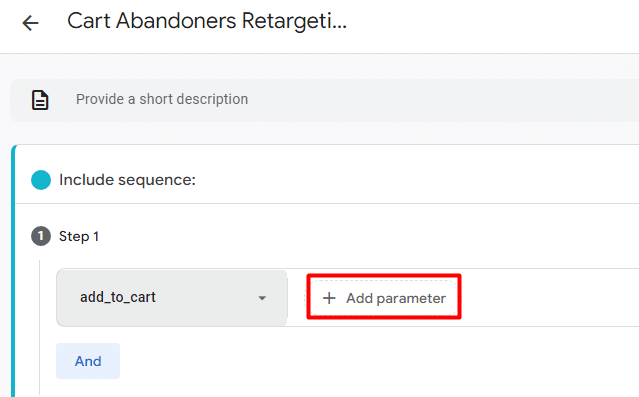
Step 7: To specify conditions, click “Add a new condition.” For this example, select the “add_to_cart” option under “Events.”
If needed, you can further refine this with an additional ga4 parameter.
Step 8: Create a new step in the sequence using the “Add step.”
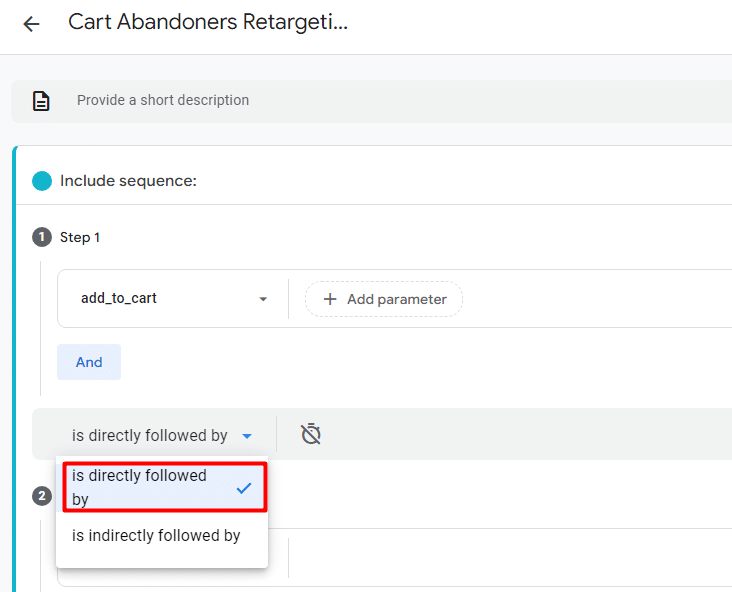
Step 9: Next, You’ll see a dropdown. Opt for “Is directly followed by” from the dropdown options.
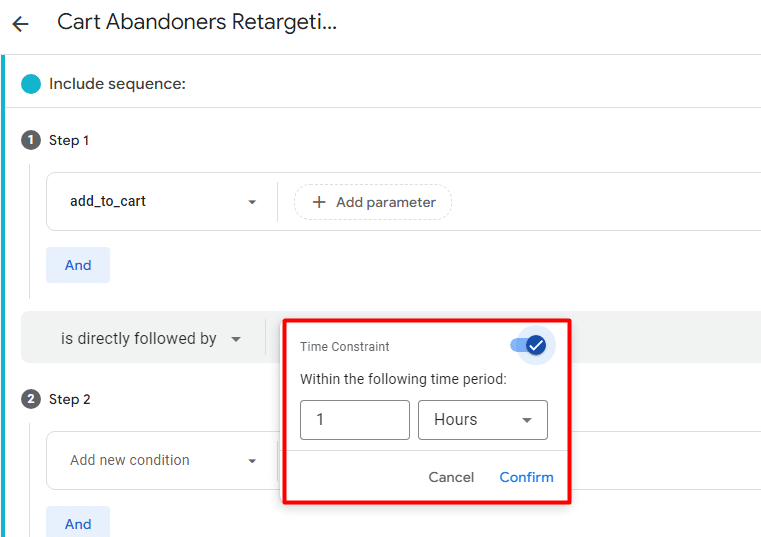
Step 10: Set a time frame by clicking the “Clock” icon next to the previous drop-down. For instance, specify that the next action should occur within an hour of adding an item to the cart.
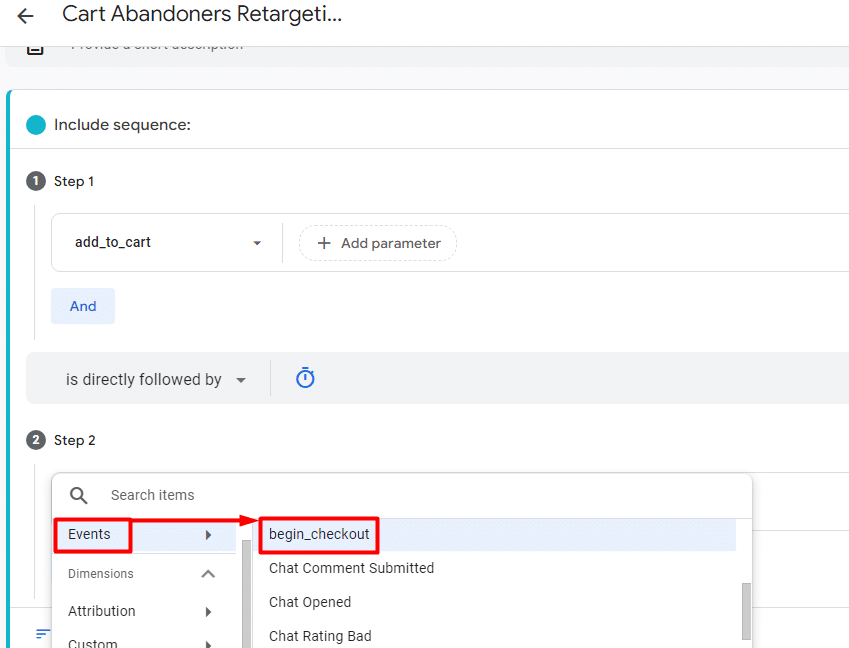
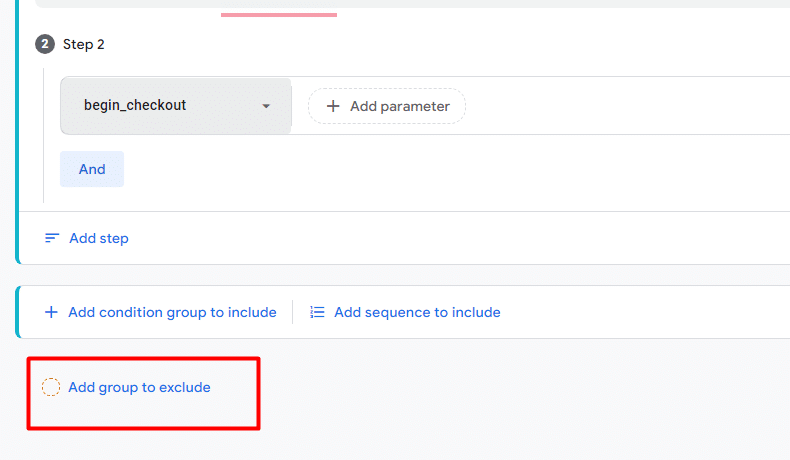
Step 11: Introduce another condition using “Add a new condition.” Select “begin_checkout” from “Events” to target users who initiated but didn’t complete the checkout process within the set timeframe.
Step 12: To ensure targetting the right audience, you need to exclude a segment. Use “Add group to exclude” for this.
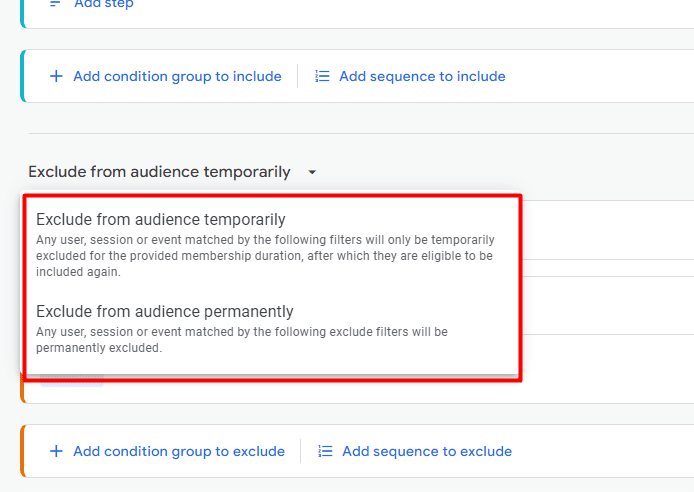
Step 13: Decide the nature of this exclusion, whether it’s temporary or permanent.
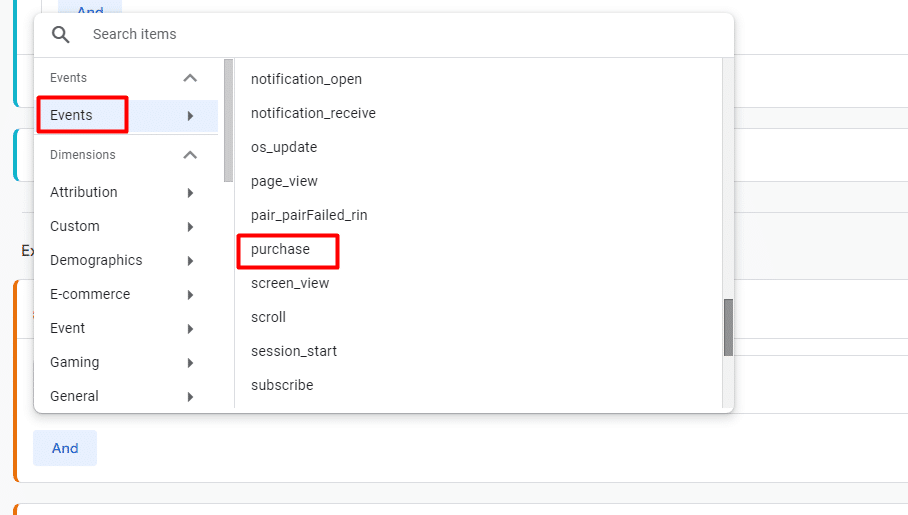
Step 14: Add another condition by clicking “Add a new condition” to exclude users who completed the buying process. For this, choose “Purchase” from “Events“.
Step 15: Check what you’ve done so far. And finalise your settings by clicking “Save.”
Try not just to copy what we did here but utilise the methodology. And you’re on your way to capitalising on GA4’s powerful remarketing capabilities.
Benefits of using Google Analytics 4 audiences
Google Analytics 4 audiences offer features that can significantly enhance your marketing strategies and user engagement. Here are the key benefits of harnessing the power of GA4 features like audience, segment, etc:
Enhanced targeting capabilities
With audiences, you can refine your marketing campaigns to cater to specific user groups based on their demographics, behaviours, and interests. This precision targeting ensures that your message reaches the right audience at the proper moment, potentially boosting sales and revenue.
Personalisation at its best
One of the standout features of GA4 audiences is the ability to personalise user experiences on your website or app. Whether showcasing tailored product content or offering unique discounts, personalisation can significantly enhance user engagement and satisfaction.
Boosting sales
By leveraging audiences, you can target ads to users more likely to engage with your products or services. Remarketing campaigns can also be designed to re-engage users who’ve visited your site but have yet to purchase, nudging them towards conversion.
Elevating customer engagement
Personalised content and offers, driven by audiences, can significantly enhance user interaction on your platform. Sending targeted emails with relevant information or promotions can further cement customer loyalty.
Mitigating customer churn
Audiences can be a valuable tool in identifying users on the brink of disengagement. You can rekindle their interest and reduce churn by reaching out with targeted offers or support.
Launching new offerings with precision
Audiences can help identify users who might be most receptive when introducing new products or services. Tailored marketing campaigns can educate users about the new offerings, encouraging trials and adoption.
GA4 audiences FAQs
How many audiences can I have in GA4?
You can create up to 100 audiences per GA4 property. This limit applies to a single exploration.
What is the maximum audience duration in GA4?
The default audience duration is 30 days; the maximum is 540 days. This means that users can stay in an audience for up to 540 days after they meet the criteria for being added to that audience.
What is an audience trigger in GA4?
An audience trigger in GA4 is a condition that, when met, causes an event to be triggered. Audience triggers can be used to track complex user behaviour, such as when a user reaches a certain number of sessions, views a certain number of pages, or completes a certain set of actions.
Summary
Harnessing the power of Google Analytics 4 and Google Tag Manager enables precise audience segmentation. GA4 audience plays a pivotal role in customising campaigns. E-commerce platforms, in particular, can pinpoint users on the brink of a product repurchase.
With the right Google Analytics service, any business can utilise a spectrum of audience categories, from engaged users to those less active, at one’s fingertips, paving the way for enhanced campaign effectiveness.