How to Set Up Google Analytics | A Step-by-Step Guide

Google Analytics is free, easy to use and there’s a reason that up to 50 million websites use it. Google Analytics is now on it’s fourth version, and GA4 can completely transform your marketing, allowing you to tailor promotional materials in ways that weren’t possible before.
How to set up a Google Analytics account for the first time?
Step 1 – Create a GA4 account
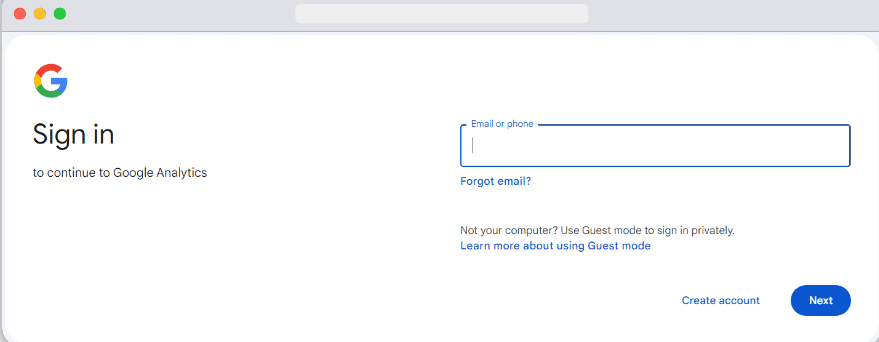
The process begins by heading to analytics.google.com. You’ll get a prompt to log in to your Google account. If you’re not one of the 1.8 billion people that have an account, now’s the time to sign up.
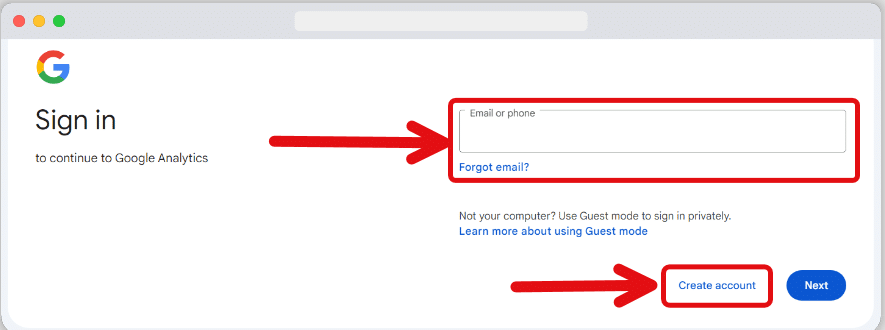
You’ll then be taken to the “Create an account” step. In the “Account name” field, give your account a name. Then, utilise the “Account Data Sharing Settings” to control how you share your GA4 account data with other Google products and services.
Click “Next” once you’re satisfied with the setting.

Step 2 – Create a GA4 property
The next step in setting up your GA4 account is to create a property. Think of the property as a container where data from your website and app is stored.
You might have a property that collects data from just one website or a single app for basic setups. If your analytics needs are more complex, you can set up a property to pull data from various sources.
Enter a suitable name in the “Property name” field, ensuring it contains at least four characters. Then, specify your preferred time zone and currency. This will help ensure that all your reporting is consistently formatted and easily interpreted.
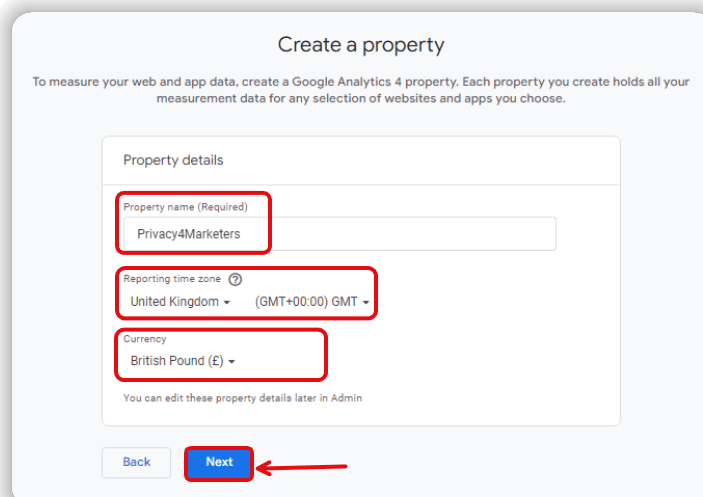
Once you’ve done the above, click “Next“.
Step 3 – Enter your business details
In the next step, provide details about your business to help Google Analytics 4 tailor your needs. In the “Describe your business” section, fill in the “Industry category” and “Business size” fields.
Select the category that best fits your industry and check the size of your business based on the number of employees.
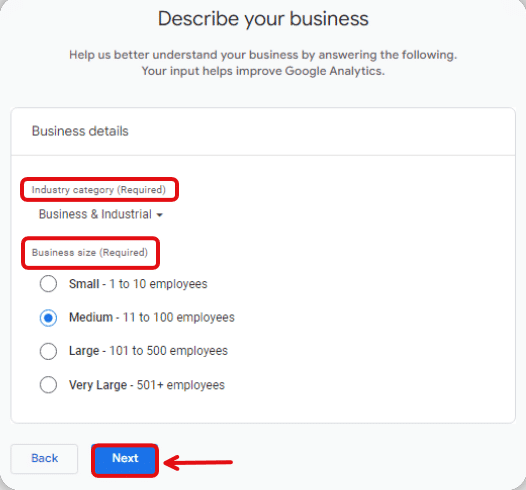
After entering these details, click “Next” to proceed.
Step 4 – Choose your business objectives
Select at least one business objective to tailor GA4 reports to your specific needs during setup. This choice helps GA4 customise its default reports to evaluate your business goals.
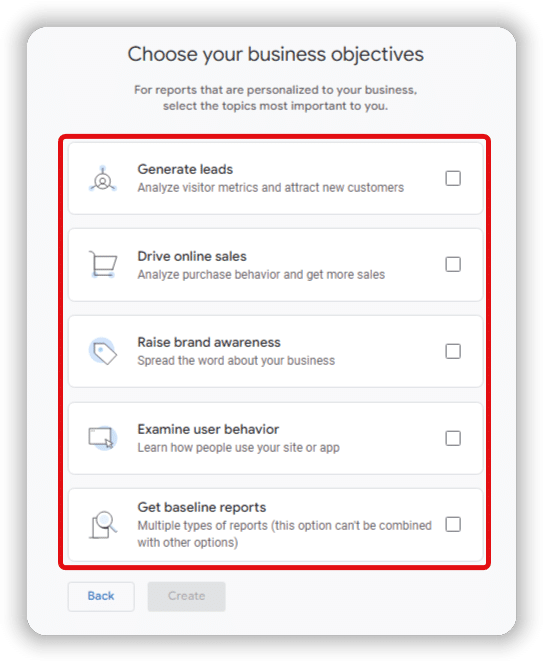
Here’s a table of the available business objectives, along with the associated default reports:
| Objective | Key Focus | Default Reports |
|---|---|---|
Generate leads | Analyse visitor metrics and attract new customers | Overview User Acquisition Traffic Acquisition Landing Page |
Drive online sales | Analyse purchase behaviour and get more sales | Overview Ecommerce Purchases Promotions Purchase Journey Checkout Journey |
Raise brand awareness | Spread the word about your business | Overview Google Ads Campaigns Demographic Details Pages and Screens |
Examine user behaviour | Learn how people use your site or app | Overview Events Key Events Pages and Screens |
Baseline Reports | Overview of all customer activities | All reports in Life cycle |
For example, choosing “Get baseline reports” provides an overview across the customer life cycle, not tailored to any specific objective. Note that this option cannot be combined with others.
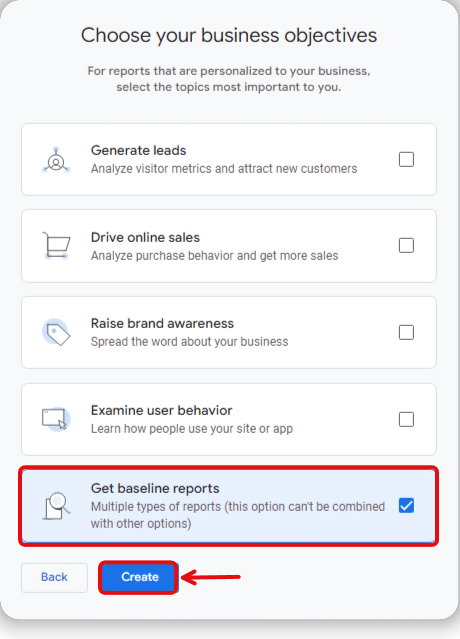
Once you’ve selected the objective, click “Create” to proceed to the next step.
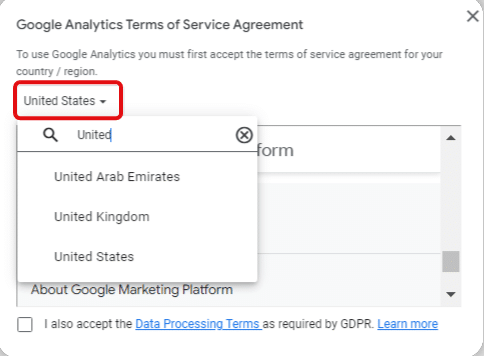
After you click “Create,” a pop-up will display the Google Analytics terms of service. Adjust the country setting to see the terms relevant to your location.
Please review these terms carefully. If you agree, check both boxes. Finally, select “I Accept” to proceed to the last step in setting up your Google Analytics account.
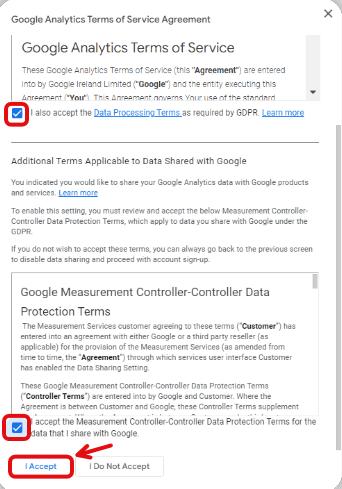
For businesses governed by the General Data Protection Regulation (GDPR), it’s essential to tick the box labeled “I also accept the Data Processing Terms as required by GDPR” to meet regulatory standards.
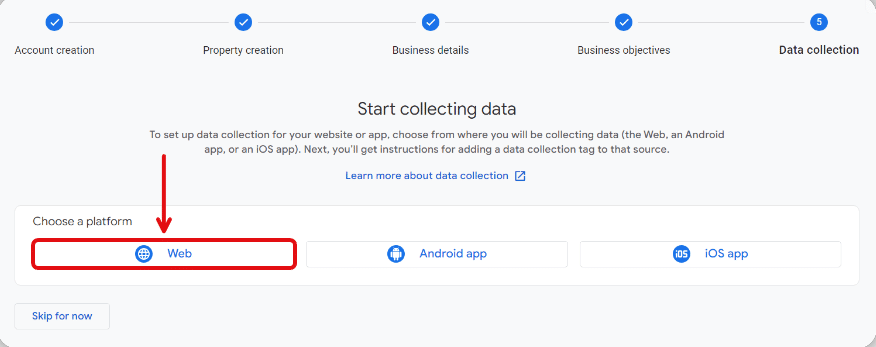
Step 5 – Create a data stream
The final step in setting up Google Analytics 4 is creating a data stream that channels data from your website or app to your new GA4 property. The process varies depending on whether you’re setting up a data stream for a website, iOS app, or Android app.
For example, click the “Web” option in the “Start collecting data” window to track your website’s traffic.
Enter your domain in the “Website URL” field and assign a name to your data stream in the “Stream name” field. After entering the details, click “Create stream.”
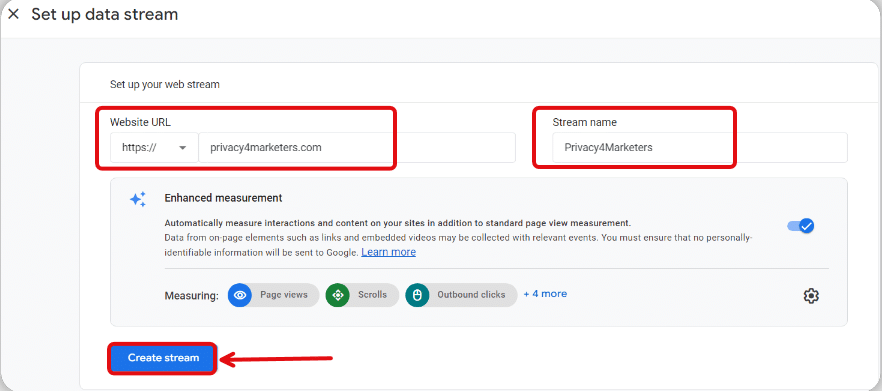
A window will display your data stream’s measurement ID and other relevant information. Save this measurement ID to a text file for future reference.

Once the data stream is configured, the next step is installing GA4 on your website to monitor traffic and user interactions.
How to set up Google Analytics on your website
You have three main options for installing Google Analytics on your website. Each option caters to different types of setups and technical needs:
- Set up GA4 with an integration
- Set up GA4 using Google Tag Manager
- Set up GA4 manually
Let’s explore each of these options in detail.
How to set up GA4 using an integration
This method is optimal if you’ve built your site using website builders such as WordPress, Squarespace, or Wix and have not installed Google Tag Manager (GTM).
Platforms like Squarespace and Wix have native GA4 integration capabilities. This means they come with built-in features that allow you to connect your site directly to GA4 simply by entering your GA4 property’s measurement ID in the appropriate settings menu.
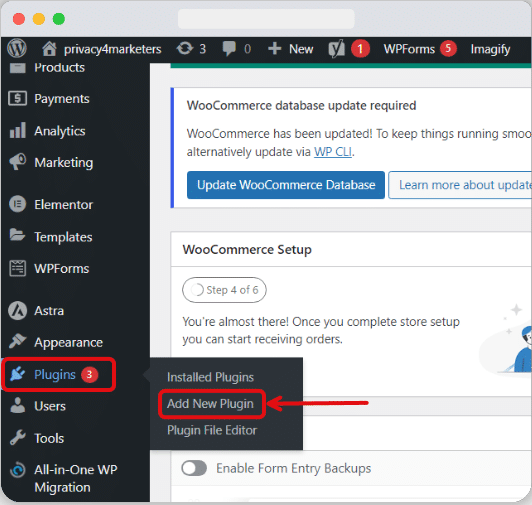
The process is slightly different for WordPress users as it doesn’t support native GA4 integration. Instead, you can use a third-party plugin. One popular choice is Google’s Site Kit plugin. Here’s how to install it:
Step 1: Install the plugin
Log into your WordPress admin dashboard. Then, navigate to “Plugins” > “Add New Plugin” from the left sidebar.
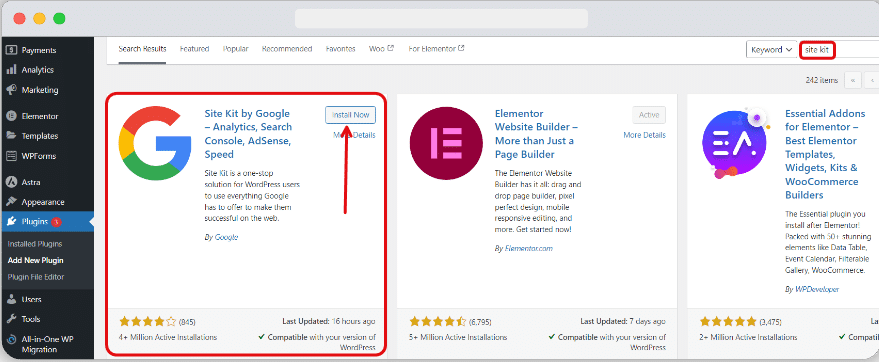
On the “Add Plugins” page, search for “site kit.” Find “Site Kit by Google – Analytics, Search Console, AdSense, Speed” and click “Install Now,” then “Activate.”
Step 2: Configuring site kit
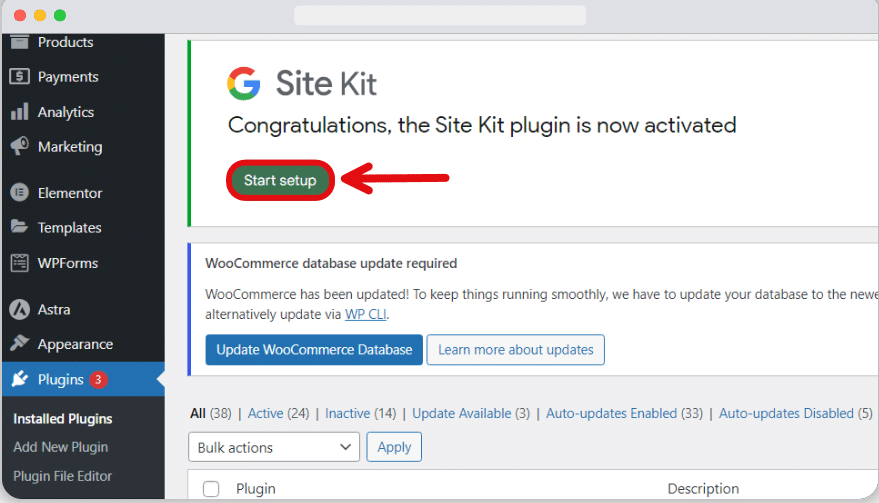
After activation, you’ll see a success message with a “Start setup” button. Click it.
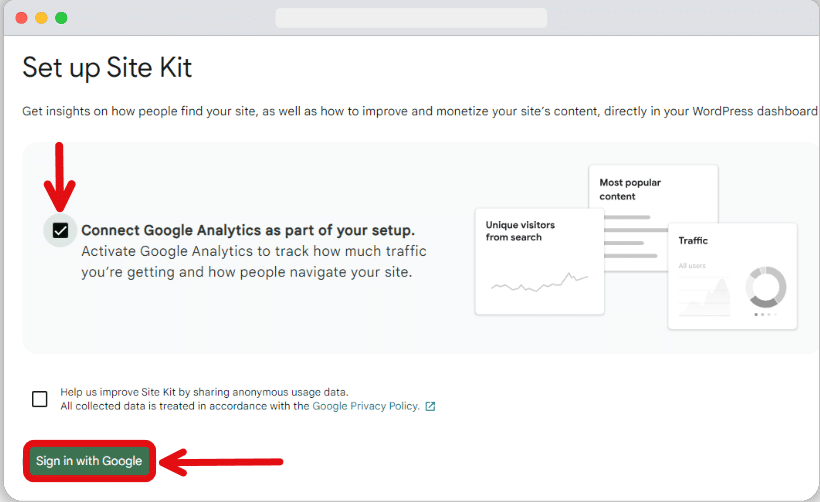
On the following setup screen, check “Connect Google Analytics as part of your setup” and click “Sign in with Google.”
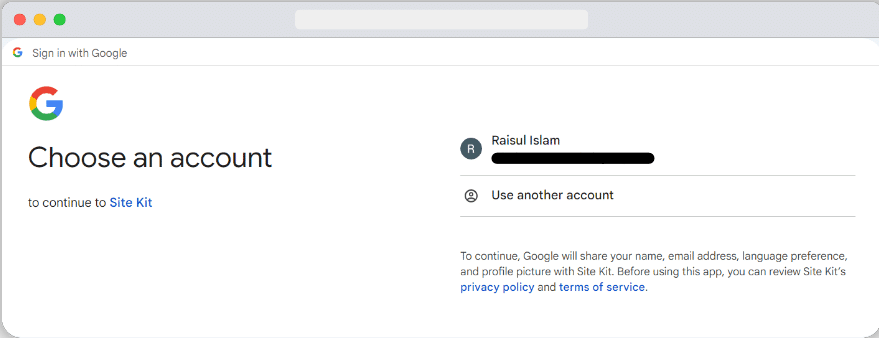
Sign into your Google account from the following window to grant Site Kit the necessary permissions.
Step 3: Configure site kit
Now, Site Kit will guide you through the following steps:
- Verifying your website ownership
- Turn on metrics in your dashboard
- Set up Search Console
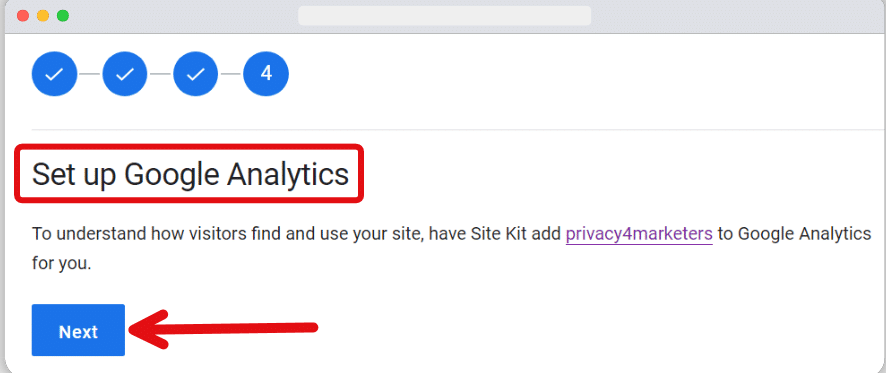
When you reach the “Set up Google Analytics” screen, click “Next.”
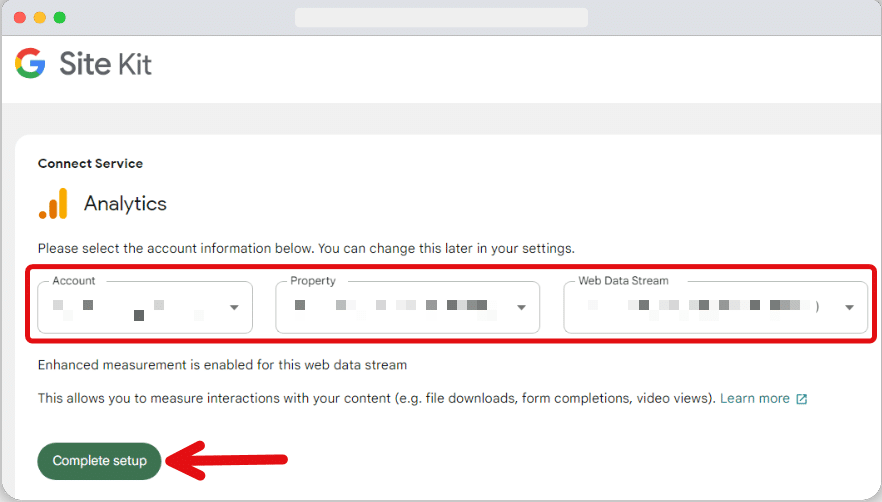
Use the drop-down menus on the “Connect Service” screen to select your GA4 account, property, and web data stream. Click “Complete setup” to finalise the setup.
A confirmation message will then display, indicating that GA4 has been successfully installed on your WordPress website using the Site Kit plugin.
How to set up Google Analytics 4 with Google Tag Manager
Google Tag Manager is one of the powerful web analytics tools that allows you to install code snippets, known as “tags,” on your website without directly modifying the code. This is particularly useful for deploying GA4 tags.
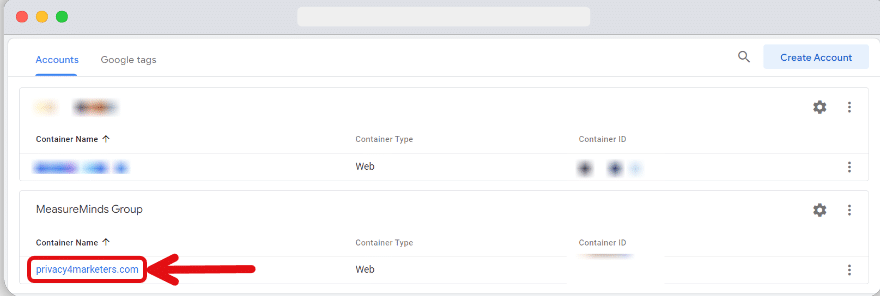
First, navigate to https://tagmanager.google.com/ and sign into your Google account.
Once logged in, choose the correct GTM container for your website.
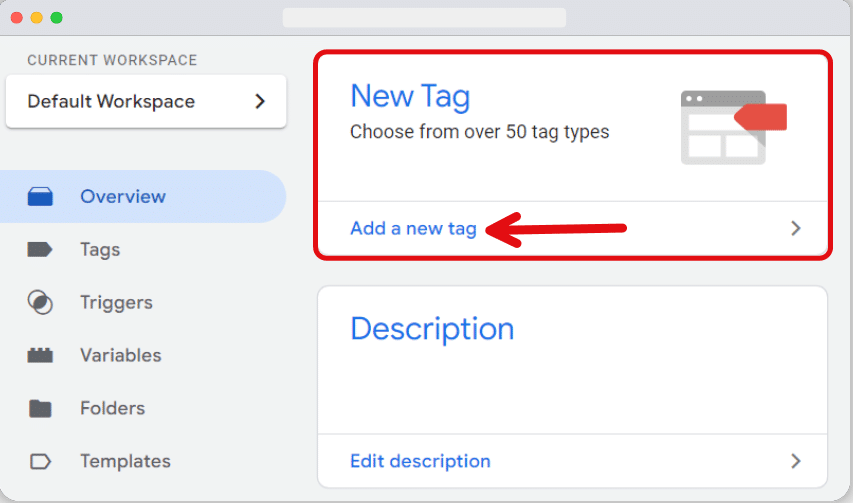
Click on the “Add a new tag” button from your container’s workspace to initiate a new tag setup.
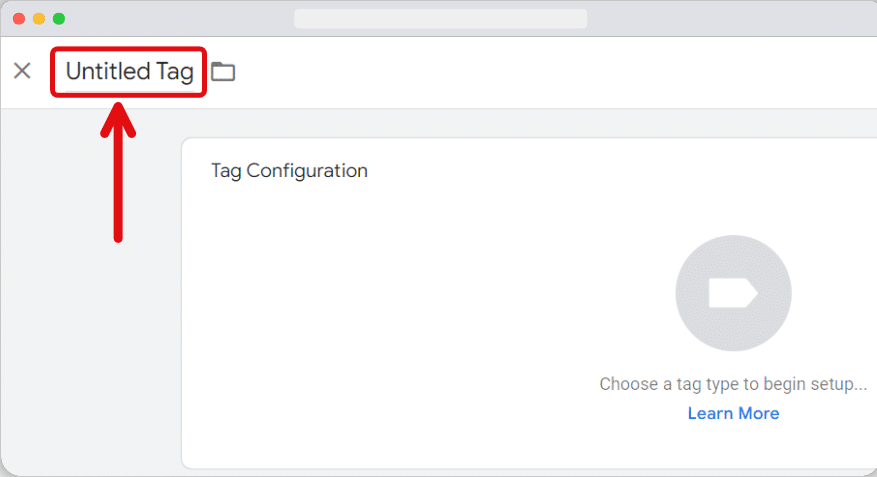
Name your tag by clicking “Untitled Tag” and typing in something descriptive like “Google Analytics 4 Setup.”
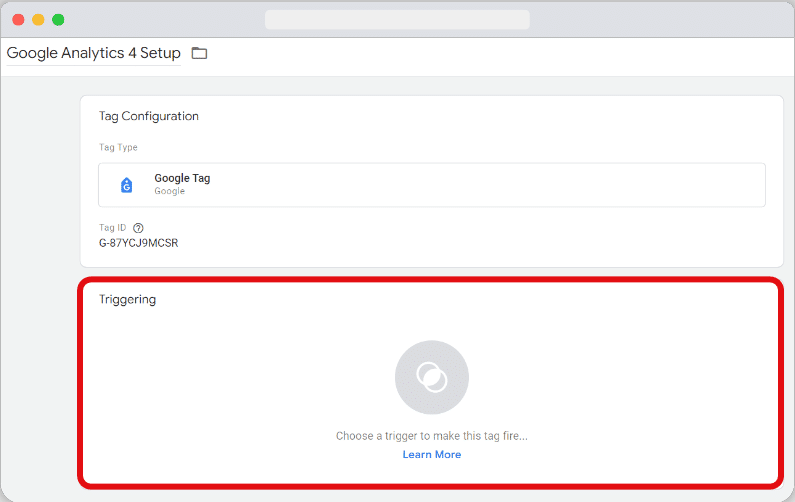
Continue configuring your tag by clicking anywhere in the “Tag Configuration” panel.
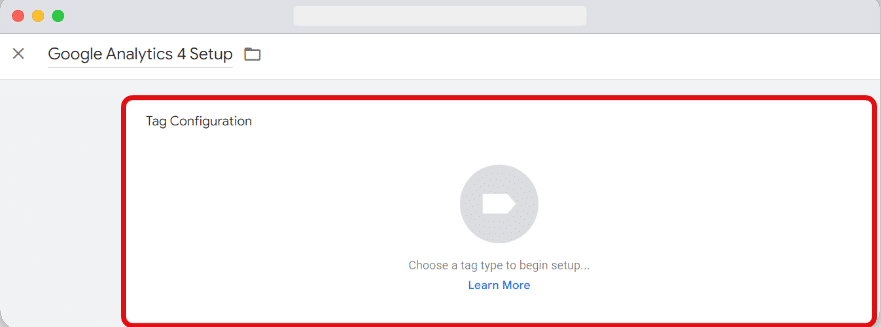
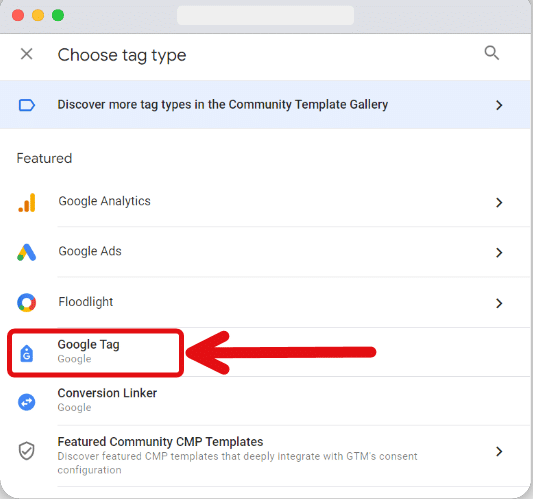
In the window that appears, select “Google Tag” as your tag type.
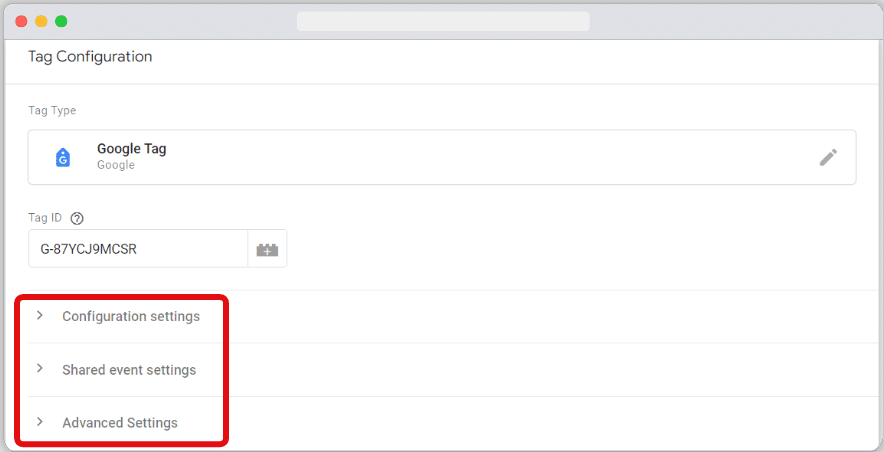
Enter your GA4 data stream’s measurement ID in the “Tag ID” field. If you haven’t saved it, it is time to find your measurement ID.
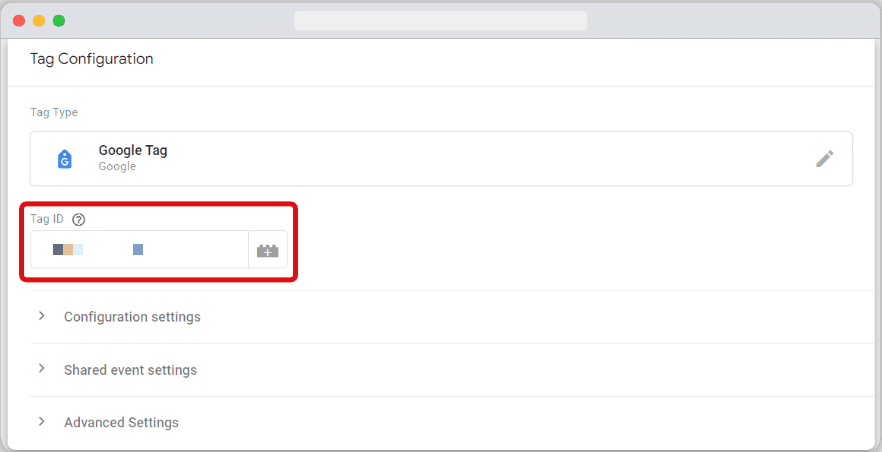
You can also adjust the settings in your tag’s configuration, shared event, and advanced settings if needed.
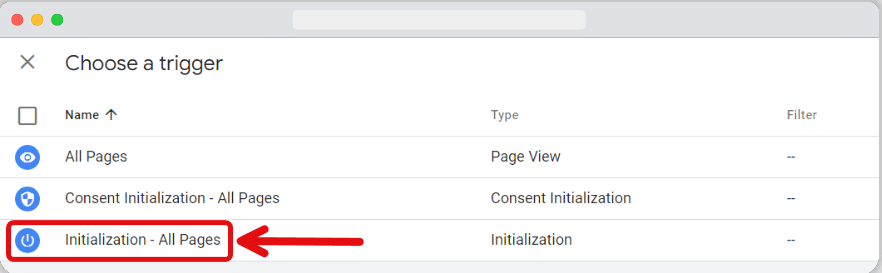
To determine when GTM should fire the GA4 tag, click anywhere in the “Triggering” panel.
Choose “Initialization – All Pages” from the triggers list. This ensures your GA4 tag will load before any other tags on your site.
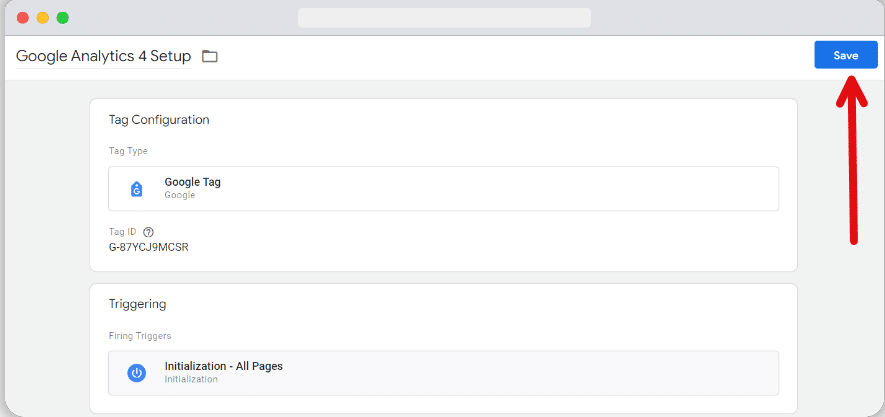
Save your newly created tag by clicking “Save” at the top right corner of the tag setup window.
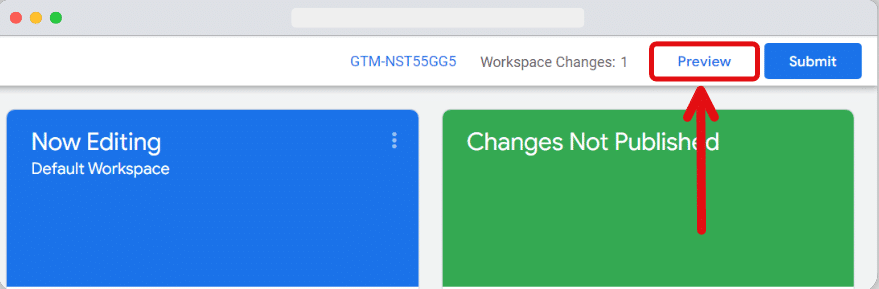
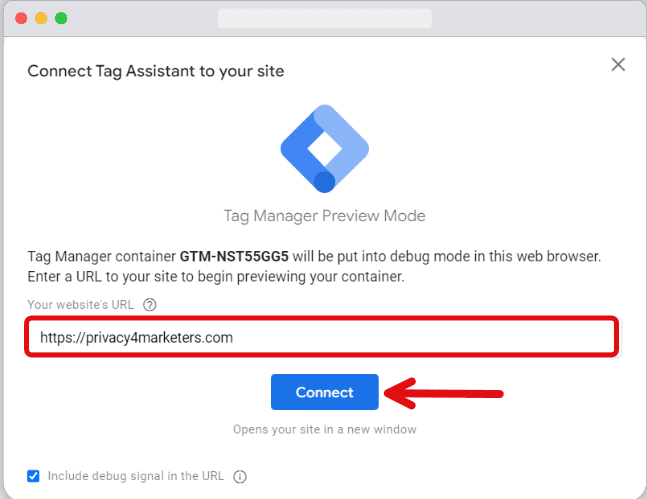
Next, test the new tag by selecting “Preview” from the workspace overview.
The Google Tag Assistant will open in a new tab. Enter your website’s URL in the “Your website’s URL” field and click “Connect.”
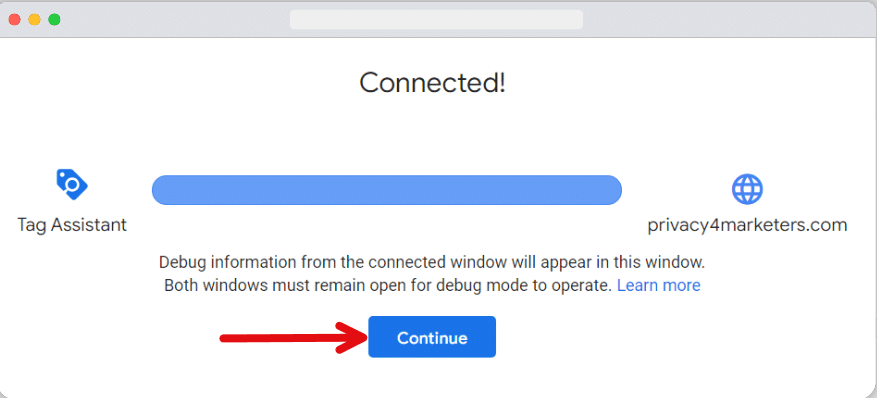
After your website loads in a new window, return to the Tag Assistant tab. If the connection is successful, a “Connected!” message will display. Click “Continue” to close it.
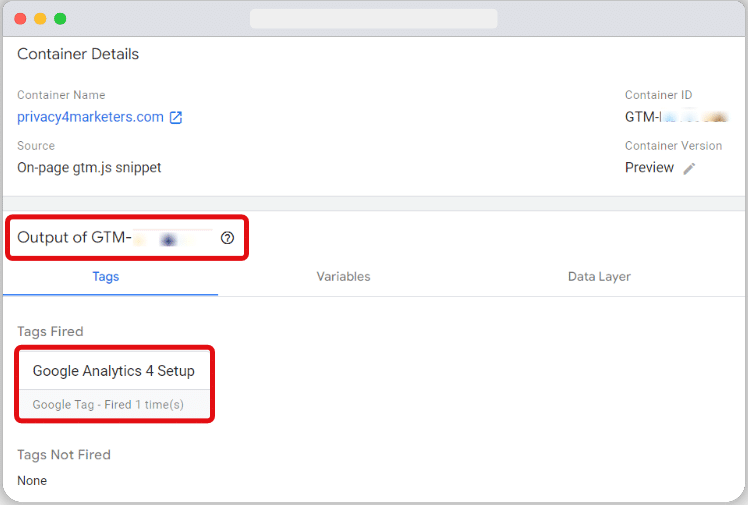
If the Tag Assistant shows your GA4 tag in the “Tags Fired” category on the “Output of [your measurement ID]” panel, your setup is correct.
Close Tag Assistant and your website window. Go back to GTM and click “Submit” to save your settings.
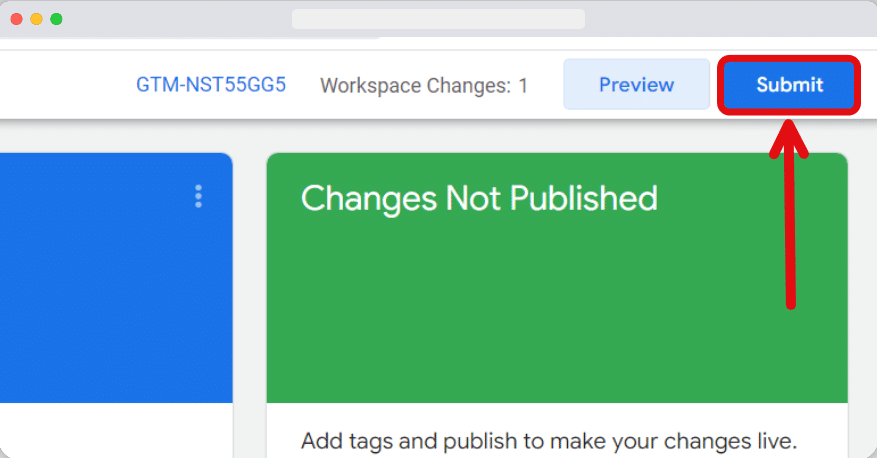
In the “Submit Changes” window, ensure it’s set to “Publish” and Create Version. Use the “Version Name” and “Version Description” fields to document your changes, like naming it “GA4 installed.”
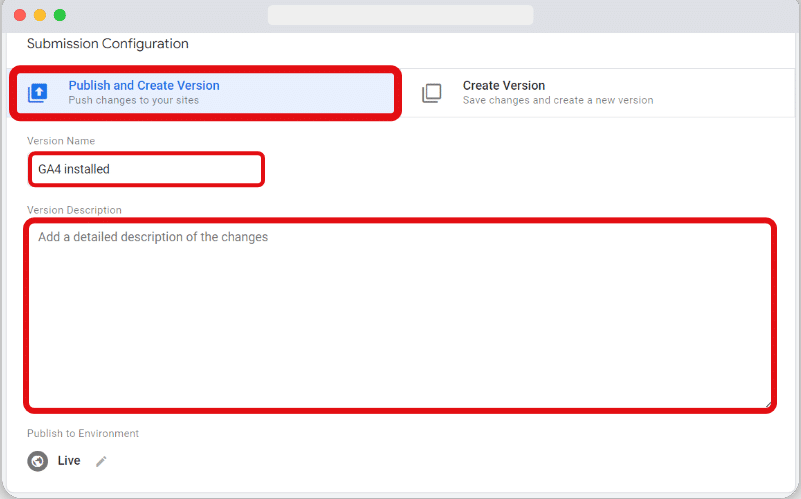
Finally, click “Publish” to go live with your changes and activate the GA4 setup on your site.

This method using GTM simplifies the GA4 installation and maintains a clean website backend without direct code edits.
How to set up Google Analytics manually
Disclaimer: This method requires you to modify your website’s code. If you are uncomfortable working with code, consider using the GTM or an integration method to install GA4 or seek assistance from a web developer.
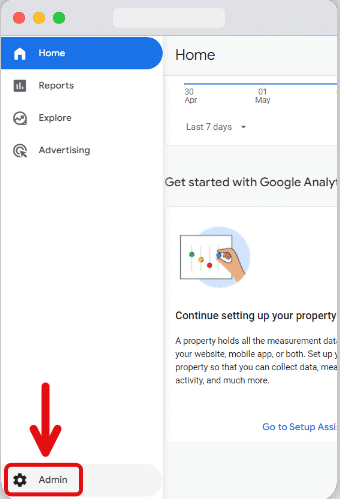
To manually install GA4, open the “Web stream details” for your site’s data stream. You can access this through the “Admin” section of your GA4 dashboard.
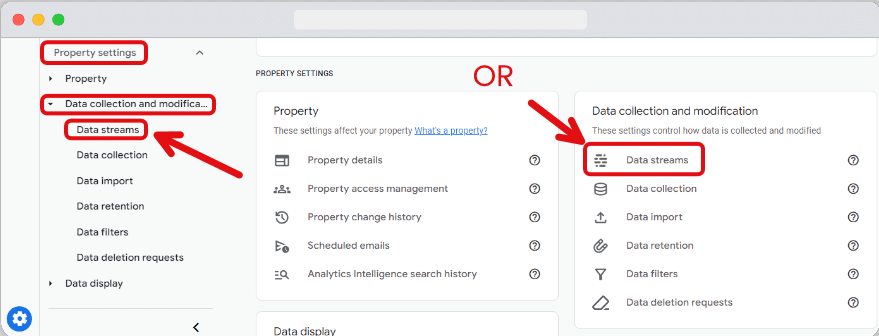
Navigate to “Property settings,” select “Data collection and modification,” and then “Data streams.”
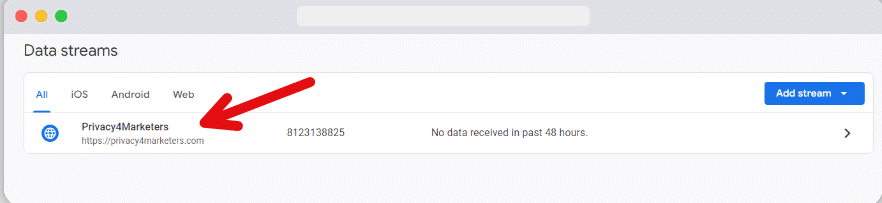
Click on your website’s data stream to bring up the “Web stream details.”
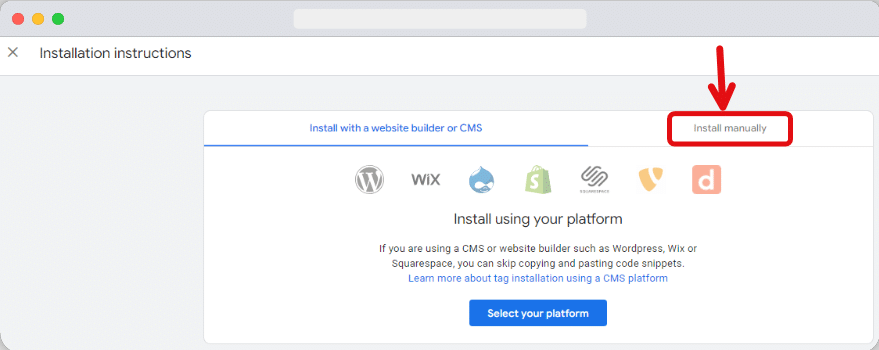
In the web stream details window, scroll down to “View tag instructions“.

Then click “Install manually.”
That will display a code snippet. Copy this snippet using the clipboard icon provided.
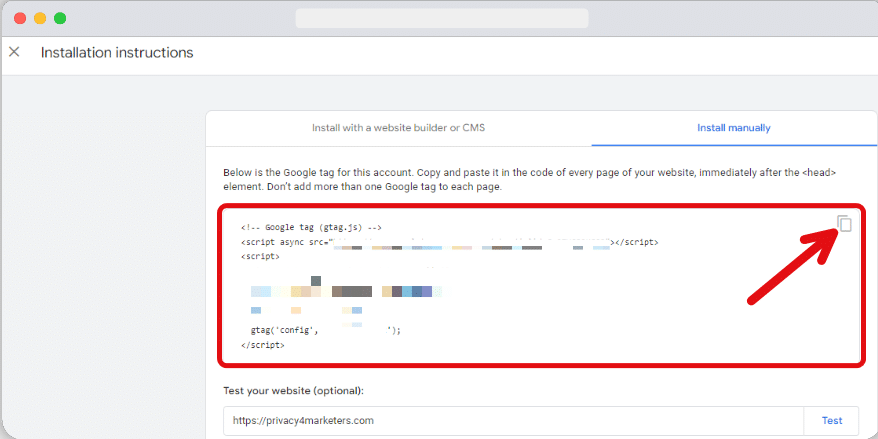
Paste this code snippet into the HTML of each webpage right after the <head> tag. Save the changes once done.
Pro tip: If your site uses a header.php file for generating the <head> section across pages, insert the code snippet just after the <head> tag in this file to apply it universally on your site. This ensures the GA4 code snippet is consistently added to all pages.

What features of Google Analytics 4 should I focus on?
The wealth of options within GA4 can be a bit overwhelming, so here are some of the features you really should be focusing on:
Improve your advertising with deeper Google Ads Integration
GA is very useful because its information allows you to tailor your ad campaigns to specific groups of customers. But how does GA4 build on this?
For a start, with GA4, you receive data collected throughout the entire lifetime of a user, from their first site visit until the present. This means you can better define your audience and deliver ads to which they are more likely to respond.
You can also get more in-depth data about your ad campaigns by comparing conversions from different sources, such as
- YouTube
- Google searches
- Social media
This gives a much better sense of how different marketing channels work together.
Getting the most out of your ads is essential for growing your business. We conduct comprehensive research about your business so you can reach the right customers and boost your standing on Google ads.
Learn more with Google Analytics 4 reports
You have probably noticed that there has been a real push towards user privacy over the last few years. Legislation such as GDPR and CCPA has given website users greater control over the information collected about them.
Google has had to adapt to accommodate a world in which data and what we do with it is a much higher priority for the general public. To help overcome this, GA4 has been updated to fill in for any lost data. To overcome this gap, GA4 creates a single-user journey for all data linked to the same entity.
Once, GA presented us with reams of data within our reports. We now get much more manageable summary cards (more in-depth data is also available; click the card).
What do Google Analytics 4 reports tell me?
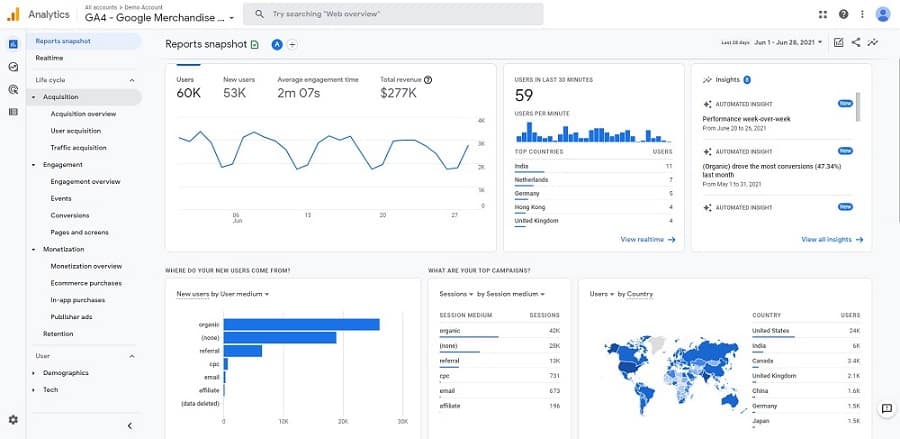
On the home page, you’ll see a graph that summarises all of your traffic, conversions and revenue. From here you get a sense of how your site is performing. What pages get the most hits? Did you notice more visitors one month than another? Where do your visitors come from? All of this information is summarised here.
You can also use ‘Real-Time Reports’. These tell you what events have occurred in the last 30 minutes. This is a useful tool if you need to find data at a specific time such as during the launch of a new product. It’s also helpful if you want to check that your tracking code is working as it should be.
Life cycle reporting is another fantastic addition. You can get a complete overview of the customer journey in GA4 allowing you to optimise it. This new feature puts a focus on engagement, monetization and customer retention. We can gain insights into how users interact with the conversion funnel.
For example, you can discover the interactions that led users to sign up to your newsletter. This can improve your website conversion rate. We use a combination of GA4, content experiments, user testing and eye-tracking within our Conversion Rate Optimisation (CRO) services.
Make the most of event tracking in Google Analytics 4
As mentioned, Google has introduced a new data model with GA4. This means you can get a more detailed view of how visitors access and interact with your property.
Event tracking has always been a feature, but users were now constrained by how much data they could collect.
In GA4, there’s no such restriction, you can be as specific as you like about the user actions and details you want to record. This can include data you’ve learned about a user or the kind of objects they clicked on. Events also include transaction and product details. The list is endless. Making the most of event tracking is important to get the best information out of GA4.
How to configure a custom event in Google Analytics 4
The kind of custom event that you’ll want to create depends on the kind of business that you’re running. Luckily, Google has a fantastic list of recommended events. These cover many industries, from retail and eCommerce to gaming.
Before creating a custom event, you should ensure that there isn’t already a pre-set that meets your needs. But how do you configure events within GA4?
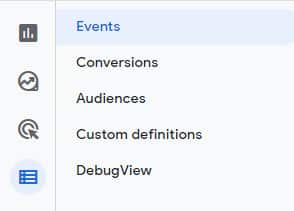
We’ll focus on a simple event that will tell us about views for an individual page of our site. To do this, go to the toolbar on the right of the screen and scroll down until you find ‘events’.
Create event
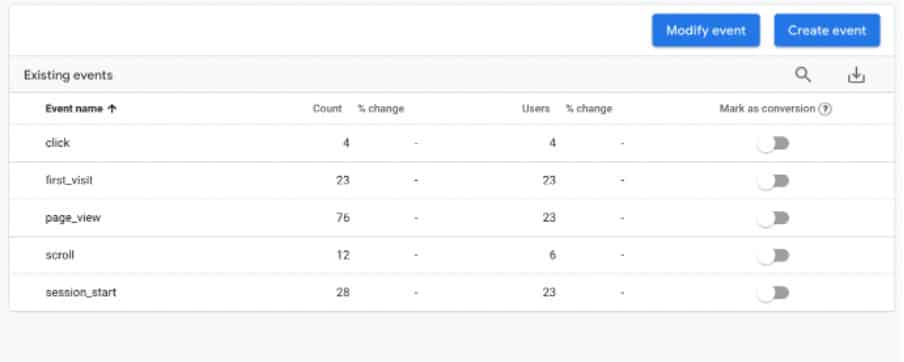
You’ll see a list of all current events on your property. Select the blue rectangle on the top right of the screen labelled ‘create event’. From the following page click ‘create’.
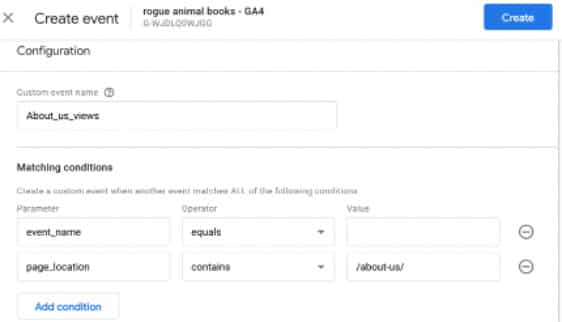
We’ll measure views on the ‘about us’ page for our event. You can choose whichever page you’d like if you follow the same structure.
Name the event
Start by naming your event. Again this can be any name you want, as long as it gives you enough information to know what the event is about.
Add conditions
Leave the parameter and operator unchanged and select ‘add condition’. You’ll then be given a second group of duplicate options. In the Value box, enter ‘page_location’ and change operator to ‘contains’.
Finally, in the values section, paste the corresponding part of the URL from the page you want the event to monitor. For us, it’s ‘/about-us/’. Now, hit create.
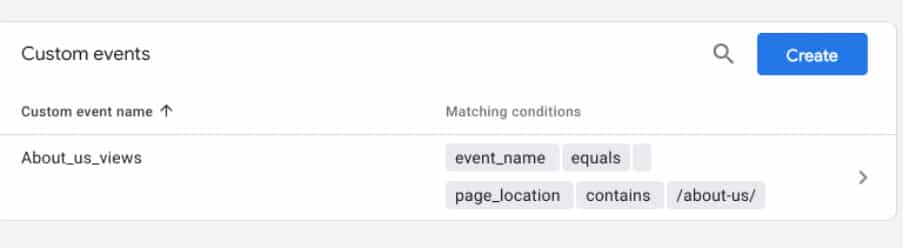
Your new event will now appear in the ‘Custom events’ list.
There can be much to take in if you’re new to GA and event creation. It’s worth playing around with events to get to grips with the system.
So… what are you waiting for?
Need help getting to grips with GA4? No problem! We offer Google Analytics training taught by experts.
Further reading
Look at our blog post ‘10 Common Google Analytics Problems and How to Fix Them’ for more GA tips.
- Top 24 Google Analytics Chrome Extensions & Sheets Add-ons - 21/05/2026
- Best Consent Management Platforms (CMP) - 19/05/2026
- Google Signals and Consent Mode: What This GA4 Change Really Means - 23/04/2026