As the digital realm evolves, businesses have to adapt to technological changes, the demands of their customers, or the need to expand. This creates a necessity for website migration.
If done well, a web migration will boost your search engine rankings and user-experience (UX). If done poorly, your organic traffic will tumble as visitors are faced with a confusing site or 404 errors.
Using free tools, this SEO migration checklist shows you how to migrate your website to not only enhance traffic, but also increase conversions. This will leave your audience, marketing team, and business owners delighted.
Why migrate your website?
Ultimately business owners change CMS, or do other major website migrations to achieve specific business goals. These include:
- Provide an improved user-experience, including increasing page speed and creating a mobile-friendly site.
- Improve SEO and Google ranking
- Add additional functionality
- Security updates to prevent cyber threats or become GDPR compliant
- International expansion, including adding additional languages, currencies, and cultural nuances
- Rebranding as a result of mergers and acquisitions
Each of these reasons is valid and a site migration done well will achieve multiple goals.
What are the major risks of a website migration?
When providing SEO migration services, we pay particular attention to risks in three different categories:
- Reduced SEO – A drop in position, which leads to a drop in traffic.
- Reduced UX – A site being slower or harder to navigate than it used to be, which leads to a drop in conversions.
- Broken functionality – From individual pages not working, to the entire site crashing.
In this website migration checklist, we review each of these in turn, along with steps to not only prevent the risks, but also improve Google rankings and conversions.
SEO migration checklist
The following SEO migration checklist ensures that the core factors to rank high with Google are strong.
Record baseline metrics
Without recording your organic traffic and conversions before the website migration, it will be impossible to know whether the SEO aspect of the migration was a success.
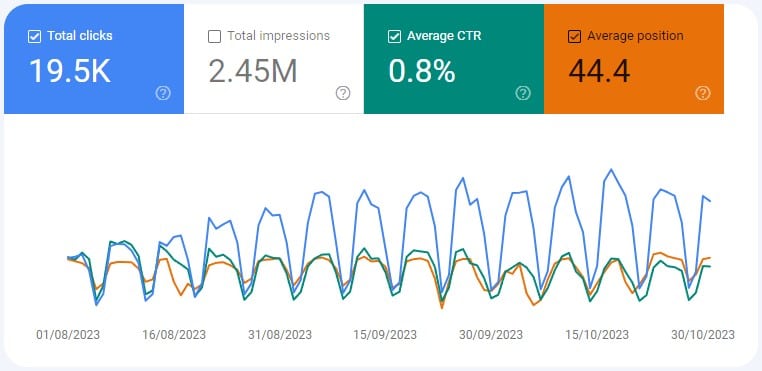
To record traffic:
- Set up a Google Search Console account if you don’t already have one.
- Under Performance click Search Results
- Make a note of the average Clicks, CTR, and Positions over the last 3 months.
- Note if the overall trajectory is upwards or downwards.
- Note keyword rankings and URLs for keywords generating particularly high volumes of traffic.
Conversions can be measured in a number of ways including:
- Number of sales
- Number of contact forms filled in
- By configuring Google Analytics 4 goals to track conversions
SEO audit
Why would you audit your old site when you’re going to get rid of it?
The answer is to discover what works and what doesn’t. By doing so, your web redesign won’t inadvertently make things worse.
Our SEO migration service includes a full SEO audit. If completing your own audit, pay particular attention to high-performing pages. Ask yourself how these pages differ from other pages on your site with regards to content and layout. Ensure these positive aspects are included in your new design.
Content audit
A website migration is an ideal time to refresh your content and delete old blog posts that are no longer relevant. It’s important you don’t accidentally remove content that’s performing well. There are plenty of horror stories where webmasters have deleted a whole bunch of content, then been shocked at the huge loss of traffic.
To complete a content audit:
- Login to Search Console and navigate to the right property.
- Change Date to the last 12 months.
- Scroll down and click Pages.
- Press Export (This will export data for 1,000 pages. For sites with more than this, use Screaming Frog or the free Search Analytics for Sheets addon, which allows you to export up to 25,000 pages).
- Sort the spreadsheet by Clicks, then Impressions.
- Decide a minimum number of Clicks and Impressions which guarantees you want to keep content. Flag anything above this as ‘to keep’.
- Review all the pages below this minimum and make a note of pages you definitely want to keep. Include contact forms, terms and conditions, and any core landing pages in this list.
- Make a note of pages added in the last three months and flag them as ‘to keep’ too. They won’t have enough traffic data for you to determine their potential.
You now have a list of pages to keep and a list to delete.
Implement 301 redirects
301 redirects prevent 404 errors and broken links. According to Google’s John Mueller, 301 redirects also preserve 100% of the benefit of any incoming links. They are therefore essential for SEO and user-experience.
To map old URLs to the new URL structure and implement 301 redirects, start by identifying any redirects you will need to apply universally. These might include:
- http to https
- Adding a slash or removing a slash from the end of URLs
- Removing .html, .php or other URL extensions that your old CMS system used
- Changing folders, sub-domains, or any other site modifications.
These universal redirects are best made by editing the .htaccess file or using a Regex Redirect in Rank Math (Free, available for WordPress only) or Yoast (Paid).
Next, map the URLs you identified need deleting in the content audit. This used to be a laborious task, but AI tools have sped up this process considerably.
- Once your new site is created in dev, visit https://getredirects.com/ and register for an account. This AI SEO tool is currently free as it’s in beta mode.
- Click Match Pages.
- Select I want to upload my own list of pages.
- Upload a list of pages to delete in a single column in a .csv file.
- Press Next.
- Enter the web address of the dev site.
- Press Next.
- It will then generate a list of recommended 301 redirects. Press Export.
- Review the 301 redirects and upload it in Yoast or Rank Math.
Forwarding pages resolves broken internal links by redirecting them to a different, relevant page. For your home page and most visited landing pages, double check whether any forwarding makes sense and ensure redirects don’t send you to the page you’re leaving.
Migrate metadata
Your Meta Title and Meta Description appear in Google’s search results and are the only information potential visitors have before deciding whether or not to visit your website. It’s therefore essential that this data is migrated and optimised.
To review your meta tags:
Connect Screaming Frog to Google Search Console
This allows you to sort pages by the Clicks they receive, making it easier to prioritise your pages.
- If you haven’t already, install Screaming Frog SEO Spider.
- In Screaming Frog, from the Configuration menu select API Access then Google Search Console.
- Click Connect and follow the instructions to grant access to Search Console.
- Select the Property you want to analyse.
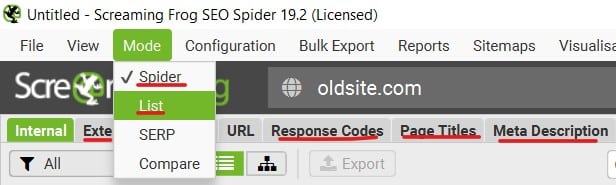
Crawl both the old site and the dev site
- Enter the web address of the old site and click Crawl.
- Wait as Screaming Frog crawls your website.
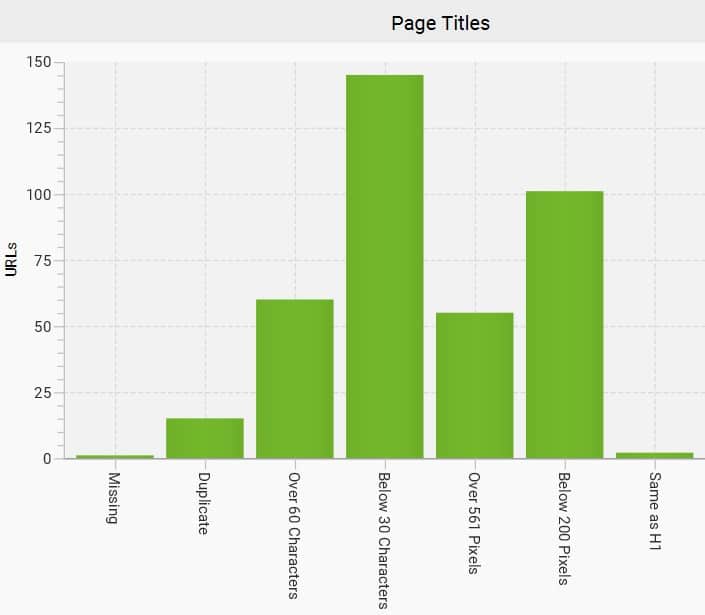
- Click the Page Title tab. This shows an overview of how well optimised the Page Titles are, as pictured below.
- Press Export.
- Repeat for Meta Description.
- Repeat all the above steps for the dev site.

- Copy all the exported spreadsheets into separate tabs in Excel or Google Sheets.
- Copy the URLs into a second column of each tab.
- Delete the live domain name or the dev domain from this column by using Ctrl + H to find and replace the domain name with nothing. This gives you a column with matching information on both domains.
- Use VLOOKUP to show the Old Meta Title, Old Meta Description, New Title and New Description in a single spreadsheet.
- Use the IF function to check whether the Old and New Title and Old and New Description match.
- Where they don’t match, ensure they are copied across.
Optimise meta titles and descriptions
- Sort your spreadsheet by number of clicks (Z-A). This will put the pages that receive the most traffic first.
- Ensure your Meta Titles are 20-60 characters and include a keyword.
- Ensure your Meta Descriptions are 120-160 characters, include a keyword, and ideally a call to action.
- Follow these instructions for more details on how to optimise the Meta Titles and Descriptions.
In an ideal world, you would optimise every page. If your site has thousands of pages, then manually completing this process won’t be possible, so automate this process, or prioritise the pages that receive the most traffic.
Create XML sitemaps
XML Sitemaps are pages that list all the URLs you want Google to index on your site. They help speed up Google’s crawl of your site, meaning the new site structure will be indexed faster.
Most CMS systems include free sitemap generators, for example in WordPress, we recommend the Google Sitemap Generator.

A canonical tag is a HTML element used in SEO to specify the preferred version of a web page. It distinguishes which URL you want Google to show when there are multiple pages with similar or duplicate content.
During a website migration, ensure that the canonical tag on the new website points to the correct URL, not one that no longer exists or is redirected. Additionally, include a self-referencing canonical tag on each page to indicate that the page itself is the preferred version. This helps reduce the risk of duplicate content issues and helps search engines to prioritise the right pages once your new site is live.
Most CMS systems will automatically generate canonical tags, however they need manually checking, particularly on complex or multilingual websites.
Structured Data Markup
Structured data (Schema.org) is a way to organise and label information on web pages. It enables search engines to understand and display different sections of each page. Structured data is particularly important to appear in Google’s eCommerce results, rich snippets and job searches. Google is also beta testing Search Generative Experience (SGE) – AI powered search results, which are likely to be launched in 2024. SGE will include more sections requiring structured data.
To migrate structure data:
- Analyse your existing Markup to understand its structure and content types.
- Ask yourself if this accurately represents your dev site’s content types. If it does, ensure it’s copied across.
- If it doesn’t determine which Markup is best for your content and implement it.
- Test the structured data using Google’s Schema Markup testing tool and, when your new site is live, by manually checking job results, or other specific search results.
SSL Certificate
Having an SSL certificate is now standard practice and many hosts will provide one for free. They help establish trust and security with users and search engines and will prevent warnings from appearing when visitors fill in forms or enter credit card information.

When choosing a host, check they provide an SSL certificate, or ensure your old SSL certificate is migrated over to your new website.
Disavow Toxic Backlinks
While not strictly part of an SEO migration, completing a backlink audit is an important SEO check that should be completed periodically. To view backlinks in Search Console:
- Open Search Console.
- Scroll down on the left and choose Links.
- Under the External Links section, press More.
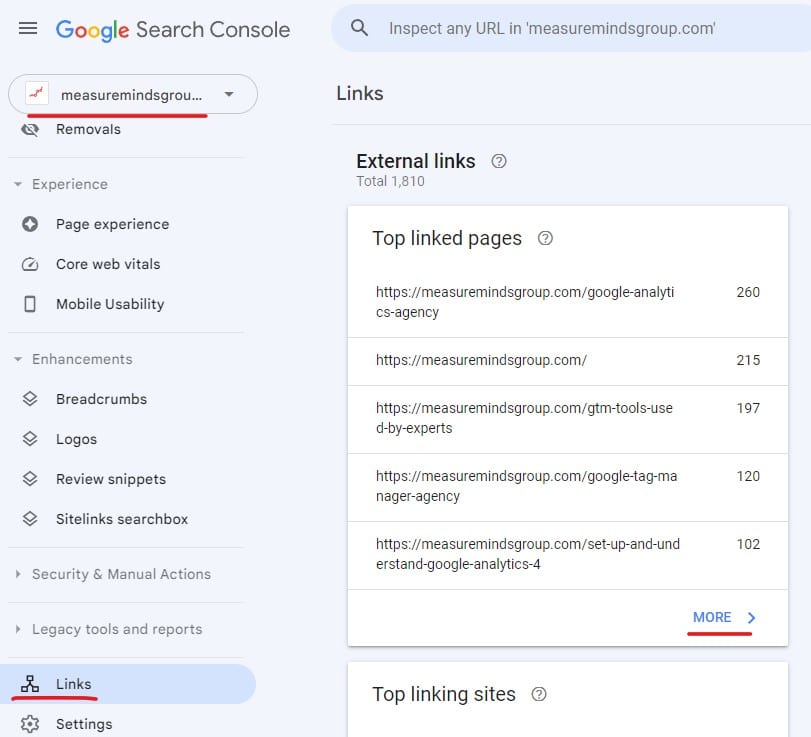
This allows you to monitor backlinks for free, but doesn’t provide an indication of their quality. If you spot a lot of backlinks that look suspicious, you may wish to disavow them. Particularly watch out for many links with similar content, or odd URLs (e.g. all URLs end in -k).
Disavowing links tells Google to ignore them altogether for SEO purposes. Google specifies that:
“This is an advanced feature and should only be used with caution. If used incorrectly, this feature can potentially harm your site’s performance in Google Search results.”
For this reason, we recommend using an SEO services agency or a professional SEO agency tool like Semrush or Ahrefs to complete a backlink audit. This is only necessary if there are a substantial number of toxic backlinks which put you at risk of receiving a manual penalty.
When you radically change a website’s content or design, Google looks for indicators of how good the new site is. One way they evaluate this is through backlinks.
Google measures a range of factors to determine whether your redesigned site is well received by site visitors. The following are all ranking factors that help determine whether your migrated website will improve or decline in the search rankings:
- On-page SEO factors: Time on page, bounce rate, number of pages visited per user, and repeat visitors.
- Off-page factors: Number and quality of backlinks and social media shares.
Most SEO experts believe that Google gives on-page and off-page factors equal weighting. It’s therefore important to manually build new backlinks post-migration.
When working on a web migration project, it’s common for webmasters to noindex the dev site to avoid them showing in the search results. When you put a site live, ensure you don’t inadvertently leave these in place, otherwise your site will be invisible to search engines.
- Visit several pages of your site and press Ctrl + U to view the source code.
- If you see the following code in the <head> section, it means the page will not be indexed by Google:
<meta name=”robots” content=”noindex”> - Run your site through Screaming Frog in crawl mode.
- Look at the Indexability Status column. Any URLs with noindex will not appear in the search results.
- Open the robots.txt file in the root directory of your site. Look for disallow, anything after this will be the pages that are blocked from crawling.
Update the robots.txt file and the noindex tag as necessary to ensure search engines can crawl and index all relevant pages.
Check indexing in Google Search Console
After go-live, check whether pages are indexed in Google Search Console:
- Open Search Console
- Choose your Property
- Under Indexing click Pages
- Ignore redirected pages, but review any other errors you see.
You will need to repeat the above steps every few days post-migration, as it will take time for Google to crawl your site.
Following the steps in the above SEO checklist ensures your new site will gain increased traffic. However, it’s not the full picture. For your migration to be successful, it’s also essential that it converts. This is achieved by completing the following series of UX checks.
UX Migration Checklist
Optimise page speed
According to research by Portent in 2022:
A site that loads in 1 second has a conversion rate 3x higher than a site that loads in 5 seconds.
We live in a world of short attention spans and instant gratification. No matter what you think of that personally, the fact is, fast websites convert.
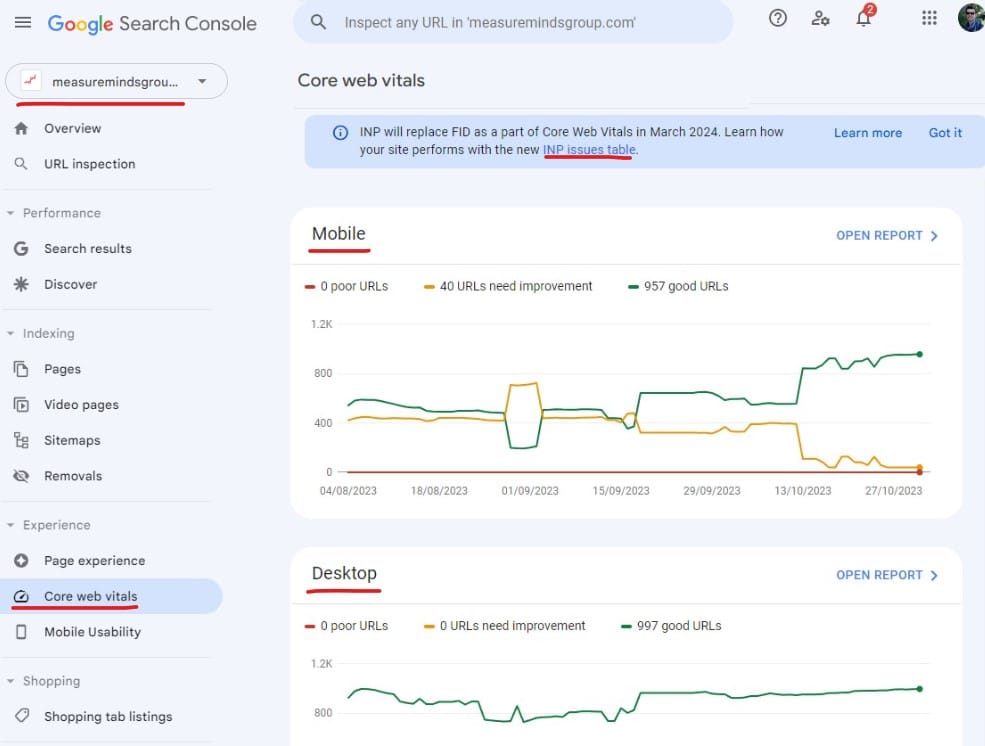
To check your site’s overall page speed in Google Search Console:
- Sign in to your Google Search Console account and select the migrated website.
- In the left-hand menu, under Experience, choose Core Web Vitals.
- This shows you an overall measure of your website’s speed on mobile devices and desktops.
- In March 2024, Google will replace FID with Interaction to Next Paint (INP). Click the INP Issues Table to see how page speed will impact you from March 2024 onwards.
To improve page speed, use Google’s page speed insights tool. This will give personalised recommendations on what will make the most difference for your site.
Depending on your site, it will include tasks like:
- Compressing images
- Reducing unused Javascript
- Reducing unused CSS
- Enable browser caching
- Reduce server response time
- Implement lazy loading
Ensure your site is mobile-friendly
In the UK and US, over 98% of adults have a mobile phone. Many sites receive more visits from mobile users than desktop users. Ensuring your migrated site is mobile-friendly is therefore an essential component of UX.
To check whether your site is mobile-friendly:
- Sign in to your Google Search Console account and select the website.
- In the left-hand menu, under Experience, choose Mobile Usability.
- Pages either pass or fail. If any pages don’t pass, scroll down to see what you need to do to resolve the issue.
- Manually test your website using a range of browsers.
- Resize your view window to check your website looks good in a variety of browser dimensions.
As well as helping conversions, page speed and mobile-friendliness are also major SEO ranking factors.
Create an intuitive website structure
At the design stage of the migration process, seek as many opinions as possible on the new website design and how it could be improved. This way, you receive a balanced view before you start the migration itself. In particular:
- Ensure that the overall layout is intuitive and that it’s easy to navigate to important pages in one or two clicks.
- If there are words that keep cropping up again and again in your keyword research, ensure they are included at least once in your menus or footer text.
- Include internal links from your blog pages to relevant commercial pages.
- Itemise your blog posts into different categories and include a block showing the latest related blog posts on your commercial pages.
Either at the development or post-migration stage:
- Conduct A/B testing to trial different designs and see which converts best.
- Use UX tools like Hotjar to analyse how visitors interact with your site.
- Consider using other Conversion Rate Optimisation tools to improve UX and increase conversions.
Implement a communication plan
Before launching your site, put together a communication plan to inform stakeholders, team members and clients. This allows you to announce your website migration with a fanfare and ensures users won’t be daunted by changed functionality.
If your site includes complex functionality or forms, include video explainers of how to use any new features.
Website functionality checklist
Change the TTL (Time To Live)
Your DNS provider has a setting called TTL (Time To Live), which determines how long a website’s DNS settings are stored in cache. The DNS controls which host visitors are sent to.
When migrating your website to a new host, reducing the TTL to 5 minutes helps prevent a scenario where some visitors access the old site and some arrive at the new site. If you forget to change this, different users will visit different hosts for up to 24 hours after go-live.
To change the TTL:
- Login to your DNS provider’s control panel or dashboard.
- Locate the DNS records for the domain in question.
- Change the TTL (Time to Live) value to 300 seconds for the relevant DNS records.
- Save the changes, and the updated TTL will propagate across DNS servers.
This change has to be done at least 2 days before go-live.
Have a rollback plan
Despite the best of intentions, things can go wrong. There may be an issue with the new site which only becomes apparent when multiple users start visiting it, or you may find you need to access data or content from the old site.
Because of this, keep a backup of the old site for as long as possible and also prepare a rollback plan. That way, in the event everything goes horribly wrong, you can put the old site live again as you work to resolve the issue.
Complete a thorough quality assurance check
Once you have completed the SEO and website migration, do a thorough quality assurance check to ensure everything works. Specifically:
- Ensure landing pages look and function as you would expect.
- Manually test all functionality on the site.
- For eCommerce websites, add multiple products to the shopping cart and purchase them. If need be, add test products with very low prices to test this. Check that the payments clear in your bank account.
- Verify internal links work as expected.
- Test contact forms by filling in any forms and ensuring that you receive them. Check that these register as conversions in Google Analytics.
- Perform cross-browser and cross-device testing to ensure compatibility and mobile-friendliness.
Run a Screaming Frog report in Spider mode and check:
- Whether there are any 404 errors or non-indexable pages.
- If you have changed domain names, no links go to the old domain. To test this, click the External tab, which will list external links. Review the list and ensure no URLs appear from your old domain.
- Click the Page Titles and Meta Descriptions tabs and ensure that your Meta Tags are good.
- Click All and Filter by Images. Ensure there are no broken images on the migrated site.
In List mode:
- Import the list of URLs you have deleted and redirected. Where a 404 error appears, redirect the URL to a relevant page instead.
The above website migration checklists ensure your SEO, UX, and functionality are all optimal and optimised.
SEO Migration Services
Our SEO experts have years of experience providing SEO migration services for a wide range of CMS systems.
If you want to make sure your website migration goes smoothly, don’t hesitate to get in touch.