How to Use Google Analytics 4 (GA4) | The Score System

Welcome, enthusiasts of data-driven insights, to an in-depth exploration of the GA4 SCORE system, a comprehensive framework that guides you through the intricacies of Google Analytics 4.
In this article, we’ll take a deep dive into each stage of the SCORE system, revealing how it can be your unwavering compass on the path to mastery in the world of data analytics.
This is a write-up of Mary Owusu’s talk that she gave at GA4ward MK4. Here you can find her slides. You can watch her talk on our youtube channel:
Setting the stage for success (Step 1)
Before we immerse ourselves in the GA4 SCORE system, it’s imperative to emphasise the significance of laying a sturdy foundation.
The initial step, “Set up,” is pivotal. Proper configuration to set up Google Analytics 4 is not merely a routine task; it’s the cornerstone upon which your entire GA4 endeavours rest.
To ensure maximum flexibility and control, we strongly recommend harnessing the power of Google Tag Manager (GTM). Your setup is the bedrock upon which your GA4 success story will be built, so exercise due diligence and avoid rushing through this phase.
Correcting and refining (Step 2)
Once your GA4 environment is established, it’s time to delve into the “Correct” stage. Hasty reporting on inaccurate data can spell disaster for your analytical efforts. This stage is where we swiftly address errors and default settings that might skew data.
Remember, precise data is not just a preference; it’s the cornerstone of meaningful insights that drive informed decisions. In the “Correct” stage, we fine-tune our GA4 setup to ensure data accuracy, setting the stage for robust analytics.
Optimising for precision (Step 3)
Now comes the “Optimise” stage, where the real magic happens. With accurate data in hand, you can tailor GA4 to meet your unique business needs.
This phase isn’t merely about making adjustments; it’s about crafting a comprehensive plan that outlines your business goals and the specific events you need to track.
This plan serves as the blueprint for your GA4 setup, aligning it perfectly with your organisation’s objectives. Armed with this strategic approach, you can then roll up your sleeves and start implementing those events, confident that every action is purposeful.
Reporting with confidence (Step 4)
With your GA4 environment meticulously optimised to your business requirements, it’s time to embark on the “Report” stage. This is where the true value of your efforts shines through.
Armed with the right data and a setup that aligns seamlessly with your goals, you can generate impactful reports with unwavering confidence.
Whether you’re scrutinising user behaviour, tracking conversions, or evaluating the success of marketing campaigns, you can do so with a sense of assurance, knowing that your data is reliable and actionable.
Exporting the benefits (Step 5)
As you become proficient in reporting, the next logical step is to think about exporting your data.
Discard irrelevant information and focus on what truly matters to your business. This step is not just about data extraction; it’s about ensuring that your hard-earned insights are readily available for strategic decision-making.
A continuous journey
It’s essential to remember that the SCORE system isn’t a one-time fix; it’s a continuous cycle that keeps your GA4 strategy evolving and improving over time.
As you continue to set up, correct, optimise, report, and export, your mastery of GA4 will grow, and your confidence will soar. This journey is dynamic and adaptive.
A deep dive into the correct stage of the GA4 SCORE system
Now that we’ve outlined all the steps needed for GA4 mastery, let’s take a more comprehensive look at the intricacies of each stage, starting with the “Correct” stage.
This phase is all about fine-tuning your setup to ensure GA4 data accuracy, which is the foundation of informed decision-making in the digital realm.
Here are 5 things you should do/consider.
1. Implement Google Tag Manager for GA4
If you haven’t set up GA4 using Google Tag Manager (GTM), there’s no need to worry!
To guide you through this process, we recommend exploring the plethora of YouTube tutorials available that provide step-by-step instructions, ensuring you harness GTM’s power to optimise your GA4 setup effectively.
2. Create a development GA4 property for testing
Consider creating a mock GA4 property in the “Correct” stage. This is essentially a replica of your primary GA4 property, dedicated solely to testing and experimentation. Why is this crucial?
GA4 settings and events are often not retroactive. In other words, if a mistake occurs in your primary property, you risk losing valuable historical data.
A mock property acts as a safety net for testing changes before applying them to the main property, preserving your data integrity.
To create a mock GA4 property, follow these steps:
1. Use the same process you employed to create your main property.
2. Replicate your main property’s settings precisely.
3. Utilise the mock property for testing changes before implementing them in your main property, ensuring a seamless transition.
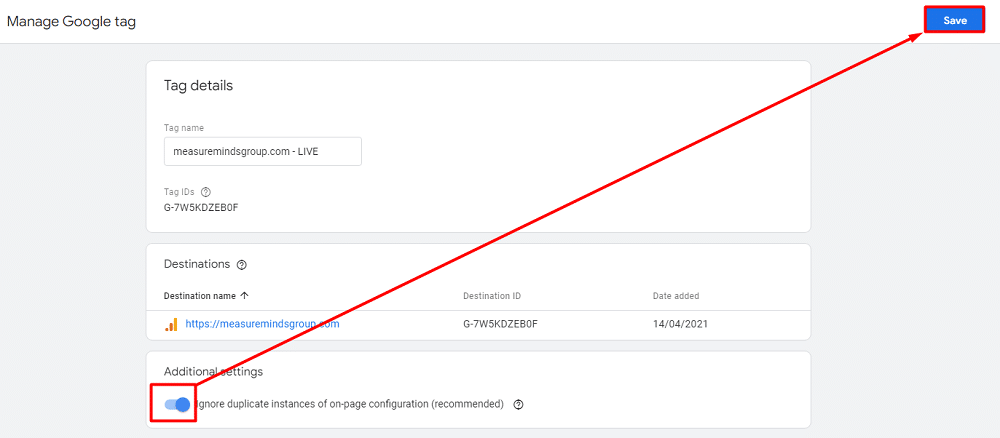
3. Addressing data bloat
Have you observed inflated data in GA4 compared to GA3 or Universal Analytics? This discrepancy could be related to ‘multiple instances of on-page configuration’.
Google Analytics introduced a feature to ignore duplicate instances, but it’s turned off by default.
Here’s how to turn it on:
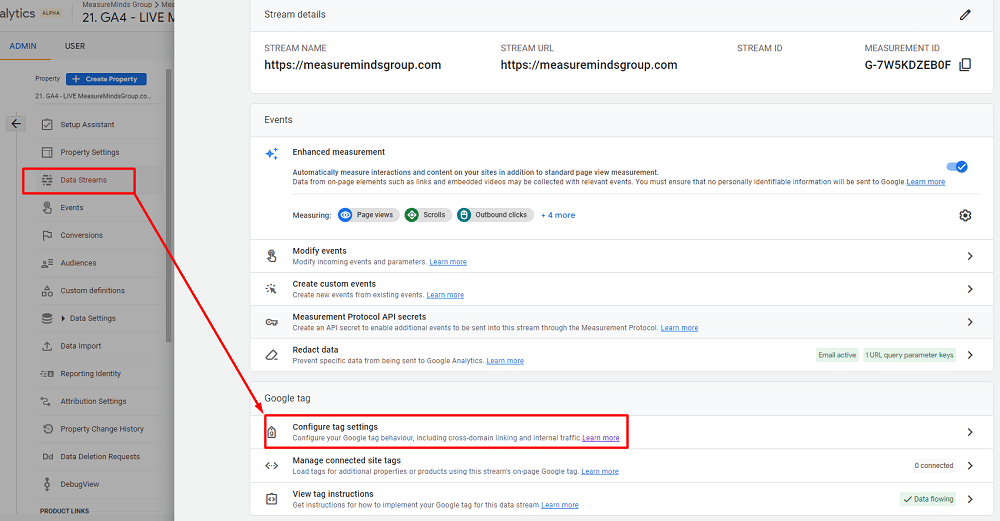
1. Navigate to the “Admin” section.
2. Under “Data Streams” select your stream, then select “Configure Tag Settings” from the next window.
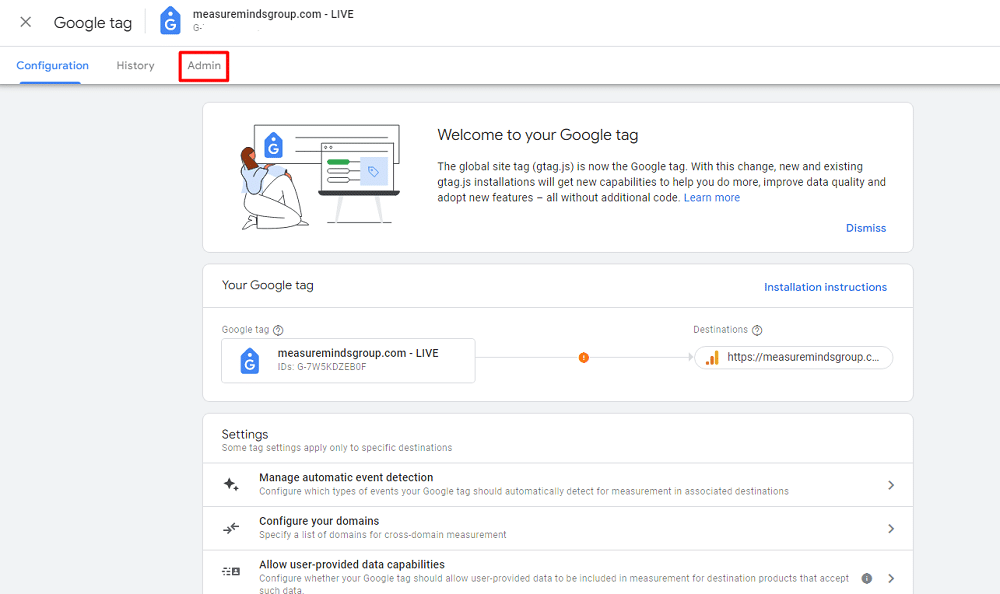
3. Navigate to the “Admin” section.
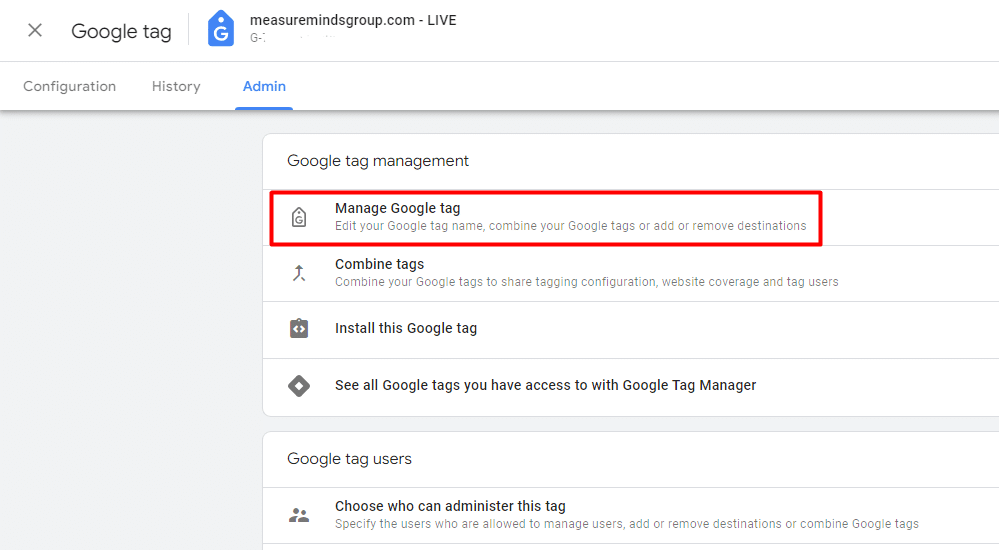
4. Click “Manage Google Tag” from the next window.
5. Locate the “Ignore Duplicate Instances of On-Page Configuration” setting.
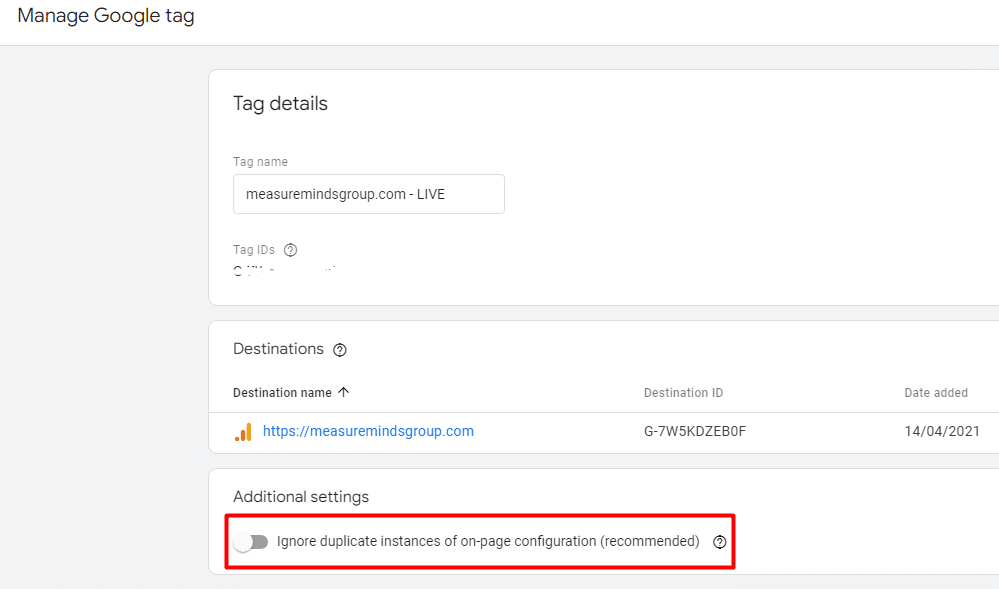
6. If it’s turned off, activate it & click “Save”. This should rectify exaggerated numbers in your GA4 data and ensure you’re working with clean and reliable information.
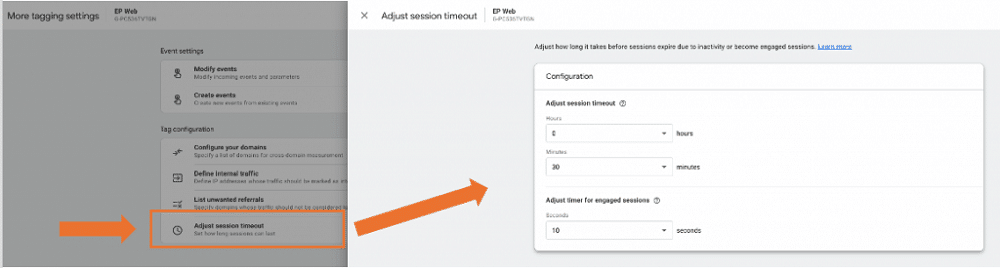
4. Session timeout settings
By default, GA4 sessions timeout after 30 minutes of inactivity. However, this might not align with your website visitors’ behaviour, especially if they tend to keep multiple tabs open or engage in longer sessions. To fine-tune this setting for better accuracy:
1. Access the Admin section.
2. Under Data Stream, select Configure Tag Settings and click on Show More.
3. Find the “Adjust Session Timeout” option.
4. Consider extending it to better match user behaviour on your site, ensuring your data accurately reflects user interactions.
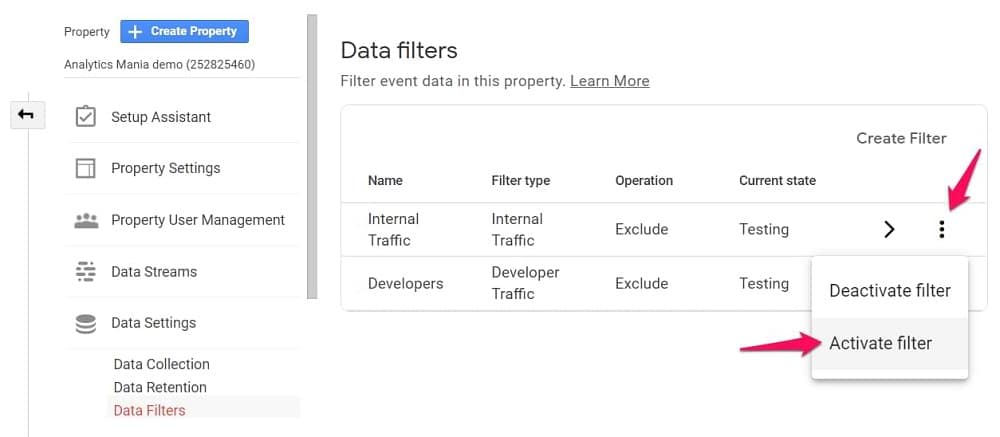
5. Internal traffic filter
Did you set up an internal traffic filter to exclude specific IP addresses? Well, like a lot of people, you may have forgotten to activate it! To rectify this and ensure your data isn’t polluted by internal traffic:
1. Define internal traffic by entering your organisation’s IP addresses under Data Streams > Web Data Stream > Configure Tag Settings > Show All.
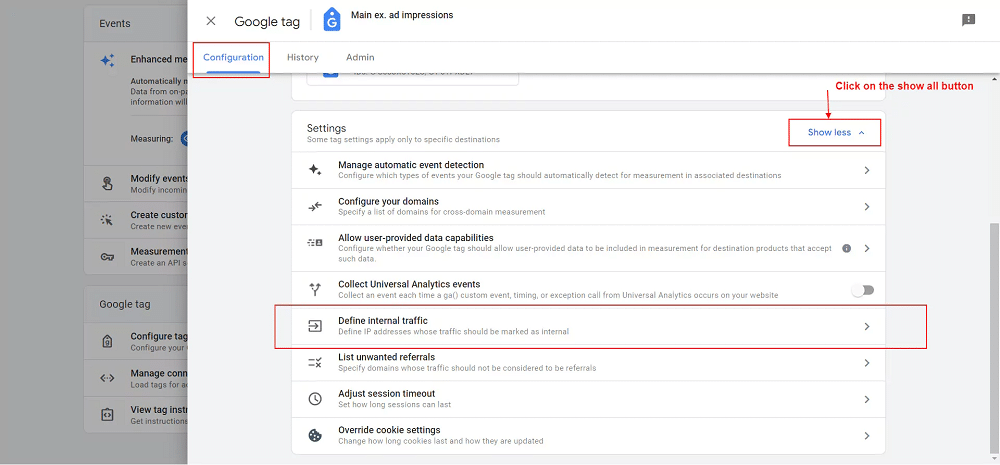
2. Activate the internal traffic filter by navigating to Admin > Data Settings > Data Filters and selecting “Activate.”
Exploring further correct stage considerations
The “Correct” stage encompasses more than these key considerations. It also includes considerations such as data retention settings, cross-domain tracking, managing unwanted referrals, and tracking forms effectively.
If you seek detailed guidance on these topics, numerous YouTube experts can assist you with these essential adjustments and any other Google Analytics problems you may encounter.
Our YouTube channel has an extensive library of videos on all sorts of Google Analytics issues.
By addressing these issues comprehensively in the “Correct” stage, you’ll ensure that your GA4 data is accurate, reliable, and poised to deliver meaningful insights in subsequent stages of the SCORE system.
Achieving precision in the optimisation stage of the GA4 SCORE system
Welcome to the heart of GA4 mastery, the “Optimised” stage of the SCORE system. This is where your GA4 setup transforms into a finely tuned instrument, primed to deliver precise insights that drive your organisation forward. Let’s delve deeper into this critical phase.
1. Crafting a master plan
One common pitfall in the “Optimisation” stage is neglecting to create a master plan.
Before you dive into event creation and customisation, a solid plan that aligns your GA4 setup with your organisation’s overarching business goals is essential.
Consider employing a GA4 Master Plan template. This document outlines your business objectives, website Key Performance Indicators (KPIs), and the corresponding events you need to track to meet these targets.
It aids in prioritising event creation, maintains alignment within your team, and keeps everyone focused on core objectives.
2. Ecommerce event naming
For those operating in the e-commerce sphere, heed this advice: avoid creating custom ecommerce events needlessly.
Google provides well-documented e-commerce event names that should be utilised. Doing so ensures that your e-commerce data flows seamlessly for reporting and analysis. Having a standardised setup keeps everything simple.
To gain more comprehensive insights into GA4 e-commerce setup and implementation, check out our article on GA4 ecommerce reporting.
3. Double event creation
Beware the trap of double event creation, a pitfall that can occur when using bothGA4 and Google Tag Manager (GTM), which you should be.
Events should be crafted once, preferably within GTM, and applied consistently. Creating events in both GA4 and GTM leads to redundancy, resulting in duplicate events cluttering your reports.
If you’re looking for more in-depth tutorials on setting up GA4. Here are a few of our guides that we believe may help:
Also, you can scroll through our blog to find more!
Reporting and exporting for data empowerment with GA4
Welcome to the final stages of GA4 mastery: “Reporting” and “Exporting.” Having diligently set up, corrected, optimised, and created events, it’s now time to make sense of your data and safeguard it for the future. Let’s explore these crucial steps in detail.
Custom insights and alerts
In the “Report” phase, setting up custom insights and alerts takes centre stage. Custom insights continuously monitor your data and notify you when specific thresholds are met.
For instance, you can receive alerts when daily conversions drop below a predetermined number, allowing you to identify problems and fix them quickly.
To establish custom insights, navigate to the Home screen of your GA4 account, delve into the Insights and Recommendations section, and click the blue plus button to create a new alert.
Customising these insights to align with your specific tracking requirements ensures that you stay informed and proactive in your analytics endeavours.
Understanding GA4 reports can be challenging, especially if you’re transitioning from the previous version of Google Analytics. To demystify the reporting process and unlock the full potential of GA4, consider turning to resources such as the GA4 process toolbox, MeasureMinds blog or YouTube channel.
Our extensive library of tutorial videos covers a spectrum of GA4 reporting facets, from standard reports to advanced explorations, providing valuable insights and guidance for those looking to learn Google Analytics tips and tricks.
A familiar interface with GA4 data
If you find comfort in the classic GA3 interface but wish to leverage GA4 data, consider the GA4 Classic Mode, a free Looker Studio tool. This free tool acts as a bridge between the familiarity of GA3 and the power of GA4.
It transforms your GA4 data into a GA3-like format. This can be particularly helpful for users who are transitioning and want to maintain a sense of familiarity.
How to export your GA4 data
Now, let’s delve into the “Export” phase, a critical step in ensuring that your data is not only accessible but also under your control. Google Analytics aims to distance itself from data storage, emphasising the importance of exporting your data. Below, we’ll outline the three possible export options:
1. Export to Google Sheets
The GA4 connector for Google Sheets is a relatively new feature that allows you to import your GA4 data directly into Google Sheets for further analysis.
Benjamin from Loves Data provides a helpful video guide on this process, making it accessible even to those without extensive technical expertise.
2. Export to BigQuery
Exporting your data to BigQuery and visualising it with tools like Looker Studio is a more advanced yet highly flexible option.
This approach empowers you with more extensive data analysis capabilities and scalability. However, it typically requires a deeper technical understanding of data processing and analysis.
3. Analytics Canvas
If you seek a user-friendly solution that doesn’t demand extensive technical expertise, consider Analytics Canvas. This paid option simplifies data extraction and analysis, automating the data export process.
Choosing the right export method hinges on your specific needs, technical proficiency, and budget. It’s essential to evaluate these options carefully to ensure that your data is exported efficiently and securely.
In closing
In conclusion, the SCORE system – Set up, Correct, Optimise, Report, and Export – serves as your roadmap to GA4 expertise.
Each stage plays a pivotal role in empowering you to extract invaluable insights from your data while ensuring its security and compliance with data protection regulations such as GDPR.
If you’re unsure on whether your collected data breaches any privacy laws, take a look at our GDPR compliance checklist.
As a data-driven marketer or analyst, your role is integral, and by following this system diligently, you continue to make a substantial impact on your organisation’s success. Stay committed to the journey, and the rewards of GA4 mastery will be well within your reach.
About Mary Owusu
Mary Owusu’s journey from impoverished to empowered led her to create SprintMarketer.com–her AI-first digital marketing agency that generates multiple 5- to 6-figure revenue pipelines for businesses in weeks, not months, with zero ad costs. Using artificial intelligence, the agency identifies immediate revenue opportunities within a business, markets them to optimal audiences, and then converts those audiences into paying customers through automation and analytics. To advance the digital marketing and analytics fields, Mary is both assistant professor of marketing at a top-tier private university in New York State and board president of the Digital Analytics Association–shaping future generations of digital marketers and analysts.

- Top 24 Google Analytics Chrome Extensions & Sheets Add-ons - 21/05/2026
- Best Consent Management Platforms (CMP) - 19/05/2026
- Google Signals and Consent Mode: What This GA4 Change Really Means - 23/04/2026